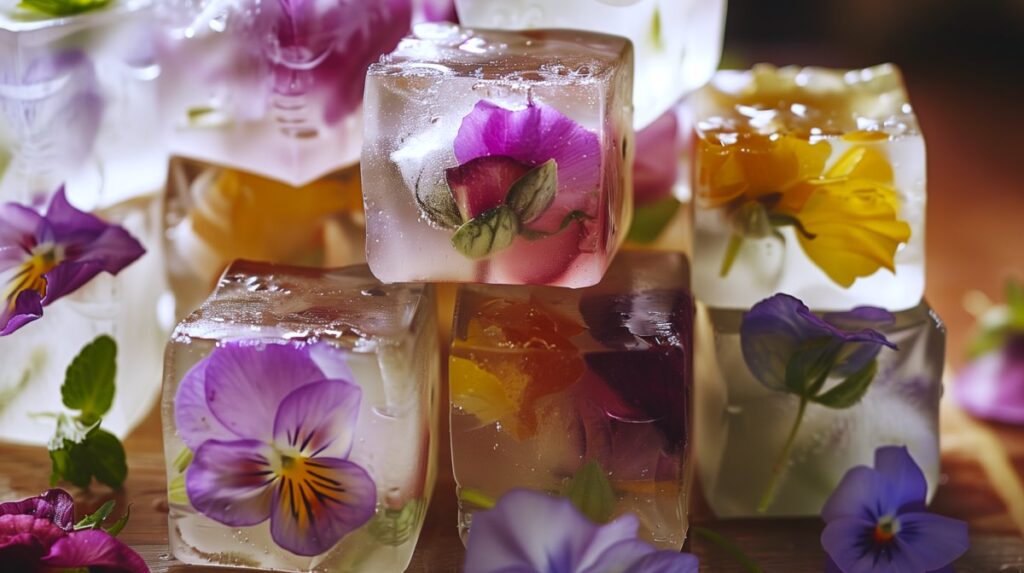
Category: Culinary

There’s a lot of hype surrounding all kinds of cookware in the marketing world. Today, we’ll be dealing with ceramic cookware.

If you’ve ever researched safe cookware, you’ve probably heard about the many dangers of certain materials and chemicals that are often used in today’s pots and pans, including non-stick varieties. Of course, non-stick isn’t the only dangerous kind of cookware, but it’s the easiest to recognize.

Toxic chemicals, such as the notorious Polytetrafluoroethylene (PTFE), are often found in many non-stick cookware varieties and are known to be unsafe.

So what happens when you and your family are exposed to small amounts of these chemicals over a long period of time? Well, let’s just say that the answers you read to that question may range wildly from causing detrimental health conditions like cancer or Alzheimer’s to the idea that every kind of cookware is probably safe as long as it’s being sold.

After all, if the cookware and chemical manufacturers tell us their products are safe, they must be telling us the truth, right?

I think we all know that plenty of dangerous substances and materials have been sold in the past that were anything but safe.

Unsafe cookware must be avoided at all costs for three reasons:

1.) The potential adverse health effects aren’t worth the “benefits” of more “versatile” cookware that contains dangerous chemicals or other reactive substances.

2.) Questionable cookware is easy to avoid as long as you’re ever-so-slightly informed, especially since safer cookware varieties are readily available.

3.) Research, lawsuits, and regulations have provided plenty of evidence that there’s been enough incriminating data over the years to give you a reason to doubt claims of safety regarding today’s widely sold cookware.

The good news is that there are safer kinds of cookware that can replace your non-stick pots and pans. There is absolutely no reason to continue to cook with toxic cookware. While there may be other kinds of cookware that I prefer, ceramic is definitely one solid alternative.

History of Ceramics

Ceramic cookware is one of the oldest kinds of cookware that has been used repeatedly through the centuries. The word “ceramics” originated from the Greek word keramikos meaning “of pottery”, and from keramos meaning “potter’s clay”.

History tells us that the earliest ceramics made by humans were pottery objects made from clay, bone, bone ash, and animal fat. The earliest uses of ceramics in history aren’t known, but what is believed to be the oldest ceramic figurines were discovered in Czechoslovakia.

Down through the millennia, ceramics were used for art, storage, and cooking. Ceramics have indeed played an integral role in human history.

Is Ceramic Cookware Safe?

Ceramic cookware is generally made of inorganic and non-metallic materials that are known to be non-toxic. That means that they don’t typically contain lead, cadmium, or other toxic metals. This is why many people opt to use ceramic cookware rather than non-stick pans, aluminum, copper, or other kinds of toxic cookware.

However, the questions surrounding the safety of ceramic cookware can’t be answered quite that easily. There are a few very important factors that you need to consider before purchasing any kind of ceramic cookware. As long as you consider the following considerations, ceramic cookware is a great, non-toxic option.

Important Considerations:

When it comes to purchasing quality ceramic cookware, a few things need to be observed. As we mentioned in the list above, it’s important that you only purchase your ceramic cookware if it’s 100% ceramic. It’s also crucial that the glaze doesn’t contain any toxic metals or other contaminants like lead. If you purchase ceramic products made in the US, this usually isn’t a problem.

Also, it’s worth mentioning that non-stick ceramic-coated metal cookware should not be considered a safe alternative to other potentially toxic cookware. Essentially, this kind of cookware is primarily metal, coated with a few layers of non-stick ceramic material that flakes off or is easily scratched over time, potentially allowing underlying materials and metals to leach into your food.

Why Should You Use Ceramic Cookware?

Using ceramic cookware for meal preparation ensures safe and healthy cuisine for you and your loved ones. By using safe cookware alternatives, ceramic in this case, you can have full assurance that the food you put on the table is safe and healthy. What we cook isn’t the only factor in food safety. We must also question the safety of what we cook with.

When it comes to performance, ceramic cooks quite well. It has good heat retention properties, and many varieties are dishwasher safe as well. Besides that, it’s also environmentally safe.

Ceramic cookware is also quite versatile. It can survive heat that would melt stainless steel, but it can also be used to store food inside the fridge and freezer. Even microwaving is an option when it comes to ceramic cookware. Furthermore, this kind of cookware looks beautiful when serving meals.

You shouldn’t settle for anything but high quality when it comes to ceramic. That said, the higher the quality, the more expensive you’ll find products. Consequently, sub-par foreign ceramics that may contain lead are readily available online and elsewhere, so it’s crucial that you don’t cut corners.

If you can’t afford high-quality ceramic cookware, there are other safe options that are less expensive.

Disadvantages Of Using Ceramic Cookware

Sure, ceramic cookware is safe, easy to clean, evenly cooks food, and is toxin-free. However, there are some disadvantages of ceramic cookware. First, the surface of ceramic cookware can be damaged by scrubbing. Secondly, it can be quite heavy compared to other kinds of cookware. Third, it easily cracks, so extra care should be taken when handling it.

As noted a bit ago, high-quality ceramic may be very expensive compared to other safe cookware alternatives like cast iron or stainless steel. While somewhat durable, you will find that the longevity of ceramic cookware is also naturally not quite as robust as cast iron. It’s rather easy to break a ceramic pan accidentally, but it’s pretty impossible to break a cast iron skillet. 

Final Thoughts

When it comes to our family’s health and safety, we always want the best. We want to cook healthy dishes, buy fresh ingredients, maintain the cleanliness of our kitchens, and avoid introducing any potential toxins in our food supply. We tend to overlook the kind of cookware we use when striving to maintain a healthy kitchen.

With so much conflicting information and clever marketing techniques, it really can be difficult to wade through the options. But, when it comes to ceramic cookware, it’s important to remember that quality is paramount. As long as you purchase high-quality ceramic cookware, you can have assurance your pots and pans are no longer providing you with your daily dose of toxins.

The key to purchasing any healthy cookware alternative is that there’s more than one option. Personally, ceramic isn’t my favorite cookware choice. But I also don’t mind the plain, bulky look of cast iron. Quality ceramics are also expensive, so that’s a consideration, too. Therefore, there are many great choices when it comes to safe cookware.

Your choice should be made on which of those kinds of cookware will meet the vast majority of your cooking and personal preferences.

Ceramic Cookware FAQs

Is ceramic cookware toxic?

No, quality ceramic cookware is free of chemicals like PFOA, PTFE, and PFOS that can be toxic. It’s a safer non-stick option.

Does ceramic have harmful coatings?

Quality ceramic cookware has an inert glaze coating that is lead-free and non-toxic when intact. Research the brand you’re purchasing from to see what materials were included in the glaze.

Is ceramic better than Teflon for non-stick?

Yes, quality ceramic is naturally non-stick and more durable than Teflon coatings that can chip and flake.

Can ceramic withstand high heat?

Ceramics can generally handle high heat. That said, when proper cooking techniques are utilized, the “high” setting on the stove isn’t necessary.

Is ceramic cookware scratch-resistant?

Ceramic is scratch-resistant but not scratch-proof. Metal utensils can still damage the surface over time, and they’re less durable than stainless steel and cast iron.

Does ceramic leach chemicals when heated?

No, ceramic itself does not leach harmful chemicals at any temperature when unglazed or glazed properly.

Are ceramic non-stick properties long-lasting?

With proper care, ceramic retains its non-stick surface for several years. However, a well-seasoned and polished cast-iron pan may be a better option for durability.

Are ceramic cookware oven and dishwasher safe?

Check manufacturer instructions – quality ceramic is usually dishwasher safe.

Does ceramic break easily?

It’s chip and crack-resistant but can break if subjected to sudden temperature changes or direct high impact.

  • How to Make Dish Soap That Actually Works

    How to Make Dish Soap That Actually Works

    How to Make Dish Soap That Actually Works

    Natural dish soaps are superior in terms of providing greener alternatives that are safe for your health and the environment. Better yet, natural homemade dish soap works just as well vs. synthetic dish soaps on the market.

    Like other dish soaps, it effectively removes dirt and bacteria, including sticky grease and oil. Even though you can easily purchase that store-bought stuff at the nearest grocery, don’t settle for those harsh chemicals.

    Rather, make another simple choice to switch to homemade and natural, as with many other alternatives we recommend here at Enticingly Simple. Plus, you won’t have to wonder if those chemicals from traditional dish soaps have any lasting impact on your health since you won’t be using them anymore.

    Why Use Homemade Dish Soap?

    Commercial dish soaps are made of toxic chemicals that can harm your family’s health and the environment. That’s reason enough to make the switch to more natural alternatives.

    However, even some so-called “green” dish soaps may contain harmful chemicals like Sodium Laureth Sulfate. This harmful chemical is often tainted with a “probable” carcinogen, 1,4-Dioxane, and has been tagged as a low/moderate health hazard by the Environmental Working Group.

    Worse yet, it can also be tainted with Ethylene Oxide, a known human carcinogen with a danger rating of 10 by the Environmental Working Group.

    Basic DIY Dish Soap

    If it’s your first time making your own dish soap, you should begin with easy and simple DIYs in the beginning. Here are some general ingredients and basic instructions to jumpstart your dish soap-making process.

    Ingredients:

    Your first dish soap needs the following ingredients:

    • 1 3/4 Cups of water
    • 1 Tbsp Borax
    • 1 Tbsp Natural Soap Flakes ( or Natural/Homemade Bar Soap)
    • 15-40 Drops of Essential Oils

    Also, feel free to double this recipe if you’re a dishwashing champion in the kitchen.

    Instructions:

    Making dish soap is so easy. Follow the steps below, and you’re done:

    1. Bring water to a boil.
    2. Mix dry ingredients (borax and soap flakes) in a bowl.
    3. Pour boiling water over your mixture of borax and soap flakes.
    4. Stir or whisk the mixture until the soap flakes have fully dissolved.
    5. Allow mixture to cool for 6-8 hours, stirring occasionally.
    6. Once the mixture has gelled, add essential oils and shake well.

    Powerful DIY Homemade Liquid Dish Soap

    If you have successfully made your own basic dish soap, you might want to try making a more comprehensive dish soap that makes use of more ingredients. This dish soap is a force to be reckoned with when it comes to dirty dishes. In this liquid dish soap, you will need to prepare the following ingredients.

    Ingredients;

    • ¼ cup of Castile Soap
    • 1 ½ Cups Water
    • ¼ Cup Natural Soap Flakes (or Grated Homemade Bar Soap)
    • 2 ¼ Teaspoons to 1 Tablespoon of Super Washing Soda (choose the amount based on your preferred thickness) – See Note
    • 1/2 Teaspoon High-Quality Glycerin
    • 15-40 Drops of Essential Oils (citrus oils smell great, and lavender is a wonderful floral scent).

    Instructions:

    1. Boil water. In a bowl, pour boiling water over soap flakes and stir/whisk until dissolved.
    2. Add the following measured ingredients to the soap and water mix: castile soap, super washing soda, and glycerin. Mix Thoroughly.
    3. Allow mixture to sit for 24-36 hours, stirring occasionally.
    4. Once the mixture has reached your preferred consistency, go ahead and add the essential oils of your preference.
    5. Place the mixture inside a pump container. It’s now ready to use!

    Important Notes and Tips:

    1.) If your soap isn’t reaching the desired thickness, just heat it up again and add more washing soda. Also, you will notice that it becomes much thicker after the first 24 hr. cooling time.

    2.) This dish soap mix will thicken over time. So, if you notice it getting thicker over days or weeks, all you’ll need to do is mix in a bit of hot water.

    3.) If you notice clumps at any point in the process of making your dish soap, just use a whisk or blender to get it to the smooth consistency you desire.

    Things to Keep in Mind

    Using water in dish soap is a little tricky. Water in different geographical regions may contain different levels of pH. Therefore, water hardness or softness may drastically vary from one location to another.

    For those of you with soft water, you’ll find that all of your soaps (dish soaps, body wash, laundry, etc.) will clean far better. For those of you with hard water, you’ll have to use noticeably more soap for cleaning. This really applies to any soap you use in your household, including this dish soap.

    With that in mind, don’t go and make a triple or quadruple batch just yet. You may need to tweak the level of washing soda or soap content slightly after your first batch. So, try the standard recipe, then tweak it to your water type (if you’re a perfectionist).

    We only mentioned a few essential oils that can be used. However, there’s an endless list of exciting essential oils with various scents and benefits that you should try.

    There’s simply no reason why each batch of your homemade dish soap can’t be an exciting new scent every single time. That’s why homemade is far superior. Just be sure to use high-quality essential oils.

    Summary

    Say goodbye to commercial dish soaps that have a hazardous effect on your health and the environment. DIY dish soaps are affordable, effective, and easy to make. You can also personalize each batch of dish soap to your own individual preference.

    Better yet, you can make this for a friend or family member as well.

    If you are a beginner when it comes to making DIY dish soap, the basic dish soap recipe is perfect for you. Feel free to make the more comprehensive dish soap recipe once you’ve tried the basic recipe and are more confident.

    Remember, try different essential oils. After all, your customized essential oil scents may just end up causing your friends to be envious of how you created such an aromatic experience in something so simple as dish soap.

    It’s time to save a buck, it’s time to experience adventure, it’s time to venture into yet another realm of homemade simplicity. For the sake of your family, happy memories, and your health, make the switch. You won’t regret it.

    How to Make Dish Soap That Actually Works

    What is the best natural ingredient for homemade dish soap?

    Castile soap is the top base ingredient. It’s made from plant oils and is biodegradable and non-toxic.

    What gives homemade dish soap a thick, gel-like texture?

    Xanthan gum acts as a natural thickening agent to give homemade dish soap a pourable gel consistency.

    What oils help cut grease in DIY dish soap?

    Coconut oil is a powerful degreaser. Olive oil also helps lift grease while adding a smooth texture.

    How do you naturally scent homemade dish soap?

    Add 15-20 drops of essential oils like lemon, grapefruit, orange, or tea tree for a fresh, clean scent.

    Does homemade dish soap produce enough suds?

    Yes, adding a tablespoon of glycerin helps homemade soap have plenty of bubbly suds.

    How long does DIY dish soap last?

    It lasts 2-3 months when stored properly in an airtight container in a cool, dark place.

    Can you use homemade dish soap in the dishwasher?

    This may be okay, depending on the recipe you’re using, and it may void your dishwasher warranty. If your recipe includes lots of oils (coconut, olive oil, etc.), don’t use it in the dishwasher. Dishwashing liquid is also low-foaming. If your soap recipe foams easily, it could cause the dishwasher to overflow.

    What’s the ideal process for making dish soap?

    Slowly melt the ingredients together on low heat, whisking continuously until fully blended. See the recipes earlier in the post for more information.

    How do you package homemade dish soap?

    Dispense into foaming soap dispensers, reused bottles, or glass jars with pumps.

    Is DIY dish soap safe for hands and the environment?

    Yes, homemade soap without harsh chemicals is far gentler to use than traditional synthetic dish soap. Also, since you’re using natural ingredients, they’re biodegradable and good for the environment.

  • How to Make Infused Water That is Absolutely Refreshing

    How to Make Infused Water That is Absolutely Refreshing

    How to Make Infused Water That is Absolutely Refreshing

    Are you fond of drinking soda, coffee, and other flavored drinks? They taste good, but we all know that drinking these drinks in huge amounts can adversely affect our health. Why not try adding fruits and herbs? If you’re up for some positive change, start drinking healthy alternatives.

    Stop drinking soda and other artificially flavored beverages. We should drink water regularly, not coffee, soda, or artificially sweetened drinks. But what if water bores you? We’ve got one great solution for that – infused water.

    What is Infused Water?

    Infused water combines water, different fruits, and flavorful herbal leaves to make the water more interesting, tasty, and healthier. Examples of fruits and herbs that you can add to your water are strawberries, tea leaves, basil, lemons, cucumbers, oranges, blueberries, and mint.

    You can add almost everything depending on your needs and personal preferences.

    This is a natural way to drink a slightly sweet, tasty beverage without the addition of toxic artificial sweeteners.

    What Does Infused Water Do to Our Health?

    Unlike canned juices and sodas, infused water is a refreshing drink that’s actually healthy. It’s a great companion to healthy weight loss, too. Drinking water naturally boosts your metabolism, so if you don’t like the plain taste of water, infused water is exactly what you need. Since infused water doesn’t taste nearly as boring as water, you’ll likely increase your daily fluid intake as well. 

    If you want to lose weight, getting plenty of fluids is foundational. With infused water, you can cut out those unhealthy beverages that tempt you and replace them with this refreshingly healthy alternative.

    Do you have digestive problems or feel bloated? Infused water can be a great way to detox, too. Infused water for detoxification is called detox water. It’s a combination of vegetables, fruits, and herbs plunged into cold water.

    Although infused water is flavorsome, it contains little to no calories. It helps eliminate toxins and acids from your body, helping you feel great and lose weight. Combine your detox water with a full one-week detox plan to make it more effective and fun.

    Other Benefits of Drinking Infused Water:

    • Helps with hydration during weight loss.
    • Keeps food moving through your system.
    • Improves your mood.
    • Cools your body.
    • Flushes toxins away.
    • Prevents you from craving junk foods.
    • Reduces muscle fatigue during workouts.
    • Perks you up in the morning (especially with mint).

    How To Make Infused Water

    1. Gather your chosen ingredients. Rinse them well to make sure they’re clean. You can choose not to peel fruits and vegetables, but be sure to buy organic. Avoid overripe or bruised fruits. Slice the fruits and veggies thinly so that they will infuse more quickly. Fill up a pitcher or water bottle with purified water.
    2. Wait for the ingredients to infuse into the water. Let the water with fruits and vegetables sit at room temperature for 2 hours at most. The longer your fruit soaks in the water (even in the fridge), the more flavorful the water will be. Remember, fruits and vegetables infuse their flavors differently. Citrus infuses almost instantly, while herbs take a longer time. Once you’ve put in all the ingredients of your choice, put the infused water inside the fridge. Tip: To speed up the infusing of leafy ingredients like peppermint, slice or gently rub the leaves together before adding them to your water.
    3. Drink and enjoy! Now you can enjoy your healthy infused drink. Feel free to refill it with water and wait for it to be infused again.

    Note: You can be very creative with your herbs, fruits, and vegetables. To make your water more charming, you can even add edible flowers.

    Other Optional Ingredients:

    • Spices: Cardamom pods, cinnamon sticks, cloves, black pepper, fresh ginger, and vanilla beans
    • Herbs: Thyme, spearmint, cilantro, rosemary, basil, peppermint, and parsley
    • Edible flowers: lavender, rose, hibiscus, pansies, violets and citrus blossoms
    • Fruits: berries, tropical fruits, citrus, melon, apples, peaches, pears and more
    • Vegetables: celery, beets, bell peppers, carrots, and cucumbers

    Most Popular Infused Recipes

    Making infused water is as easy as slicing fruit and filling up a pitcher. Many people have perfected their own recipes using fruits, vegetables, and herbs. Here are a few of the most popular infused recipes and their health benefits that you can try:

    Lemon- Infused Water

    Lemon Infused Water

    The most basic and most popular infused water is lemon water. It is also called lemon detox water because it’s perfect for detoxifying the body and helps with healthy weight loss. Add in mint leaves, and you will have a delicious, invigorating citrus flavor. It’s really cheap and healthy compared to sodas and other unhealthy colored drinks.

    Tangerine and Strawberry Infused Water

    Tangerine Strawberry Infused Water

    Hydration boosts metabolism, while fruity water increases the likelihood of keeping hydrated. Add some cinnamon to this recipe for a bit of warm spice if you’d like. Tangerine and strawberry are fruits available year-round, so you can always keep a fresh batch of this mixture in the fridge.

    Mango Ginger Water

    Mango Infused Water

    Ginger in water may sound strange, but it’s great combined with fresh ripe mango. Ginger and mango infused in water boost your metabolism while keeping you hydrated. Plus, the combination of these flavors is incredible. Try adding ginger to other recipes as well.

    Cucumber Lemon Water

    Cucumber Lemon Infused Water

    On a hot summer day, cucumber and lemon is a very refreshing combination. This is a great recipe for after a workout or after you’ve been out in the hot sun for a long time. If you need a pick-me-up or a way to cool down, this is a great recipe. Better yet, add some peppermint to this mix, and you will feel refreshed almost instantly.

    Final Thoughts on Infused Water

    Infused water doesn’t only make you feel refreshed; it makes the process of staying hydrated easy and simple. If you want to be healthy, you need to get used to drinking water. But, just because you need to drink water doesn’t mean that variety and creativity won’t make it into a pleasurable experience.

    Fruits, spices, herbs, and veggies will be excellent healthy additions to the water you drink. With the small amounts of vitamins and sugars from these fruits, you’ll find that infused water feels like drinking a beverage without all the unhealthy characteristics. 

    Remember, there are many kinds of fruit-infused recipes that you can make. Compared to other drinks that are not so healthy, infused water will save money in your purse as well. Drinking water will never be boring again!

    Infused Water FAQs

    What fruits work best for infused water?

    Citrus fruits like lemon, lime, grapefruit, and orange make refreshing infused waters. Berries, melon, cucumber, and apples work well too.

    What herbs or vegetables can be used?

    For a flavor boost, try herbs like mint, basil, rosemary, or sliced cucumbers, celery, and ginger.

    How long should you infuse the water?

    2-3 hours allows maximum flavor extraction. You can infuse overnight in the fridge for stronger flavor.

    Does the produce need to be organic?

    Organic is ideal, but thoroughly washing non-organic produce helps remove pesticides and chemicals.

    How much produce should be used per serving?

    1-2 cups of chopped produce like citrus slices, berries, or cucumber provides ample flavor infusion.

    Do you have to remove the produce?

    Yes, strain out produce after infusing to prevent overpowering flavors or mold growth. Compost leftovers.

    What is the best way to store infused water?

    Store in airtight jugs or bottles in the refrigerator for up to 2-3 days.

    Does infused water need a sweetener?

    The natural sweetness of the fruit is usually enough, but you can add honey, maple syrup, or stevia.

    Can infused water be made into ice cubes?

    Yes, freeze leftover infused water in ice cube trays for flavorful hydration later on.

  • Clearly Filtered Water Pitcher Review: Crystal Clear, Healthy Water

    Clearly Filtered Water Pitcher Review: Crystal Clear, Healthy Water

    Clearly Filtered Water Pitcher Review: Crystal Clear, Healthy Water

    Tap water and bottled water may be fairly inexpensive, but both contain a cocktail of contaminants that your body absolutely doesn’t need. As your body is cumulatively exposed to these contaminants over time, your health may be at risk in any number of ways.

    You’re exposing your body to countless questionable chemicals by merely drinking unfiltered tap water.

    The chemicals found in drinking water are wide-ranging. Every glass of water you drink from the tap may contain VOCs (Volatile Organic Compounds), endocrine-disrupting chemicals, fluoride (hotly debated), arsenic, and any number of other harmful contaminants.

    By the way, the most generally available bottled water brands are just selling tap water. Cross bottled water off the list as a safe alternative.

    The good thing is that water filtration can be done in your home. There are many kinds of water filtration systems and solutions that can be used nowadays, all of which have different levels of effectiveness. If you’re not currently filtering your water, beginning to use just about any water filtration system will be a huge step in the right direction.

    Finding solutions for water filtration can be a daunting task at first, but it’s important to ensure that you know what’s in your water.  That being said, don’t spend the next three months researching which option is best for you while still drinking contaminated water. 

    For those of you drinking water straight from the tap, switching to a water filter pitcher is easy, cost-effective, and an obvious solution to ensure cleaner drinking water. We’ll take a look at one very well-made quality filter pitcher in just a bit. But first, let’s take a deeper look at the problem we face regarding the water we drink.

    The Problem

    Aside from shelter, food, and clothing, clean water is one of the most basic needs of human beings.  Unfortunately, there are a lot of contaminants found in public drinking water. Water utility companies around the country have reported findings of over 300 pollutants in tap water.

    In regards to those findings, the Environmental Working Group (EWP) has reported that more than half of those chemicals are not subject to any health or safety regulations. To make things worse, there are also no restrictions on the allowable amounts of these chemicals found in drinking water. 

    What about all the other chemicals that are regulated? Findings show that they’re well within reasonable limits, right?

    Wrong.

    Of the chemicals that are regulated by the federal government, 49 of them have been found in drinking water above allowable limits. It’s said that well over 50 million Americans drink tap water with chemicals that exceed health guidelines put forth by the federal government. Don’t forget, that only includes those chemicals which are regulated.

    Problems have solutions. Oftentimes, there are complicated solutions to problems as well as simple solutions. The easiest and simplest way to immediately switch to cleaner drinking water is by purchasing a water filter. More below.

    Clearly Filtered Clean Water Pitcher Review

    Clearly Filtered Clean Water Pitcher

    When it comes to water filter pitchers, there are more than a few great options. This water filter is made of 100% BPA-free materials, so it’s safe and won’t add even more contaminants above and beyond the chemical cocktail you’re already drinking. It also filters out 99.99% of chlorine and 90% of fluoride.

    Besides that, this particular filter pitcher blows away the competition with a 200-gallon usage life before the filter cartridge needs to be replaced.

    This pitcher has an excellent holding capacity of 64 ounces, too, so you’ll always have a supply of filtered water whenever you need it. One great thing about these filter pitchers is that they’re made for convenience and will easily fit in the fridge.

    Clearly Filtered Chart
    Clearly Filtered Performance Chart

    The Clearly Filtered Clean Water Pitcher has raving reviews on Amazon as well, which is always a good sign. Not only will your switch to a water filter pitcher like this one limit your exposure to chemicals, but it will also give you peace of mind.

    The chart at the right shows a few contaminants that the Clearly Filtered pitcher removes, but it’s only a short list. Besides the contaminants listed to the right, it also removes things like pesticides and insecticides.

     One very important detail about this particular filter is that it won’t strip out healthy minerals like calcium and magnesium.

    Features Recap:

    • 100% BPA free
    • 64-ounce capacity
    • Removes up to 90% of fluoride
    • Removes 99.99% of chlorine
    • Attractive Design
    • Sturdy

    Pros:

    • Removes contaminants
    • Excellent capacity
    • Cheaper cost per gallon (see chart)
    • Better-tasting filtered water
    • Easy carry handle
    • Excellent 200-gallon filter life
    • Easy-to-follow instructions
    • Doesn’t remove healthy minerals like calcium and magnesium

    Cons:

    • Somewhat more expensive than other filter pitchers
    • No filter indicator (recommended change every 6 months)
    • More expensive filter replacement cartridges (but they have a 200-gallon capacity, 5 times that of other brands)

    A note on filter indicators:

    While filter indicators are helpful and convenient, most of them simply measure either time or movement. Filter indicators do not measure the amount of water passing through the filter.

    One particular Brita filter I had in the past had a filter indicator that would count each time I poured a glass of water. However, the problem with this was that it seemed like every time I nudged or moved the filter (without pouring any water), it would count against my filter life. This led to the indicator notifying me to change the filter prematurely due to an inaccurate means of gathering data.

    Premature filter changes aren’t beneficial for anything except for the profits of filter manufacturers. While I’m not saying that’s necessarily the intention behind including these indicators, I am saying that they simply aren’t necessary. I find that it’s oftentimes best to simply ignore the recommendations of filter indicators altogether.

    Instead, periodically change your filters on a scheduled basis. Clearly Filtered recommends changing their filter every 6 months, it’s just that simple. I’m very glad they didn’t decide to include a filter indicator on their filter pitcher. That shows that they don’t want to make people pay for a device that has no real and practical benefit.

    Competing Filter Pitcher Products

    As you probably already know, there are many products available when it comes to filter pitchers. After a brief perusal, you’ll find that these pitchers come in all kinds of different shapes and sizes.

    Some have features that others do not, such as different filtering capacities, different filtration methods, various styles, and quality differences. Lets take a look at two more of the most common water filter pitchers on the market today.

    Zero Water ZD-018 Water Dispenser Review

    Zero Water ZD 018 Water Dispenser Review

    Aside from the Clearly Filtered Clean Water Filter Pitcher, there are a lot of other water filters available on the market today. One of these is the Zero Water ZD-018 Water Dispenser and Filtration System. It has a 5 stage dual ion exchange filter that removes virtually all dissolved solids from the tap water (99.63% TDS removal, to be exact).

    You can verify that the TDS (total dissolved solids) are removed with the included TDS meter that comes with the filter system. Total dissolved solids are basically dissolved minerals and salts in your water. This filter does an exceptional job of removing these dissolved solids.

    However, there’s an important question that you need to ask yourself before considering this filter:

    Should you want to remove all of the dissolved solids from your water?

    Total dissolved solids would also include the beneficial minerals that we should want to keep in our water. Do not use filtration systems that strip your water of beneficial minerals like calcium and magnesium. So, while the TDS meter is a pretty nifty idea to show the effectiveness of Zero Water’s 5-stage filter, we don’t want a filter that effective.

    Therefore, we don’t recommend the Zero Water filter because mounting evidence suggests that “zero” water is actually less healthy than water containing healthy minerals.

    Brita Everyday Pitcher Review

    Brita Everyday Water Filter Pitcher Review

    Another very popular water filter brand is the Brita Everyday Water Filter Pitcher. It accommodates up to 10 cups of filtered water and is a very basic and inexpensive filter pitcher overall. It reduces the taste of chlorine and also reduces copper, cadmium, and mercury. It’s BPA-free, too, with an easy-fill lid and comfortable grip handle.

    The Brita does have a filter indicator. But as we noted earlier, don’t expect it to measure the life of your filter accurately. The Brita filter requires a filter change after approximately 40 gallons (or two months). Just mark a date in your calendar for the next filter change.

    If you’re in a crunch or on a strict budget, then this is a great option for you. However, it requires frequent filter changes and is at the lower end of water filter pitchers. Either way, this is definitely an improvement over basic tap water.

    The Clear Winner

    Every product has its own advantages and disadvantages, but the Clearly Filtered pitcher is impressive. The only possible negative would be the price. However, the price is well worth it, with a super long filter life of 200 gallons and a quality build. Other filter pitchers on the market have filters with a maximum life of 40 gallons and are of lesser quality.

    For the price, the Clearly Filtered pitcher is a very good buy.

    The Clearly Filtered Clean Water Filter Pitcher is a smart buy that ensures healthy and safe drinking water for the whole family. If you’re looking for a simple way to reduce the contaminants in your drinking water, the best choice is by using a filter pitcher. The Clearly Filtered pitcher definitely isn’t the most attractive filter pitcher on the market, but effectiveness is much preferred over style. Among filter pitchers, this one from Clearly Filtered beats the competition.

    Wrap-Up

    Enough with those pesky chemicals and enough with chemically contaminated water. You now have a clear solution when it comes to improving the safety and quality of your water. While there are some very good whole-house water filtration systems, switching over to clean water doesn’t necessarily need to cost thousands of dollars.

    If you’re drinking water from the tap, there’s no reason to continue receiving the chemical cocktail your body’s become accustomed to daily. Water filter pitchers are a massive improvement over the tap! They’re clearly a no-brainer decision if you want to limit your exposure to environmental contaminants.

    Once you switch to drinking healthier water, you’ll never go back.

  • Non-Toxic Cookware: Have Chemicals Been Lurking in Your Food?

    Non-Toxic Cookware: Have Chemicals Been Lurking in Your Food?

    Non-Toxic Cookware: Have Chemicals Been Lurking in Your Food?

    Are chemicals leaching into your scrumptious meals just because of the kinds of cookware you’re using?

    Have you ever wondered if the cookware you regularly use to cook the stuff that goes into your body every day is actually safe?

    If you haven’t ensured that the cookware you’re using is safe, there’s a good chance that chemicals are lurking in every meal you consume.

    If you love your non-stick Teflon-coated pan, you probably never heard of “Teflon flu,” aka  Polymer fume feveror else you wouldn’t be using it.

    Well, you might want to look at your cookware again and re-evaluate. You definitely want to do enough research to be certain that your cookware is safe to use in every respect of the word.

    This page will assist you in researching various types of cookware to find out which is safe for you and your family. Read further to know more about non-toxic cookware, what to look for, various types, and the benefits of using this safer cookware.

    Benefits of Using Non-Toxic Cookware

    The major issue of traditional cookware, including non-stick pans and aluminum, is that it often contains chemicals that may leach into food quite easily. Most of us presume that the pots and pans we cook with are safe without question. No one would want chemicals leaching into their food or into the food of the ones they love.

    The good news is that non-toxic cookware that won’t leech chemicals into the food is available. This safer cookware is readily available for purchase for those of you who have no interest in eating contaminated meals. Most of these safer cookware alternatives are more simple, old-fashioned, and a lot more fun to cook with.

    Non-toxic cookware is often less expensive compared to harmful Teflon cookware and other chemically non-stick varieties, but not always. Most non-toxic cookware is also dishwasher safe, oven safe, able to be used on the stove-top, and easily washed. Not only is this safer cookware easy to use and handle, but it also performs better when cooking.

    Safe, non-chemical leaching cookware comes in all kinds of shapes and sizes. In a bit, we’ll show you the best kinds of safe cookware to purchase. But first, let’s take a look at the kinds of cookware you need to avoid.

    Cookware to Avoid

    Toxic Cookware

    Teflon

    We’ve all heard of Teflon, which is short for Polytetrafluoroethylene (PTFE). We even see the incidence of this synthetic fluorocarbon fluoropolymer in bathroom cleaning products due to its ability to create a slick, non-stick surface.

    Though the benefits of this synthetic compound have been touted repeatedly, there’s a rather large elephant in the room that most big companies don’t want you to think about. The elephant in the room that a lot of people don’t want to think about can be addressed by asking a simple question.

    Here’s the Question:

     Is Teflon Safe?

    Teflon has been proven to emit fumes at high temperatures that are harmful to humans. These fumes that can be inadvertently created under normal conditions have even been known to kill pet birds.

    Actually, one expert who studied “Teflon Toxicosis” as early as 1986 claimed that this condition was the leading cause of death among birds. There have been cases where birds have died within minutes! I don’t know about you, but I’d rather not breathe in fumes that kill birds almost instantly.

    If heating up my cookware causes it to release fumes that would kill pet birds almost instantly, it’s probably time to switch to something safer. I’d also rather not expose babies, children, or any of my loved ones to those fumes.

    In Humans, Teflon is not without its health consequences. At the beginning of this article, “Teflon Flu” was mentioned, also known as Polymer fume fever. When Teflon is heated to high temperatures, it releases toxic fumes. When you breathe these fumes, you will develop flu-like symptoms. The long-term effects of regular exposure to Teflon fumes are unknown because studies are lacking and inadequate.

    While manufacturers provide warnings on their labels recommending avoiding high temperatures with their products, it’s been demonstrated that these fumes can occur in as little as 2-5 minutes on a conventional stovetop. So, while I’m sure we appreciate the warnings, they don’t really help!

    The associations between Teflon chemicals and adverse health effects are somewhat controversial, but DuPont and 3M were forced to stop their way of producing the chemical as of 2015 to prevent it from being released into the environment. However, even though production has changed and other chemicals are being used, those chemicals are very similar and pose the same risks.

    See a recent news story where DuPont was ordered to pay 5.1 million dollars to a man who worked in one of its Teflon Plants: “Dupont Ordered to pay $5.1M in Testicular Cancer Case“.

    For further reading, check out the “Madrid Statement“, a document signed by over 200 scientists from over 38 countries, highlighting the dangers of both the old and new chemicals, as well as their use in various household products.

    Teflon Dangers – A Short List:

    Madrid Statement and Teflon Dangers
    Excerpt From the Madrid Statement
    • Liver Toxicity
    • Neonatal Toxicity
    • High Cholesterol
    • Ulcerative Colitis
    • Decreased Birth Weight
    • Decreased Vaccine Immune Response
    • Delayed Puberty
    • Reduced Hormone Levels
    • Tumors

    Besides the dangers listed above, other potential adverse health concerns have been noted by many. Avoid Teflon.

    Aluminum

    It’s said that aluminum damages brain tissue. Perhaps that’s one reason that there have been studies linking aluminum exposure to an increased risk of Alzheimer’s disease. Actually, it’s said that aluminum exposure may be the “single most aggravating and avoidable factor related to AD [Alzheimer’s Disease].”

    All things considered, you should limit your exposure to aluminum if possible. It’s great that aluminum is so light, inexpensive, heats quickly, and is easy to clean, but do you really want to take an unnecessary risk?

    A family relative of ours has Alzheimer’s Disease, and she’s been cooking with aluminum pots and pans all her life. While there’s no intention of postulating that as scientific evidence of a direct link (correlation does not always equal causation), studies have shown incriminating evidence about the potential dangers of aluminum.

    It’s just not worth the risk. Stop cooking with aluminum leaching pots and pans because there are far better and safer alternatives.

    Copper

    Who doesn’t like the glimmer and shine of copper? Copper cookware is beautiful and performs quite well for novice and professional cooks alike. That being said, not all things beautiful are things that should be used. If you have copper cookware, use it rarely because it really belongs on the shelf.

    The finish of copper cookware is primarily made up of copper and nickel, both of which are heavy metals. These heavy metals are then leached into food during cooking and can build up in the body over time.

    If you do use copper cooking equipment, be sure it’s encased in a non-toxic material like stainless steel. Do not use copper-lined cookware.

    Non-Toxic Cookware Recommendations

    Healthy Cookware

    Once you begin cooking with non-toxic cookware, you’ll see that there’s absolutely no reason to continue cooking with cookware that poses the risk of chemicals leaching into food. Once you understand more about the simplicity and price accessibility of non-toxic cookware, you’ll see how easy it is to replace your chemical-leaching pots and pans with safer alternatives.

    Better yet, you’ll actually recognize the materials that this safer cookware is made from.

    Ceramic

    Ceramic is generally safe as long as you do your due diligence before purchasing. One problem with ceramics, in general, is that many companies use cheap manufacturing methods and materials from foreign countries. If cheap ceramic cookware is produced in a foreign country, there’s a real danger that it could contain traces of lead in the glaze.

    Ceramic cookware can also break very easily, depending on the quality. Depending on the durability of some ceramic cookware, it may or may not be scratched or cracked under intense heat.

    While ceramic cookware can potentially be a great alternative to the more toxic kinds of cookware mentioned earlier, the buyer must do their due diligence before purchasing.

    Stainless Steel

    While there are some concerns with Stainless Steel, it’s a superior choice to any of the unsafe materials we mentioned earlier, and it’s considered non-reactive. Furthermore, stainless steel is affordable and quite pleasant looking. If purchasing stainless steel, just make sure that it is actually stainless steel.

    You can test the quality of your stainless steel by boiling a few tablespoons of vinegar in a stainless steel pot. While your vinegar is boiling, also pour some vinegar into a cup as your control. If the boiled vinegar tastes metallic (compared to the control), that means that your stainless steel is of lower quality and will likely leach chemicals when cooking acidic foods. In this case, don’t cook acidic foods in your stainless steel cookware.

    One downside with stainless steel is that it’s not very non-stick. However, a few simple cooking hacks, like the mercury ball test, can make cooking with stainless steel much easier. Additionally, using oil or a bit of extra water is helpful when sauteeing. While your eggs may not be perfect every time in your stainless steel cookware, they’ll be safer to eat.

    Most chefs believe that stainless steel browns a variety of foods much better than their non-stick counterparts. So, go ahead and brown up some stir fry or potatoes on stainless steel instead of other unsafe non-stick alternatives.

    Cast Iron

    A thing of the past for many, cast iron has been used for centuries. If you have old cast iron pans lying around that are not being used, it’s time to dust them off and get them ready to cook your favorite dishes. Our family loves using cast iron for a number of reasons, but the durability of cast iron is reason number one.

    It’s almost impossible to damage a cast iron pan, and they last almost forever. Cast Iron is simplicity at its best.

    When purchasing a cast iron pan, you’ll see there are many options. Regardless of what kind of cast iron pan you purchase, just make sure you season it if it’s not already seasoned. Properly seasoning your cast iron pan will make it mostly non-stick. Also, cast iron can go on the stovetop and in the oven, making it versatile.

    Besides the quality of being seasoned, there’s a more important factor when it comes to purchasing a cast iron pan if you’re looking for something non-stick. The most important factor to consider if a non-stick surface is important to you is that the pan has been ground and polished on the inside cooking surface. The higher the polishing quality, the more non-stick it will be.

    Back in the old days, cast iron pans were actually more non-stick than most you can buy in stores today because they were polished to a smooth surface. I have a very old cast iron pan that is consistently more non-stick than any Teflon-coated non-stick pan I’ve ever used.

    The reason? It’s been polished to a finely smoothed surface on the inside. And when I say non-stick, I’m talking about cooking a fried egg, and it does not stick at all. Of course, the pan is also very well-seasoned.

    Cast iron cookware is relatively cheap. But, if it’s not ground and polished well, food may stick to it even if it’s well-seasoned.

    Enameled Cast Iron

    Having the same benefits as cast iron and then some, enameled cast iron is a superior kind of cookware. While the price of quality enameled cast iron cookware is definitely higher than its basic cast-iron counterpart, it’s well worth the price.

    The surface of enameled cast iron is extremely easy to cook with and doesn’t require seasoning like plain cast iron. It’s also dishwasher safe like cast iron, but far more attractive. Like cast iron, this type of cookware lasts forever.

    Better yet, some companies like Le Creuset even boast long-duration warranties, lifetime warranties for some products. So, when looking for a non-stick, beautiful, and durable alternative to sub-par cookware, you can’t go wrong with enameled cast iron. If the priceyness is a negative for you, remember that you’ll likely never need to spend money on cookware again.

    Conclusion

    There are as many kinds of cookware as there are crayons in a crayon box! But, when it comes to choosing safe cookware, it is important to consider the materials when buying. Choosing safe cookware options is one of the simplest and easiest decisions you can make to put healthy food on the table in your home. There’s simply no excuse to use dangerous cookware.

    Whether you’re on a budget, have plenty of cash to spend, or are a world-class chef, there’s safe cookware out there that will fit whatever needs you could possibly have. Do not cut corners here; don’t use questionable cookware that leaches unnecessary chemicals into your food.

    Now that you know more about the toxicity and possible hazards of traditional and/or non-stick cookware, it is time to take action. Opt for safer, non-toxic cookware to save your family from toxic substances. The safe options will cook your food just as well or far better than “quality” chemical-leaching pots and pans.

    Once you purchase safe cookware, you’ll be at peace with every tasty morsel of food you eat, knowing that you made a health-conscious decision to ensure your food is safe. Don’t worry; there’s still a home for your toxic cookware in the recycling bin.

    Non-Toxic Cookware FAQs

    What chemicals are found in conventional non-stick cookware?

    Teflon non-stick pans contain PTFE and PFOA, which can release toxic fumes and chemicals when overheated.

    How does toxic cookware impact health?

    The chemicals released can cause flu-like symptoms and potentially other long-term health issues.

    What are the safest, non-toxic cookware options?

    Cast iron, stainless steel, ceramic, glass, and enamel-coated cast iron are all good non-toxic alternatives.

    Are there truly non-toxic, non-stick options?

    100% ceramic non-stick pans are safe and effective. That said, keep in mind that they aren’t typically very durable, and you’ll likely need to replace them after a few years. Instead, try cast iron, enameled cast iron, or stainless steel.

    When using proper cooking techniques, non-stick as a preference becomes less important.

    Should I throw out my old Teflon pans?

    It’s best to replace worn or scratched Teflon with new, non-toxic cookware when possible. Avoid overheating Teflon.

    How can I prevent exposure to toxins from cookware?

    Use lower heat for non-stick pans, ventilate your kitchen, and don’t preheat empty non-stick pans.

    Are non-stick pans safe if not overheated?

    Small amounts of chemicals can still leach out even at lower temps. Non-toxic alternatives are safer.

    How do I know if cookware is truly non-toxic?

    Look for third-party tested products made of safe materials like stainless steel and cast iron.

  • Easy Apple Cider Vinegar Drink Recipe You Will Actually Enjoy

    Easy Apple Cider Vinegar Drink Recipe You Will Actually Enjoy

    Easy Apple Cider Vinegar Drink Recipe You Will Actually Enjoy

    The kitchen is a great testing ground for resourcefulness and creativity.

    It’s a place of recipe making, meal preparation, healthy nutrition planning, and more. For adventurous people, it’s also a place where unexpected items can be used for all kinds of applications. One of these items is apple cider vinegar.

    Apple cider vinegar is quite versatile, as you may already know. It can be utilized as a cleaning agent, facial toner, stomach calmer, weight loss companion, and wart remover, among many other things. But did you know that apple cider vinegar can also be used as the main ingredient in a variety of healthy drink recipes? Some of them actually taste good, too!

    Apple cider was first used medicinally by Hippocrates, the father of modern medicine. Since then, it’s been widely used as a “cure-all” option for things like rinsing it through the hair to enhance shine and stimulate follicles, spreading it on the face to relieve irritation from acne, and speeding up recovery in wound healing.

    Health Benefits of Apple Cider Vinegar

    Raw apple cider vinegar contains important enzymes, minerals, and vitamins. Medicinal use of this simple but powerful item has been well documented throughout history. It’s said that apple cider vinegar helps boost the immune system by cleansing the digestive tract and other parts of the body.

    Do you have a sore throat? If you do, try using apple cider vinegar as a natural remedy. Due to the acidic nature of the vinegar, it will decrease the pH of tissue, preventing bacterial growth. Since apple cider vinegar is also fermented, it contains prebiotics like inulin, which is useful in assisting immune-boosting white blood cells and T-cells.

    Besides all of those benefits, here’s one you’ll also love: Weight Loss. Say goodbye to diet pills. You never needed those nasty chemicals anyway. As mentioned earlier, apple cider vinegar is a great supplement to any weight loss plan.

    Some sources recommend as little as two teaspoons in a glass of water before each meal in conjunction with a healthy diet and exercise to shed off those pounds even faster.

    How Does Apple Cider Help You Lose Weight?

    In case you’re wondering how Apple cider vinegar assists in weight loss, nobody knows! Just kidding, but there are a lot of theories out there. Let’s briefly examine a few more benefits that help with weight loss.

    • Appetite suppression
    • Increases metabolic rate
    • Blood glucose control
    • Decreases water retention
    • Organic acids and enzymes that enable your body to burn fats more quickly
    • Aids in proper digestion, detox, and removing stored waste from the colon and intestines
    • Helps to maintain an overall sense of well-being

    Would any of the above benefits help with your weight loss?

    Apple Cider Drink Recipes

    If you’re bold and don’t mind the taste of vinegar, you can take straight apple cider vinegar without mixing or diluting it with water. However, if you’re like most people and have reservations about drinking plain vinegar, you need to try some amazing recipes, including apple cider vinegar.

    There are many kinds of drinks (alcoholic and non-alcoholic) made with apple cider vinegar that can be enjoyed. Some recipes are simple with just a few ingredients; some are more refreshing, some are more sugary, some are less fattening, and some are more fattening. Whatever kinds of tastes you’d prefer to implement apple cider vinegar into your diet, there’s a drink for you.

    Warmly Spiced Lemon and Apple Cider Vinegar Recipe:

    You’ll Need the Following:

    • 16 ounces of water (warm or hot)
    • 2 tablespoons of apple cider vinegar
    • 1 teaspoon ground cinnamon
    • 1/2 squeezed lemon juice
    • 1-2 tablespoons of raw honey (your preference)
    • 1 pinch of cayenne pepper (optional)

    Just mix all of the above ingredients for a great-tasting apple cider drink recipe. Feel free to tweak the recipe to your favorite tastes as well. You may want more lemon and less cinnamon, more honey, no cayenne pepper, etc. You can also chill this drink after mixing the ingredients if that’s what you prefer; it’s easier to mix everything in warm water first.

    Note: If this recipe is a bit too strong for you, just go ahead and use less vinegar or use more water.

    Refreshingly Minty Citrus and Apple Cider Vinegar Recipe:

    Apple Cider Vinegar Mint Lemon

    This recipe will make use of the infusion of a number of fruits without adding any additional sweet additives like honey. Of course, you can also add honey if you’d like, but it’s not required.

    You’ll Need the Following:

    • 24 ounces of water
    • 1 tbsp apple cider vinegar
    • 1/2 organic lemon (sliced)
    • 1/2 organic apple (sliced)
    • 1/2 grapefruit (sliced, optional)
    • 5-6 mint leaves

    For this recipe, just mix all of your ingredients, then chill in the refrigerator for 2 hours minimum. Allowing the mixture to chill for a longer period will cause all the fruit flavors to infuse into the water and vinegar solution. The longer you allow your drink to chill, the more robust the fruity flavors will become.

    Once you drink all of your fruit-infused water and vinegar, feel free to simply add more water and vinegar to your existing fruit slices. That being said, I’d suggest only reusing the fruit for no longer than two days. Just be sure to keep the drink chilled.

    Many people will also implement fat-burning green tea into their recipes as well. In that case, just steep some green tea in your water, then add the other ingredients.

    These drink recipes are so easy to make! There are many more recipes than just the two we mentioned here, but I’d suggest starting with either of these first. They’re so basic and are great beginner recipes as you get used to consuming apple cider vinegar on a more regular basis.

    You’ve now got two great recipes to start with:

    1.) A Warm Blend of Lemon and Cinnamon Spice

    2.) A Blend of Refreshing Citrus and Mint.

    Get adventurous, don’t stop with these two recipes! As noted earlier, tweak these recipes, make your own, and try others that you find. If you don’t like the taste of apple cider vinegar, you will definitely appreciate either of the two recipes mentioned above.

    Tips and Precautions on the Use of Apple Cider Vinegar

    To ensure that you reap the health benefits of apple cider vinegar, follow these simple tips below.

    9 Success Tips:

    1. Use only raw, organic, unfiltered, or unpasteurized apple cider vinegar. Never use a pasteurized, distilled, or filtered variety.
    2. When you take apple cider vinegar as a pill, choose the brand with the highest percentage of apple cider vinegar content. That being said, the processing of these pills is detrimental to many of the health benefits of apple cider vinegar, so the liquid form is recommended instead.
    3. If you have osteoporosis, apple cider vinegar is not recommended as a dietary supplement without a discussion with your doctor first.
    4. When taken excessively, apple cider vinegar could lead to hypokalemia or low potassium, which reduces bone density. (Source)
    5. If you are under medication for diabetes or heart disease, consult your doctor before taking apple cider vinegar to ensure that it doesn’t have a counter effect on your medications.
    6. Drink a lot of water to help remove toxins from the body.
    7. Mixing or diluting apple cider vinegar makes it much easier to drink. Don’t try taking it straight, or you may get discouraged and never try again.
    8. If you take apple cider for the first time, be aware if you have any allergic reactions – itching, hives, swelling, rashes, or breathing problems.
    9. Eat a healthy diet!

    Now that you’ve learned more about the amazing benefits of apple cider vinegar stop reading and try it for yourself! Truly, apple cider vinegar is a great addition to a healthy lifestyle. It’s often said that variety can increase the likely success of many kinds of health plans, whether they’re related to diet or exercise.

    With all kinds of easy apple cider vinegar drink recipes that taste good, it’s never been easier to drink this healthy beverage.

    Apple Cider Vinegar FAQs

    What are the benefits of apple cider vinegar drinks?

    Drinking apple cider vinegar can help improve digestion, boost immunity, regulate blood sugar levels, and promote weight loss.

    How much apple cider vinegar should I use in a drink?

    Most recipes call for 1-2 tablespoons of apple cider vinegar per drink. Start with less until you get used to the taste. Check out the above recipes for guidance on adding extra flavor to your beverage.

    What ingredients can I mix with apple cider vinegar?

    Try mixing ACV with water, lemon juice, cinnamon, honey, fresh fruit, mint, ginger, or green tea for different flavor combinations.

    When should I drink apple cider vinegar?

    Some people prefer drinking ACV first thing in the morning on an empty stomach. You can drink it before meals or bedtime too.

    Does apple cider vinegar drink taste bad?

    ACV has a strong, acidic taste. Adding sweeteners like honey or diluting with water can mellow the flavor. Drinking from a straw helps, too.

    Can I drink apple cider vinegar every day?

    Yes, it’s safe to drink diluted ACV daily. Too much undiluted ACV may damage tooth enamel over time, so rinsing with water afterward is a good idea, as with any acidic beverage. Moderation is key.

  • Why You Need to Eat Organic Lard: 8 Simple Reasons

    Why You Need to Eat Organic Lard: 8 Simple Reasons

    Why You Need to Eat Organic Lard: 8 Simple Reasons

    When people hear the word lard, they immediately imagine clogged arteries. This misconception has been largely debunked over the past many years. Lard is a saturated fat that can be safely consumed in moderation as part of a healthy diet.

    For greater context, check out the below article from Science Daily.

    “Trans fats, But Not Saturated Fats Like Butter [or Lard], Linked to Greater Risk of Early Death and Heart Disease” – Science Daily

    Lard is essentially pig fat.  This fat can commonly be found in unrendered or rendered forms and can be found locally as well as in many grocery stores. The rendering process of lard is quite simple. Pork fat is steamed or boiled in water; after a separation process, the leftover fat is known as lard. The end product is then strained to remove any impurities.

    Lard can also be made easily at home in a slow cooker or on the stovetop by adding water and then slowly cooking the water and pork fat until all the water evaporates.

    Perhaps you remember your grandparents talking about all the lard their families used in decades past? Well, it’s been around for quite some time. It’s used worldwide as a cooking fat, and it results in more savory dishes and flakier pastries (it’s excellent for baking). The use of lard is increasingly becoming more popular in our day, especially among the more health-conscious.

    What is Organic Lard?

    As stated earlier, lard is a saturated fat derived from pork fat. Tallow, which is derived from beef fat, is very similar to lard in composition.

    • Lard is mostly made up of fats, and these fats are known as triglycerides.
    • Each triglyceride molecule consists of three fatty acid chains.
    • The distribution of fatty acids in these chains sets one oil apart from another.

    Interestingly, lard can significantly vary in fatty acid content, dependent upon the diet of the animals it was sourced from. For example, pigs in North America are mainly fed corn, unlike pigs raised in Spain, which are often fed acorns and peanuts, resulting in varying kinds of lard.

    History of Organic Lard

    In the early 1900s, lard was regularly used as a cooking oil across the globe. It was a key ingredient for most of the tasty and scrumptious recipes from generations past.

    Lard is excellent for perfectly flaky pie pastries, melt-in-your-mouth biscuits, superior-tasting gravies, crispy fried chicken, mouthwatering popcorn, and much more.

    In recent years, lard has just about completely disappeared from most kitchens due to an overemphasis on saturated fats being linked to heart disease. Also, the increasing popularity of more unhealthy oils like hydrogenated oils and trans-fats helped reduce lard’s popularity.

    Regarding publicity, lard took a beating when Upton Sinclair’s novel, The Jungle, contained stories of fictional characters falling into lard rendering vats, only for the contaminated end-product to be sold later to the public. It portrayed that deaths of this sort in rendering plants went ignored and that lard was being sold without any consideration for workers or the consuming public.

    Due to this stigma, lard fell in popularity. If that’s not enough, aggressive ad campaigns from companies like Crisco, with hydrogenated fat products, also locked in lard’s demise. What was once a staple and mainstay for family cooking lost popularity and was given the stigma of being nothing more than “poverty food.”

    This was all primarily the result of effective marketing strategies that shifted demand from this mainstay of the family kitchen to newer and less healthy options, margarine being a key example.

    Where to Find the Best Organic Lard

    Lard is healthier when it comes from pigs that eat organic plants and feed. Containers of lard can be bought in supermarkets, but these products have usually been hydrogenated so that they will last longer. The store-bought brands are often heavily processed and may also be derived from pigs that were given harmful chemicals like ractopamine.

    Why buy lard that’s been treated with chemicals,  bleached, then deodorized with deodorizing agents? Always go organic when it comes to purchasing lard. There’s simply no reason not to.

    Choose the minimally processed lards sourced from pigs fed USDA Certified Organic diets.

    High-quality USDA Certified and minimally processed lard can easily be found online and at health-conscious grocery stores like Whole Foods. While it’s more expensive than the cheap fats found at the average grocery store, a little lard goes a long way.

    8 Reasons to Use Organic Lard

    Eat Organic Lard

    There are so many benefits and reasons to use lard; too many to have an exhaustive list here. Yet, we’ll go ahead and at least give you a few reasons why you can feel good about using this wonderfully simple fat in moderation.

    #1 – Organic Lard is Heart Friendly

    As noted earlier, the idea that saturated fats are directly linked to the onset of heart disease is a myth. On the contrary, the onset of heart disease is linked to highly processed fats like margarine and other trans-fats, not to naturally saturated fats like lard. Lard and butter have traditionally been used massively in earlier times without any trouble. 

    This issue isn’t that all fat is bad. This issue is that unhealthy diets, including those high in fats, lead to a wide variety of negative health outcomes.

    Lard isn’t the enemy when the following general rules are followed:

    • Eat a diet plentiful in whole grains, fruits, nuts, beans, and vegetables (especially leafy greens and beans).
    • Shift away from the Americanized diet, where meat always takes up the most significant portion of the plate. Instead, veggies and whole plant-based foods should be the main course.
    • If or when you opt for eating meat, eat lean meats and cuts, as well as lean seafood options.
    • Avoid processed foods and refined sugars.
    • Use fats sparingly and in moderation. That means that you don’t need to add fat to every meal.

    Various reliable sources found that saturated fats are indeed part of a healthy diet, including one study of over 300,000 individuals published by the American Journal of Clinical Nutrition (Source 1, Source 2). The issue has more to do with bad diet habits in general and less with using lard as one of many ingredients.

    #2 – Organic Free Range and Pastured Lard Can Be Rich in Vitamin D

    As long as your lard was sourced from pigs regularly exposed to sunlight, it will contain higher amounts of Vitamin D. Also, since Vitamin D requires fatty acids to help calcium’s absorption into the body, it’s wise not to limit their intake. Not only does lard improve the taste of your food, but it also may help supplement your vitamin D intake or calcium uptake.

    #3 – Lard is a Healthy Source of Cholesterol

    Studies show that saturated fats [like lard] increase HDL cholesterol levels. The increase in HDL cholesterol is associated with a decreased risk of cardiovascular disease in this study. That being said, HDL isn’t the only factor in a decreased risk of heart disease because other genetic factors also come into play. 

    Whatever the case, the average individual can consume lard and other fats in moderation. The only things that should be eaten in abundance are whole plant-based foods.

    #4 – Lard is Perfectly Suited for Baking

    If you can occasionally appreciate a good biscuit, try using lard in your recipe next time. Whether you’re preparing pastries, biscuits, pie crusts, or cookies, implementing lard into your recipes makes for excellently tasting baked goods. Varying the kinds of fats you use in your baked goods will also allow you to experiment with their differing taste qualities and characteristics.

    Personally, I really enjoy alternating fats from time to time when I bake because it’s amazing how different the results can be. For example, if you make homemade brownies with coconut oil one week, try making them with lard the next time you make them. I absolutely love making them with both oils, but I can choose which fat I want to use depending on which taste I prefer at any given time.

    #5 – Lard Can Be Bought Locally

    If you’re concerned about decreasing your carbon footprint, buy lard from your local pig farmer. Supporting local farmers is an excellent way to do business with those trying to provide for their families.

    Farming isn’t easy nowadays, so support local products from local farmers whenever you can. Also, you may even be able to take a trip to your local farm to see how they raise their pigs so that you know what you’re getting. Better yet, you could purchase unrendered pork fat from them (very cheap) and render the lard yourself.

    It’s always fun to find out how things are made so that you don’t become disconnected from reality, which often happens in our instant gratification society. Local farms are excellent places to learn about how the food we eat gets to the table. Hopefully, the local farms where you live provide good examples of the process.

    #6 – Organic Lard is Neutral in Flavor

    While some people use coconut oil because it is heat-stable cooking oil, it has a unique flavor that some may not like all that much or may not be appropriate for specific recipes. So, if you need a neutral-flavored cooking oil, lard should be high up there on your list of flavorless oil choices.

    Lard is perfect for deep frying and sautéing due to its high smoke point. Using organic lard results in a perfectly browned crust on vegetables and meats without any distinct flavor. Instead, it seems to enhance the flavors already in any given dish. Since it’s neutral in flavor, organic lard is also perfect for baked goods, as noted earlier. That’s right, it won’t make your cherry pie taste like ham, promise.

    #7 – Organic Lard is Sustainable and Environment-Friendly

    If you’re not already purchasing organic oils, you have no idea whether or not they’ve been made from genetically modified organisms (GMOs) or were sourced from crops that were heavily sprayed. Oils like organic lard are a big improvement over conventional and “natural” run-of-the-mill cooking oils at the grocery store.

    Also, since lard comes from pigs (which can thrive almost anywhere), you’re investing in a sustainable production process. If you’ve never seen pasture-raised pigs, you should probably know that they greatly help the environment. Granted, they will tear up vegetation and grass quickly so that it won’t look pretty. But, by tearing up topsoil and foraging, they help fertilize the ground naturally.

    Purchasing sustainably raised organic lard is a great way to say “NO” to a conventional market that contributes to hundreds of thousands of pesticide-ridden fields and the thriving preservative, antibiotic, and chemical market in the meat production business.

    #8 – Organic Lard is Traditional

    Over the centuries, pork fat has been used time and time again. Thankfully, in recent times, there seems to be a return to simplicity in many areas of life. There’s a certain excitement and enticement when it comes to thinking about rendering fat the way our great-grandparents did when they were young.

    Believe it or not, returning to the old ways is actually beneficial in many cases. Continuing the legacy of making and using this healthy fat should appeal greatly to anyone interested in living a natural and healthy life.

    Wrapping-Up

    Now that we’ve debunked a few myths, listed many benefits, and pondered times past, you should know why lard should once again be a food staple in your family. Better yet, since it’s so easy to render, why not show your children how easy it is to make by rendering it with them, just like your grandparents’ parents showed them when they were children?

    Stay lean, eat primarily vegetables and fruits, and eat lard in moderation.

    Organic Lard: FAQs

    What are the benefits of eating organic lard?

    Eating organic lard provides healthy fats and nutrients. Lard from pasture-raised pigs contains vitamin D, vitamin E, and antioxidants not found in conventionally-raised pork fat.

    Is lard healthier than vegetable oils?

    Yes, lard is more stable at high heat and contains more antioxidants than vegetable oils, making it a healthier choice for cooking.

    Does lard raise cholesterol levels?

    No, studies show lard does not negatively impact cholesterol levels. The high monounsaturated fat content may help lower LDL cholesterol.

    What dishes can I cook with lard?

    You can use lard for cooking eggs, sautéing veggies, baking pie crusts, roasting potatoes, and making tamales, among many other uses.

    Is lard better for high-heat cooking than olive oil?

    Yes, lard has a very high smoke point, which makes it excellent for frying and cooking at high heat.

    How can I store lard properly?

    Store lard in an airtight container in a cool, dark place or in the refrigerator. It can be kept refrigerated for up to a year.

    What is the difference between lard and tallow?

    Lard comes from pigs, while tallow comes from cattle. Both contain vitamins, minerals, and stable saturated fats.

    Where can I buy high-quality organic lard?

    Look for organic lard from pastured pigs at health food stores, local farms, or online retailers like Fatworks.

  • 3 Easy Crockpot Freezer Meals Your Family Will Devour

    3 Easy Crockpot Freezer Meals Your Family Will Devour

    3 Easy Crockpot Freezer Meals Your Family Will Devour

    Finding time to make a healthy and delicious dinner can be pretty difficult these days. Whether you’ve been on the go or spending all day doing some major house cleaning, there are days when you just don’t feel like cooking a meal. At the same time, you don’t want to prepare unhealthy, chemically-ridden frozen dinners and other processed food options.

    Instead of running to the freezer section at the nearest grocery store, consider making the below DIY recipes part of your frozen meal plan. Everyone in your family will love these recipes! After all, it’s important to you that your family gets a delectable yet healthy dinner.

    Plan ahead and put your mind at ease with these three simple and delicious crockpot freezer meals for your whole family. Nothing complicated here; you’ll just need a few simple ingredients, some freezer-proof containers, and a crockpot, and you’re all set!

    1.) Crockpot Slow-Cooked Beef Stew

    This recipe is a classic favorite of mine, and it will always remind me of my Granddaddy. Every year on his birthday, we would make him his “favorite Beef Stew.” Year after year, he would always go on and on about how it was so delicious! I can see him now exclaiming in his thick North Carolinian accent, “That there is a good bowl of stew!”.

    This stew is certainly one you will want to add to your collection of favorites. Also, be prepared to give 3 or 4 helpings to everyone you serve when making this stew because they’ll definitely want more.  The recipe below makes about six servings, but you’ll surely want to double it after you try it for the first time!

    Old-Fashioned Beef Stew Recipe

    Soup Stew Ingredients

    Yield: Makes six servings

    Cook Time: 5hrs. 10min (8hrs. if slow-cooked) 

    Ingredients:

    • 2 pounds of cubed grass-fed stew beef
    • 4 tablespoons of butter
    • 2 cups of water
    • 1 cup organic beef broth
    • 2 tablespoons of Worcestershire sauce
    • 2 tablespoons A1 sauce
    • 3 organic potatoes
    • 4 organic carrots
    • 1 organic onion
    • 1 clove of organic  garlic
    • 1 teaspoon of parsley
    • 1 teaspoon oregano
    • 1 teaspoon basil
    • 1 teaspoon Himalayan pink Salt/Sea Salt

    Instructions:

    1. Combine beef, butter, water, broth, Worcestershire sauce, A1, veggies, and spices in the Crockpot.
    2. Cover with the lid and cook on high for 5 hours OR cook on low for 8 hours.
    3. For freezing: Be sure to allow the stew to cool before placing it in any freezer-safe containers.

    On those busy days that we all just know you’ve planned for, all you’ll have to do is reheat this amazing stew. Be sure to run some warm water over your container just after removing it from the freezer to make it easier to get the stew into the pot you’re going to heat it up in. Once you’ve got your frozen stew in the pot, simply bring it to a boil.  After you’ve brought it to a boil, turn down the heat, serve, and enjoy.

    2.) Ham and Bean Soup

    Do not be fooled by the simplicity of the name of this soup. Believe it or not, this is actually one of our family favorites.  Even our two-year-old will ask for second and third helpings.

    As a mommy who loves to see her family actually enjoy what she cooks without sacrificing nutrition, I always try to make a healthy and tasty dinner. Ham and bean soup is one meal that proves to be the perfect fit for any dinner night, time and time again.

    I’d actually never made this particular soup until my husband and I were married. When he asked me to make it one day, I was a bit surprised because, in my experience, beans always tasted a bit bland. With hesitancy, as someone who was never a fan of beans, I tried it out. To my surprise, it was one of the best soups I had ever made!

    Now, I always make it, and my family absolutely loves it.  Once you’ve tried this soup, you’ll have yet another great recipe to add to your arsenal that’s actually quite easy to make.

    Savoury Ham and Bean Soup Recipe

    Ham and Bean Soup

    Yield: Makes 6 servings

    Cook Time: 6 hours 10 min

    Ingredients:

    • One organic ham (bone-in is always a good option)
    • ½ of a large organic onion chopped
    • 2 lb. of organic Great Northern or navy beans
    • 8 cups of water
    • 1 cup organic celery chopped (optional)
    • 1 tsp of Himalayan Pink Salt/Sea Salt
    • 1 tsp of pepper

    Instructions:

    1. Rinse off the beans and pick through to remove any stones or shriveled beans.
    2. In the crockpot, combine water, ham, chopped onion, chopped celery, and beans.
    3. Add the salt and pepper.
    4. Set the crockpot on high and let cook for 6 hours (or until beans are tender).
    5. Before freezing, let cool completely. Transfer the soup to your freezer containers and place it in your freezer.

    Once you’re ready to get the soup from the freezer to the table, just transfer it from your container into a large pot and cook on medium until it begins to boil. If you’d like a heavier side dish with this meal, cornbread makes a delicious accompaniment to this already tasty dish. Also, you may only want to put half a teaspoon of salt in if you’re sensitive to sodium.

    Crockpot Chicken on Veggies With Stuffing

    This dinner is the perfect hot meal to eat on a cold winter’s day. The combination of tasty stuffing and mouth-watering spices makes for a hearty meal when you need to warm up. Not only will your family love this meal, but it will also “wow” your guests. I love preparing this meal because it doesn’t take too long to prepare and, at the same time, is super easy to make.

    This chicken and stuffing recipe is also the perfect freezer meal to have on hand when you have unexpected company or when you just want to have a quick and tasty meal the whole family can enjoy.

    Scrumptious Chicken Over Veggies With Stuffing Recipe

    Roast Chicken

    Yield: Serves 6

    Cook Time: 6-8 hours

    Ingredients:

    • One whole thawed free-range organic chicken
    • Three organic carrots
    • Four large organic potatoes
    • ½ cup organic celery
    • ½ organic onion chopped
    • 1 tsp Himalayan pink sea salt
    • 1 tsp oregano
    • 1 tsp basil
    • 1 clove organic garlic minced
    • 1 tbsp parmesan cheese
    • 2 tbsp butter

    Ingredients For the Stuffing:

    • About 6 slices of bread diced (you may need more or less depending on the size of your chicken)
    • ½ cup organic celery
    • ¼ cup organic onion diced
    • 1 clove organic garlic minced
    • ½ tsp oregano
    • ½ tsp basil
    • ½ tsp parsley
    • ½ tsp rosemary
    • ½ tsp Himalayan Pink Salt/Sea Salt
    • 2 tbsp butter

    Instructions:

    1. Stuffing: In a medium mixing bowl, combine diced bread, celery, onion, garlic, salt, and spices together.
    2. Melt 2 tbsp of butter until it reaches a liquid state. Add the butter and mix well. Set aside.
    3. Veggies: Combine carrots, onions, potatoes, and ½ cup of celery in the crockpot.
    4. One handful at a time, pack the stuffing into the chicken. If you have too much stuffing, you can let it overflow into the crockpot.
    5. Lay the chicken on top of the veggies.
    6. Melt 2 tbsp of butter until it gets to a liquid state. Add spices, garlic, salt, and parmesan cheese to the melted butter and rub the outside of the chicken until completely covered.
    7. Place lid on your crockpot and cook for 6-8 hours on LOW. You know your chicken is done when the joint is 165 degrees Fahrenheit.
    8. After the chicken is finished cooking, let it cool completely and debone it to place over the veggies.
    9. Optional: Remove legs, thighs, and wings, then place over veggies (without deboning).  Place stuffing in a separate container.
    10. It’s recommended to place this meal in a disposable foil baking pan covered with aluminum foil. Then, all you have to do is place the entire roast in the oven when you’re ready to reheat.

    When you are ready to reheat the meal, preheat the oven to 350 degrees Fahrenheit. While the oven is preheating, I suggest allowing the meal to thaw a bit in your roasting pan.  Once the oven is preheated, place the roasting pan in the oven. Cook until everything reaches 165 degrees Fahrenheit. So, after your meal is piping hot, serve and savor every bite!

    Go Ahead and Start Planning Your Meals!

    I hope that these three crockpot freezer meals will be a great help to you as you plan meals for your family. It’s important for us moms not to be stressed out about making dinner. At the same time, we need to feel good about the meals we make for our loved ones.  Isn’t it just comforting to know that there is a healthy dinner ready to go right when you need it?

    I know that these three delicious meals will always come in handy for busy moms like yourself.

    Lastly, you can make any of these meals on-demand without sticking them in the freezer. I hope you and your family enjoy these meals as much as my family and I do.

    Crockpot Freezer Meal FAQs

    What are some popular crockpot freezer meal options?

    Other options than the ones discussed above include dishes like chili, shredded meats for tacos or sandwiches, and casseroles. One great casserole example would be to combine a bit of rotini pasta, browned hamburger, tomato sauce, Italian spices, salt, and mozzarella cheese.

    How do you reheat a freezer meal in the crockpot?

    When ready to cook, thaw if necessary (for meals that aren’t saucy or don’t contain broth) and empty contents into the crockpot to cook. You’ll find that adding some hot water first will help with the reheating process. Also, use the low setting when reheating larger portions of food to ensure even cooking.

    What are the best containers to use for crockpot freezer meal storage?

    Use heavy-duty freezer bags or airtight freezer-safe containers to prevent freezer burn and preserve the quality of the food.

    How long can you store crockpot freezer meals?

    Most crockpot freezer meals can be stored for up to 3 months. Always label your meals with the date they were frozen. Realistically, we’ve kept our meals for even six months without any issues. Proper storage is the most important factor.

    Do you need to adjust cooking times for crockpot freezer meals?

    If you’re cooking from thawed ingredients, no adjustment is necessary. If cooking with frozen ingredients, you may need to add additional cooking time.

    What are some kid-friendly crockpot freezer meal ideas?

    Kids often enjoy meals like meatballs in marinara sauce, cheesy chicken and rice, or beef and vegetable stew.

    How can you prevent freezer burn on crockpot meals?

    Remove as much air as possible from freezer bags, use proper freezer containers, and consume meals within the recommended timeframe.

    Can you cook vegetables and meat together in a freezer meal? 

    Of course! You can combine vegetables and meat in any meal you want to create. Just ensure that all ingredients are properly prepped before cooking. That may include sauteeing the meat or veggies beforehand.

    What’s the best way to label crockpot freezer meals?

    Use a permanent marker to write the dish’s name, cooking instructions, and the date it was prepared on the freezer bag or label. Additionally, you could include a “use by” date.