Author: Cora

  • 3 DIY Apple Cider Vinegar Scalp Scrub Recipes
  • Proper Application for Optimal Results
  • Safety and Precautions
  • Customizing for Different Hair Types
  • Maintaining a Healthy Scalp Post-Exfoliation
  • Comparison to Salon Treatments
  • Perfecting Your Hair Care Routine with ACV Scrubs
  • Apple Cider Vinegar Scalp Scrub FAQs
  • We love this common household item for face care, but it also works well for the hair and scalp. Apple cider vinegar (ACV), known for its natural cleansing properties, works as an excellent base for a scalp scrub.

    Lastly, regular use of an apple cider vinegar scalp scrub can provide a deeper cleanse than shampoo alone, leaving you with a refreshed, invigorated feeling and setting the stage for healthier-looking hair.

    5 Benefits of Apple Cider Vinegar (ACV) for Your Scalp

    Rich in natural properties, ACV may contribute to a better environment for hair growth and scalp maintenance.

    1.) Balancing pH Levels

    Your scalp’s pH levels are essential for maintaining healthy hair and scalp condition.

    Apple cider vinegar is believed to help balance the pH levels of the scalp, creating a more optimal environment that may reduce the likelihood of developing conditions like seborrheic dermatitis.

    2.) Removing Residue and Product Buildup

    Over time, residues from hair products accumulate on your scalp, potentially clogging hair follicles.

    Using apple cider vinegar as part of your hair care routine may serve as a natural clarifying shampoo, helping to remove product buildup and residue without stripping hair of its natural oils.

    3.) Combatting Dandruff and Flaky Scalp

    ACV’s natural acidity and antifungal properties may offer relief for those suffering from dandruff and a flaky scalp.

    By applying an apple cider vinegar scalp scrub, you can gently exfoliate the scalp, potentially keeping dandruff at bay. The anti-dandruff effects are substantial when paired with ingredients like lemongrass essential oil.

    This special essential oil has demonstrated a high level of efficacy in relieving dandruff, as demonstrated in studies.

    4.) Promoting Hair Growth and Health

    The overall health of your scalp is vital for hair growth.

    Apple cider vinegar may stimulate circulation within the scalp, promoting healthy hair growth. Its use might also prevent bacteria and fungi that can lead to poor scalp conditions that hinder hair growth.

    5.) Soothing Itchy and Sensitive Scalp

    If you have an itchy scalp or sensitive scalp, the anti-inflammatory properties of apple cider vinegar might provide relief. Its application can soothe itchiness and irritation, making it a natural remedy for scalp discomfort.

    Incorporating apple cider vinegar into your hair care routine will keep your scalp clean and nourished, making it an apt environment for healthy hair growth.

    Choosing the Right Ingredients

    Crafting your DIY apple cider vinegar scalp scrub involves selecting high-quality components that nourish your scalp while effectively removing dead skin cells.

    The right balance of oils for moisture, exfoliants for a deep cleanse, and natural add-ins can enhance your scrub’s benefits significantly.

    Oil Selection for Moisture

    Incorporate a nourishing oil base to ensure your scalp maintains its natural oils after exfoliation.

    Exfoliants for a Deep Clean

    A natural exfoliant is crucial for sloughing off dead skin cells and product buildup. As we mentioned earlier, ACV can naturally and gently exfoliate dead skin cells due to the alpha hydroxy acid it contains.

    That said, depending on your hair and scalp, you may find adding an additional exfoliant will make the process more efficient.

    Sugar is a gentle choice that effectively exfoliates without being too harsh on your scalp.

    Colloidal oatmeal: We’ve mentioned this amazing skincare ingredient in multiple other blog posts, but we had to mention it here, too, because it works wonders for an inflamed, flaky scalp. It’s anti-inflammatory, seals in moisture as a natural emollient, and it’s a gentle exfoliation ingredient especially suitable for sensitive skin.

    Salt: Salt is an excellent exfoliator for hair and scalp due to its natural abrasive texture, which helps to slough off dead skin cells and remove product buildup effectively. Additionally, salt’s purifying properties can help absorb excess oil and rebalance the scalp, contributing to the overall condition of the scalp.

    We prefer using sea salt whenever possible.

    If all you have are normal oats, simply grind them into a fine powder or in a blender. That can then be added to DIY recipes for the above benefits.

    Natural Add-Ins for Enhanced Benefits

    Boost your DIY scalp scrub with natural add-ins for their unique properties:

    By selecting the right ingredients, you’re on your way to creating an effective and soothing DIY apple cider vinegar scalp scrub.

    3 DIY Apple Cider Vinegar Scalp Scrub Recipes

    With simple ingredients, you can prepare a natural scrub that helps remove buildup, clarifies, and balances pH levels on the scalp. By adding some of the natural add-ins discussed earlier, we can enhance the scrub with many additional benefits tailored to your hair and scalp type.

    1.) DIY Basic Apple Cider Vinegar Hair Scrub Recipe

    Ingredients:

    Instructions:

    1. In a bowl, mix the brown sugar and apple cider vinegar until well combined.
    2. Add the coconut oil to the mixture and stir in. If using solid coconut oil, the mixture may need to be slightly warmed before you can mix it in. You can also use fractionated coconut oil. Either works fine.
    3. Mix in the honey until fully incorporated.
    4. If desired, add a few drops of your chosen essential oil for added fragrance.
    5. To use, apply the mixture to your damp scalp in slow, gentle circular motions to exfoliate.
    6. Rinse thoroughly with warm water and follow with shampoo and conditioner.

    2.) DIY Invigorating Mint Apple Cider Vinegar Hair Scrub Recipe

    Ingredients:

    Instructions:

    1. Combine the brown sugar and apple cider vinegar in a mixing bowl.
    2. Add the coconut oil to the sugar and vinegar, blending until a consistent paste is formed.
    3. Stir in the honey, ensuring it’s evenly distributed throughout the mixture.
    4. Add the peppermint essential oil for an invigorating scent and additional scalp stimulation.
    5. Apply to a wet scalp before shampooing, massaging gently in a circular motion.
    6. Rinse out the scrub with water, then shampoo and condition as usual.

    3.) DIY Anti-Dandruff Apple Cider Vinegar Hair Scrub Recipe

    Ingredients:

    Instructions:

    1. In a mixing bowl, combine the Himalayan pink salt, apple cider vinegar, and coconut oil.
    2. Add the Manuka honey to the mixture and stir until all ingredients are well combined.
    3. Finally, add the lemongrass essential oil to the scrub and mix thoroughly.
    4. Apply to a wet scalp using slow and gentle motions to exfoliate.
    5. Thoroughly rinse the mixture, then shampoo and use a conditional as usual.

    As mentioned in the above instructions, it’s best to scrub first, then shampoo, and then conditioner as the last step.

    Proper Application for Optimal Results

    To achieve the best results with your apple cider vinegar scalp scrub, applying it correctly and following up with proper aftercare is crucial. An accurate application not only clears away dead skin but also ensures it fits into your hair care routine smoothly.

    Sectioning and Massaging Techniques

    Divide your hair into sections:

    Before applying the scrub, begin by sectioning your hair to expose different areas of your scalp. This ensures even distribution of the scrub.

    Gently massage the scrub onto your scalp:

    Pour a small amount into your palm and use your fingertips to gently massage it onto your scalp in circular motions. This scalp massage helps to loosen dead skin and stimulate blood flow, but be sure not to use your nails as it can cause irritation.

    Remember, don’t use too much pressure for this step!

    Rinse and Aftercare

    After thoroughly massaging your scalp, it’s time to rinse out the scrub.

    Use lukewarm water to carefully wash away all traces of the scrub, ensuring that none remains on your scalp or hair. Follow with a mild shampoo and conditioner, if necessary, to remove any lingering residue and to condition your hair.

    For the shampoo step:

    Safety and Precautions

    When introducing an apple cider vinegar scalp scrub to your hair care routine, it’s important to be aware of the potential for skin sensitivity and the importance of using the scrub properly to avoid irritation.

    Understanding Skin Sensitivity and Reactions

    Your scalp is covered with skin cells that can be sensitive, just like the skin on the rest of your body.

    Before using an apple cider vinegar scalp scrub, it’s crucial to patch-test it on a small area of your scalp, even if it’s a DIY mix. Apply a small amount to a discreet area of your scalp, wait a few minutes, and rinse. If there’s no inflammation for 24-48 hours, you can proceed with using as normal.

    If you experience redness, itching, or swelling, this could indicate a sensitivity or allergy, and you should avoid using the scrub.

    While apple cider vinegar doesn’t cause any skin reactions in most people, it’s best to be on the safe side if you haven’t used it before, especially if you have a lot of skin allergies.

    Avoiding Overuse and Abrasion

    Scalp scrubs should be used with caution to prevent overuse and abrasion. The same can be said for any skin exfoliating scrub.

    Never use a skin scrub excessively.

    Remember: The goal is to remove dead skin cells and product residue without causing damage to your scalp.

    Consulting with Dermatologists or Trichologists

    If you’re unsure about introducing an apple cider vinegar scalp scrub into your hair care regimen or if you have underlying scalp conditions, consulting with a dermatologist or trichologist is a good idea.

    These professionals can assess your scalp’s health and provide guidance tailored to your needs, ensuring you use the scrub safely and effectively.

    Customizing for Different Hair Types

    When creating a DIY apple cider vinegar scalp scrub, it’s important to modify the recipe to complement your unique hair and scalp needs.

    This is exactly why we love DIYs: We pick the ingredients and concentrations entirely tailored to our exact preferences.

    Adjusting for the specific characteristics of your hair ensures the most effective and gentle cleanse.

    Adjustments for Oily or Dry Scalp

    Consideration for Color-Treated Hair

    If you have color-treated hair, you’ll want to be careful with the apple cider vinegar concentration.

    We recommend at least a 1:5 ratio of ACV to water, but a 1:10 ratio would be even better. That would equate to 1 tablespoon of ACV to 10 tablespoons of water.

    When it comes to exfoliants, if you use them at all on your color-treated hair, use milder exfoliants like jojoba beads or sugar, which can scrub away buildup without affecting your hair color.

    Tailoring to Hair Thickness and Texture

    Hair thickness and texture can also determine the composition of your scalp scrub.

    Fine or thin hair benefits from a lighter scrub that won’t weigh down strands, whereas those with thicker hair may require a more substantial mixture to fully reach the scalp.

    For coarse or curly textures, consider ingredients that will also define and nurture curls, such as argan oil, which enhances the strength and elasticity of the hair.

    Maintaining a Healthy Scalp Post-Exfoliation

    After exfoliating your scalp with an apple cider vinegar scrub, it’s crucial to nourish your scalp. The goal is to balance removing build-up while maintaining essential moisture. We’ve already covered some of this, but it’s worth diving in a bit deeper.

    Here’s how to care for your scalp following exfoliation:

    Weekly Routine for Scalp Health:

    DayRoutine
    Post-ScrubApply conditioner.
    Day 2Use gentle styling products.
    Day 3Monitor scalp moisture.
    Day 4Avoid heat styling.
    Day 5Rehydrate with a hair mask.
    Day 6Rest, no heavy products.
    Day 7Assess scalp condition.

    Diet and Hydration: Don’t forget the role of a healthy diet and ample water intake in maintaining a healthy scalp. You must drink plenty of water and consume a balanced diet rich in nutrients.

    Remember, your scalp may take some time to adjust to a new exfoliation ritual. Pay attention to how your scalp feels and adjust your routine accordingly to keep your scalp and hair looking and feeling healthy.

    Comparison to Salon Treatments

    When considering a DIY apple cider vinegar scalp scrub versus salon treatments, you are looking at two entirely different experiences.

    Cost and Convenience:

    Experience:

    Professional Expertise:

    Customization:

    Time:

    Remember, salon experiences provide the expertise of a stylist to address complex scalp issues and recommend specific treatments. For us, we don’t have a need for salon visits or stylists since we can easily do everything at home.

    All of that being stated, admittedly, a trip to a hair salon can be very enjoyable once in a while. And, if you have hair that’s more difficult to manage, professional stylists can be incredibly helpful. So, consider your own preferences, the pros and cons of either option, and see what works best for you.

    Perfecting Your Hair Care Routine with ACV Scrubs

    As we wrap up our journey through the world of apple cider vinegar scalp scrubs, it’s clear that these DIY recipes offer a customizable, cost-effective, and natural approach to hair care.

    From the basic brown sugar scrub to the invigorating mint scrub, each blend caters to different needs, ensuring that no matter your hair type, there’s a scrub that can enhance your routine. Embrace the simplicity and effectiveness of these homemade solutions, and enjoy the journey to a healthier, happier scalp.

    Apple Cider Vinegar Scalp Scrub FAQs

    What are the benefits of using apple cider vinegar in a scalp scrub?

    Apple cider vinegar’s acidic nature helps to balance the pH levels of your scalp, fostering a healthy environment for hair growth. It’s also known for its antimicrobial properties, which can combat dandruff-causing yeast overgrowth.

    How can I create a homemade scalp scrub for enhancing hair growth?

    To enhance hair growth, mix a tablespoon of apple cider vinegar with a natural exfoliant like brown sugar or ground oats for overall nourishment. Then, mix in rosemary essential oil, which has been demonstrated in studies to increase hair growth.

    Peppermint EO and tea tree are also promising EO options.

    Massage the mixture gently into your scalp to remove buildup and stimulate circulation.

    In what ways can a sea salt and apple cider vinegar scrub help with scalp health?

    Combining sea salt with apple cider vinegar creates a scrub that can exfoliate excess skin and oil buildup, providing a deep cleanse and improving overall scalp health, which is essential for healthy hair.

    What are the steps to make a DIY coffee scalp scrub, and how does it compare to apple cider vinegar scrubs?

    Mix ground coffee with a spoonful of apple cider vinegar and a carrier oil like coconut oil to create a DIY coffee scalp scrub. Coffee can enhance exfoliation, while ACV helps balance the scalp’s pH; together, they promote a clean, healthy scalp.

    How does an apple cider vinegar scalp detox contribute to reducing dandruff?

    Apple cider vinegar scalp detox involves using ACV to break down dandruff flakes and residue, thanks to its antifungal attributes. This can diminish the symptoms of dandruff over time with regular use.

    As we mentioned a few times in the post, definitely read up more on lemongrass essential oil if you’re struggling with dandruff. We included it in the DIY dandruff scrub ACV recipe for that reason (see the above post).

    Can I use apple cider vinegar in a scalp scrub for curly hair without drying it out?

    Absolutely.

    Apple cider vinegar can be mixed with moisturizing agents like honey or avocado to create a scalp scrub that won’t dry out curly hair. This can remove buildup while maintaining the necessary moisture curly hair needs.

    As mentioned earlier, limit DIY exfoliating hair scrub use to once every week or two.

  • Agave Nectar for Skin: Key Benefits and 3 DIY Recipes

    Agave Nectar for Skin: Key Benefits and 3 DIY Recipes

    Agave Nectar for Skin: Key Benefits and 3 DIY Recipes

    Agave nectar is gaining popularity as a versatile and natural skincare ingredient. Extracted from the blue agave plant, this sweet liquid is more commonly known for its role as a sugar substitute, but its benefits extend far beyond the kitchen.

    When applied topically to your skin, agave nectar can be soothing and hydrating, making it an attractive option for those looking to enrich their skincare routine with natural products. Rich in sugars like fructose, this plant-derived nectar helps to retain moisture and offers a gentle softness to your skin.

    With its naturally occurring compounds, agave nectar may help in enhancing your skin health without the harshness of synthetic ingredients. Its potential antibacterial properties contribute to a clearer complexion by fighting the bacteria that can lead to skin issues.

    Moreover, the antioxidants present in agave nectar are thought to combat free radicals, contributing to the maintenance of your skin’s elasticity and youthfulness. As more individuals seek out plant-based alternatives for skin care, agave nectar stands out as a compelling, natural choice that aligns with a holistic approach to beauty.

    A Brief Background of Agave Nextor

    Derived from the agave plant, agave nectar is a sweetener that has found its way from traditional uses to modern skincare products.

    History of Agave Usage

    Agave, specifically the blue agave plant, has been intimately connected with the cultures of Mesoamerica for thousands of years.

    The Aztecs valued it for its therapeutic properties, utilizing the sap for its healing benefits. This plant wasn’t just a source of sweetener; it held spiritual significance in that culture and played a role in traditional medicine.

    Comparing Blue Agave to Other Varieties

    While the blue agave is most famously linked to the production of tequila and for skincare purposes, its sap (agave nectar) sets it apart. The blue agave’s high fructose content distinguishes it from other varieties.

    It is richer than most and more concentrated not just in sweetness but also in the beneficial compounds your skin craves.

    When choosing an agave product, it’s crucial to discern between the blue agave plant and its counterparts to ensure you reap the intended benefits.

    Properties of Agave Nectar

    Agave nectar has gained popularity not just in the kitchen but also in the skincare realm. This section will delve into the properties of agave nectar that make it a noteworthy addition to your skincare routine, focusing on its nutritional makeup, sugar profile, and antioxidant capacity.

    Nutritional Profile

    Agave nectar is primarily composed of sugars, with fructose being the predominant.

    Additional nutrients include a number of vitamins, including B2, B6, B9, C, and K.

    Notably, vitamin C is an antioxidant that helps protect the skin from environmental damage, while vitamin K is known for its role in the body’s healing process and may help with skin elasticity and tone.

    Skin Benefits of Agave Nectar

    With its natural ability to attract and retain moisture, coupled with soothing components, agave nectar can be a pivotal ingredient in maintaining healthy and vibrant skin.

    Hydration and Moisturization

    Your skin craves hydration to stay supple and smooth. Agave nectar is a natural humectant, which means it hydrates your skin by drawing moisture from the environment.

    The high sugar content, similar to that of honey, ensures your skin retains its natural moisture, giving you refreshed, supple skin.

    • Key Component: Natural sugars
    • Benefit: Retains moisture, leaving skin supple and hydrated

    Anti-Inflammatory Properties

    If you’re dealing with redness or skin irritation, agave nectar’s anti-inflammatory qualities can help. It contains saponins, known for their soothing effects on various skin issues, including irritated skin.

    • Key Component: Saponins
    • Benefit: Reduces inflammation and soothes irritated skin

    Anti-Aging Effects

    Aging skin benefits from the rejuvenating effects of agave nectar. Packed with the vitamins mentioned earlier, agave promotes a youthful glow and minimizes the appearance of fine lines, working against common signs of aging.

    • Key Ingredient: Vitamins C and K
    • Benefit: Promotes a youthful appearance, reducing signs of aging

    Aiding in Acne and Blemishes

    The antimicrobial and antioxidant properties of agave nectar make it a strong ally in the fight against acne and blemishes. By reducing harmful bacteria on the skin’s surface, agave nectar assists in clearing and preventing acne without harsh chemicals.

    • Key Action: Antimicrobial and antioxidant activity
    • Benefit: Helps clear acne and maintain blemish-free skin

    Skin Soothing Effects

    Agave nectar can calm your skin just as effectively as it can soothe a sweet tooth. It offers comfort to stressed and irritated skin, providing a soft, soothing touch that enhances the skin’s overall texture and health.

    • Key Feature: Natural soothing agents
    • Benefit: Calms and softens irritated skin, promoting overall skin health

    By incorporating agave nectar into your skincare routine, you give your skin a chance to enjoy these natural, beneficial properties.

    Agave Nectar in Skincare Products

    Agave’s skincare applications range from homemade and DIY products to a number of professionally manufactured products designed for everyday skincare routines.

    Face Masks with Agave Nectar

    Incorporating agave nectar into your face masks can significantly enhance their hydrating and anti-inflammatory benefits.

    For instance, combining agave with aloe vera forms a potent blend that can help soothe and moisturize the skin. The natural components present in agave are especially beneficial for hydration and promoting a smooth complexion.

    Other DIY Skincare Recipes

    You can create a gentle exfoliant by adding ingredients like oatmeal and enrich the hydrating effects of your favorite DIY face exfoliator scrubs with a teaspoon of agave nectar.

    Skincare for Sensitive Skin

    If you have sensitive skin, agave nectar is a gentle alternative to harsher skincare additives.

    Its gentle and nourishing properties help to reduce irritation and support skin recovery, particularly when combined with gentle ingredients like manuka honey, aloe, and oatmeal.

    Commercial Products Containing Agave

    A variety of commercial products containing agave are available for those who prefer pre-made skincare solutions.

    Many of these formulations feature agave nectar as a key hydrating agent, complemented by other beneficial substances such as essential oils and botanical extracts that cater to a wide range of skin requirements, including those with a preference for organic skincare.

    Safety and Side Effects

    When considering the use of agave nectar for skin, it’s important to be aware of potential safety issues and side effects that might affect you.

    Dermatological Considerations

    Fresh agave nectar contains compounds that may cause skin irritation upon direct contact.

    Therefore, we do not recommend using fresh agave sap or nectar on your skin. Instead, you can purchase agave nectar online that’s gone through enough processing to reduce the likelihood of skin reactions. We prefer organic varieties as we do with most natural ingredients.

    Sensitive Skin and Patch Testing

    You should be particularly cautious if you have sensitive skin, just as with any new skincare ingredient. A patch test is recommended before the first use, especially if you have a history of plant allergies.

    Place a small amount of agave nectar on your inner forearm, cover it with a bandage, and wait for 24 hours. If you experience redness, swelling, or itching, you might have an allergy and should avoid using agave on your skin.

    3 Natural DIY Agave Skincare Recipes

    Agave nectar can be integrated into various DIY skincare recipes due to its soothing properties. For a simple home remedy, you can mix agave nectar with ingredients like turmeric or oatmeal to create a face mask that hydrates and brightens the skin. Let’s take a look at three DIY recipes below.

    1.) Agave Nectar Soothing Hydration Mask

    Indulge in a wave of moisture with this soothing hydration mask, perfect for dry or sensitive skin. Agave nectar pairs with calming colloidal oatmeal to provide deep hydration and reduce redness.

    Ingredients:

    • 1 tablespoon agave nectar
    • 2 tablespoons colloidal oatmeal
    • 1 teaspoon almond oil
    • A few drops of lavender essential oil (optional for added relaxation)

    Instructions:

    1. In a small bowl, mix the agave nectar and colloidal oatmeal until you get a smooth paste.
    2. Add the almond oil and mix well. If desired, add a few drops of lavender essential oil for its calming properties.
    3. Apply the mask to your face, avoiding the eye area. Leave it on for 15-20 minutes.
    4. Rinse off with warm water and pat your skin dry.

    2.) Blue Agave Brightening Exfoliator

    Reveal radiant skin with this gentle yet effective brightening exfoliator. Blue agave teams up with natural exfoliants to slough away dead skin cells, leaving your skin bright and refreshed.

    Ingredients:

    • 1 tablespoon blue agave nectar
    • 2 tablespoons ground brown rice or rice flour
    • 1/2 teaspoon lemon juice
    • 1 teaspoon jojoba oil

    Instructions:

    1. Combine blue agave nectar, ground brown rice, and lemon juice in a bowl.
    2. Stir in the jojoba oil to create a paste. If the mixture is too thick, add a little more agave nectar.
    3. Gently massage onto your face in circular motions for 1-2 minutes.
    4. Rinse with lukewarm water and follow up with a moisturizer.

    3.) Agave Kissed Shea Butter Lip Balm

    Pamper your pout with this nourishing lip balm, where agave nectar meets shea butter for an ultra-moisturizing experience. Perfect for chapped lips in need of some love and care.

    Ingredients:

    • 1 tablespoon shea butter
    • 1 teaspoon agave nectar
    • 1 teaspoon beeswax pellets
    • 2 drops of peppermint essential oil (optional for a cooling effect)

    Instructions:

    1. In a double boiler, gently melt the shea butter and beeswax pellets together, stirring until they are fully combined.
    2. Remove from heat and let the mixture cool for a minute before stirring in the agave nectar. If you’re using peppermint essential oil, add it now for a refreshing tingle.
    3. Once everything is well mixed, pour the liquid balm into small lip balm containers or tubes.
    4. Allow the balm to set and solidify, which may take a couple of hours at room temperature or quicker if placed in the refrigerator.
    5. Once set, apply to your lips for a smooth, hydrating experience.

    Each of these DIY skincare recipes with agave is designed to harness the natural benefits of the ingredients for radiant, healthy skin.

    Remember to do a patch test with any new skincare product, even natural ones, to ensure you don’t have a reaction before applying it to your face or lips. Enjoy crafting these natural skincare treats!

    Enhancing Agave Nectar for Skin Application

    Agave nectar can be significantly enriched through the integration of additional natural components tailored to meet your skin’s specific requirements.

    Mixing with Other Natural Additives

    If you’re seeking to amplify the efficacy of agave nectar for skincare, you can incorporate a variety of natural additives, as we did in some of the above recipes.

    • For instance, adding cinnamon can create a warming effect that enhances circulation.
    • Turmeric is renowned for its anti-inflammatory qualities, potentially diminishing the visibility of blemishes.
    • On the other hand, coffee grounds serve as an exfoliant, aiding in the removal of dead skin cells.
    • Baking soda can be included for its gentle cleansing properties, especially for use in the hair.

    Creating Custom Mixtures for Different Skin Types

    When making custom skincare mixtures, it’s crucial you select ingredients that synergize with your unique skin type.

    • For oily skin, you might find a mixture of agave nectar with a few drops of tea tree oil beneficial due to its antibacterial traits.
    • If you have dry skin, consider incorporating avocado, which is rich in fatty acids, to enhance moisturization. You can enrich the blend further with something heavier like shea butter.
    • To soothe sensitive skin, a combination of agave nectar with lavender oil can yield a calming effect. You can easily create face masks easily just by adding some ground oats or colloidal oatmeal.

    Wrap-Up: Agave and Skincare

    In the realm of natural skincare, agave nectar is a lesser-known ingredient but offers benefits for a radiant complexion.

    As we’ve explored through our DIY recipes, agave is yet another ingredient that enables you to introduce more variety in your DIY skincare creations while also elevating your skincare routine with its benefits.

    Whether it’s through a soothing mask, a brightening scrub, or a moisturizing lip balm, agave nectar’s gentle yet effective properties make it a must-try for anyone seeking to embrace the power of natural ingredients in their skincare regimen.

    As you integrate these agave-infused creations into your self-care rituals, you’re not just pampering your skin—you’re also tapping into an ancient beauty secret that has stood the test of time.

  • How to Get Blood Out of a Mattress: 7 Effective Methods

    How to Get Blood Out of a Mattress: 7 Effective Methods

    How to Get Blood Out of a Mattress: 7 Effective Methods

    When dealing with a blood stain on your mattress, it’s crucial to act promptly to prevent the stain from setting in. Blood is a protein stain, and these types of stains can be quite stubborn once they’ve dried.

    Fortunately, there are several methods you can use to remove blood effectively, reducing the likelihood that your mattress will bear a permanent mark. We’ll dive into those in depth in this post, but let’s cover a few highlights first.

    • Cold water can be your first go-to solution, as it helps to dissolve fresh blood.
    • Avoid hot water as it can cause the blood proteins to coagulate and bind to the fabric, making the stain more difficult to remove.
    • If the blood has already dried, advanced treatments, such as using salt or baking soda, enzymatic cleaners, or hydrogen peroxide, may be necessary. Each of these solutions can break down the blood cells and lift the stain from the mattress fibers.

    Additionally, proper technique is critical when cleaning blood stains. Dabbing rather than scrubbing prevents the stain from spreading. Always use gentle motions and give the cleaning agents enough time to work before you blot them away.

    We know how difficult it can be to remove blood stains from fabric. We also know what it’s like to find out a child’s nose was bleeding, only to wonder how in the world we were going to clean everything in a way that would prevent stains.

    Patience and careful application of the methods in this guide will ensure you’re prepared to clean in a way that prevents stains.

    Immediate Steps to Take for Blood Stains

    When you’re faced with a blood stain on your mattress, acting quickly is crucial. The following steps will guide you through assessing the situation, gathering the necessary supplies, and starting the cleaning process effectively.

    Assessing the Blood Stain

    First, identify whether the blood stain is fresh and review the area to ensure you have a good idea of the size of the area to be cleaned. You don’t want to clean one area only to find out you missed another once the stain’s already set in.

    Fresh blood stains are easier to clean since you can prevent staining with a few simple and quick steps. Old blood stains are more difficult to remove, but not impossible.

    Gathering Necessary Supplies

    To deal with a blood stain, you will need to start with cold water (to help break down the fresh blood), paper towels or clean cloths (for blotting the stain), and a gentle detergent or stain remover in case the stain has set into the fabric.

    We’ll cover a number of techniques and household items you can use as stain removers and preventers in a section below.

    Initial Cleaning Approach

    Begin by dabbing the stain with a paper towel soaked in cold water—never rub, as this can push the blood deeper into the mattress and spread the blood to the surrounding clean fabric.

    The goal: As soon as possible, prevent the blood from drying.

    Continue to blot the area, applying more cold water as needed until you have seen a reduction in the appearance of the stain. By this point, you’ve removed excess blood from the fabric, drastically decreasing the likelihood of heavy staining.

    If the blood has not completely come out, proceed to treat the stain with a chosen cleaner (more on that below). In the meantime, keep the area wet and do not allow it to dry.

    7 Blood Stain Removal Techniques

    In case you didn’t know, you may have access to a number of powerful stain-cleaning household products all over your house. From salt to hydrogen peroxide, baking soda, and more, many common household items are effective stain cleaners.

    We’ll cover a number of possible options to ensure you’re equipped to battle blood stains with the items you already have.

    1.) Using Salt and Cold Water

    To treat a fresh blood stain, mix 2 teaspoons of salt with 1 cup of cold water. Pour the solution into a spray bottle and liberally apply it to the stained area.

    Blot with a clean, dry cloth to absorb as much liquid as possible, and repeat this process until the blood has been removed. The idea here is to dilute the stain, prevent it from binding by adding salt, and then absorb as much of it as possible with a dry cloth.

    The idea is to pull the stain out of the mattress.

    This salt and cold water method is most often effective on recent stains.

    2.) Applying Hydrogen Peroxide

    For more stubborn stains, hydrogen peroxide can be a powerful oxidizing agent. You can use this method for wet or dry blood stains.

    Spray or dab 3% hydrogen peroxide onto the stained area. In case you didn’t know, the most common hydrogen peroxide solution you’ll find in most stores in the notorious brown bottle is 3%. So, if you ever bought hydrogen peroxide, that’s likely what you have.

    • Spray or dab a small amount of peroxide directly onto the stain and allow it to fizz.
    • Hydrogen peroxide has a bleaching effect, which helps to prevent staining.
    • Fizzing will help to prevent stains from binding to the surface of the mattress.
    • If you have a dark mattress, you may want to test in a small area first since peroxide may bleach darker fabrics.

    The fizzing chemical reaction between the hydrogen peroxide and an enzyme called catalase in our blood will produce water as a byproduct. So, once the fizzing reaction is complete, lightly blot the area with a clean cloth to pull the stain out of the fabric.

    Repeat as necessary until the stain has been removed.

    3.) Baking Soda and Detergent Paste, Finished with Vinegar

    1. Mix 1 tablespoon of baking soda and 1-2 drops of dish soap (Dawn or DIY dish soap is preferred) with water to create a thick, soapy paste.
    2. Generously apply the paste to the area that needs to be cleaned and allow it to soak for 10 minutes.
    3. Pour or spray white vinegar onto the area and vigorously scrub with a cleaning brush or toothbrush while it’s fizzing.

    The breaking down of the stain happens in step two; then, in step three above, the vinegar reaction causes fizzing while also neutralizing the base baking soda and dish soap ingredients. The fizzing will help to lift away the stains as you scrub them out of the fabric.

    As you scrub the area, feel free to spray more vinegar or sprinkle more baking soda to keep the reaction going. Once the stain has been removed, spray the area with plain cold water and dab away any excess residue.

    4.) Utilizing Enzyme Cleaner

    An enzyme cleaner can break down proteins in the blood. Apply according to the product instructions, typically letting it sit for a period before blotting away. It’s especially effective for dried blood and can prevent the stain from setting.

    5.) White Vinegar

    We already included this household item in method three above, but vinegar is also a great stain remover when used by itself due to its high acidity.

    All you’ll need to do is saturate the area with white vinegar, allow it to soak for 10-15 minutes, then sprinkle on baking soda and start scrubbing. Spray or pour a small amount of additional vinegar as needed while scrubbing until the stain is completely removed.

    6.) Meat Tenderizer

    Enzyme-based (bromelain or papin) meat tenderizer is a great stain remover and works by breaking down the proteins in the blood that make it difficult to clean from fabric.

    Create a paste of cold water and meat tenderizer, apply it to the stain, then allow it to soak for 1 hour. After that, scrub the stain away using a scrubbing brush or a toothbrush. Alternate between scrubbing and spraying additional water until the stain is completely removed.

    Once the stain has been visibly removed, use water and dab dry to remove any additional tenderizer residue.

    7.) Oxygen Bleach

    Unlike chlorine bleach, oxygen bleach is color-safe and less harsh, making it suitable for a variety of fabrics, including mattress covers. One example of oxygen bleach is OxyClean.

    To use oxygen bleach, do the following:

    1. Dissolve some of the powder in cold water according to the package instructions.
    2. Apply the solution directly onto the blood stain, ensuring it’s fully saturated.
    3. Allow the solution to work on the stain for at least one hour, or for stubborn stains, let it sit for several hours or even overnight.
    4. After the stain has been treated, scrub and blot the area with a clean cloth to absorb oxygen bleach residue.
    5. Finally, rinse the spot with cold water and blot dry.

    Oxygen bleach is particularly effective at breaking down and removing organic stains like blood without damaging the mattress fabric.

    Guidelines for Caring for Different Mattress Types

    When maintaining your mattress’s cleanliness, it’s crucial to tailor your approach to the specific type of mattress you own. Each material has unique properties that require particular care, especially when removing stains like blood.

    Memory Foam Mattress Care

    Memory foam mattresses demand careful handling due to their absorbent nature. Additionally, they can be quite fragile if you’re trying to clean the foam directly. It’s not recommended to scrub memory foam directly; rather, just clean the mattress cover that came with it or any fabric covering it that may be stained.

    For blood stain removal, gently dab the area with a mixture of water and mild detergent, avoiding wetting the mattress too much. It’s important to let the surface dry completely since memory foam can trap moisture, leading to mold and mildew.

    Allow the mattress to air dry before putting the linens back on.

    Cleaning a Conventional Mattress

    Conventional mattresses, typically featuring innerspring construction, are less prone to retaining moisture than memory foam mattresses yet require caution.

    Use cold water, the methods we discussed earlier, or an enzyme-based cleaner solution for treating blood stains. Blot the stain instead of rubbing when possible to prevent the blood from penetrating deeper into the fibers.

    For larger or more densely stained fabrics, you can use the previously mentioned scrubbing techniques and cleaning methods.

    Handling an Air Mattress

    Air mattresses are usually coated with a waterproof material, which makes cleaning a lot simpler.

    In case of a small blood stain, gently wipe the area using a cloth soaked in soapy water. Rinse with a clean, damp cloth, and dry thoroughly to prevent any damage to the material.

    For heavier stains, use the cleaning and scrubbing methods mentioned previously, ensuring that you thoroughly rinse all cleaning solutions before blotting dry.

    Safeguarding a Latex Mattress

    Latex mattresses are resilient to many forms of wear and tear but should be treated with attention during cleaning.

    For blood stains, a gentle cleaner is preferred. Apply the solution to the stain, gently blot, and allow the mattress to air dry out of direct sunlight, as UV rays can degrade the latex quality.

    Protective Measures and Prevention

    Investing in preventative measures and maintaining a regular cleaning regimen are both essential to safeguarding your mattress from unwanted stains, including blood.

    By employing the right protectors and bedding, coupled with consistent upkeep, you can extend the longevity and hygiene of your mattress.

    Using Mattress Protectors

    Mattress protectors are an indispensable first line of defense against spills and stains.

    A waterproof mattress protector not only shields your mattress from blood but also other bodily fluids and potential allergens. It’s a simple addition that can be easily washed and replaced, ensuring any accidents don’t penetrate the surface of your mattress.

    We know that for children, mattress covers are extremely useful. So, if you purchase a brand-new bed for your little one, be sure to get a mattress cover too.

    Choosing the Right Bedding

    Selecting the right bedding contributes significantly to preventing stains.

    While silk sheets add a layer of luxury, they require delicate handling and are not the best at hiding stains. Instead, opt for high-quality cotton or moisture-wicking fabrics, which are easier to clean and more resilient against stains.

    Regular change and washing of bedsheets will also minimize the presence of impurities that might eventually lead to stains.

    Aftercare and Maintenance

    Proper aftercare of your mattress after cleaning can extend its life and maintain a fresh sleeping environment.

    Attention to regular maintenance tasks such as vacuuming and deodorizing, handling future spills promptly, and ensuring good ventilation post-cleaning will make a significant difference.

    Vacuuming the Mattress

    Regularly vacuuming your mattress is crucial in keeping it free from dust and allergens.

    You should use the upholstery attachment of your vacuum to go over the entire surface of the mattress thoroughly. This is especially important following a deep clean to remove any residual particles.

    Deodorizing with Baking Soda

    To naturally eliminate odors, sprinkle baking soda liberally over your mattress after cleaning it. Let it sit for a few hours to absorb any lingering smells, then vacuum off the baking soda completely.

    Even better, add a few drops of essential oil to your baking soda and sprinkle it on the mattress before vacuuming it away.

    This simple method helps to keep your mattress smelling fresh.

    Spot Cleaning Future Spills

    When dealing with future spills, it’s important to act quickly.

    Blot any liquid with a clean, dry towel and apply a small amount of cleaning solution suitable for your mattress.

    Always follow up by blotting with a damp cloth and then drying the area thoroughly to avoid mildew.

    Ensuring Adequate Ventilation

    Maintain a comfortable room temperature and proper ventilation to help air out your mattress and prevent moisture buildup.

    Occasional airing out on a sunny day can also freshen up the mattress and help keep it dry, contributing to its longevity.

    Use a mattress pad or mattress cover as a protective barrier to enhance the clean condition of your mattress.

    How to Get Blood Out of a Mattress FAQs

    What methods are effective for removing dried blood stains from a mattress?

    For dried blood stains from things like nosebleeds or period blood, it’s important to soften the stain first.

    You can apply a paste made from water and a meat tenderizer, a mixture of salt and water, or even hydrogen peroxide to address the stain. For more info on cleaning methods, see the earlier list of 7 effective methods for cleaning blood stains from mattresses.

    Once you’ve applied the solution, gently dab the area with a clean cloth and rinse with cold water.

    Is it possible to eliminate period blood stains or dried blood from a mattress, and if so, how?

    Yes, you can remove period blood stains from a mattress by using cold water and any of the methods mentioned earlier.

    Apply the solution to the stain, then blot with a clean cloth.

    If the stain persists, consider using an enzyme cleaner, which is designed to break down protein-based stains. Remember to always spot-test a small area of your mattress first to prevent unwanted damage.

    Can dried blood be removed from an air mattress, and what techniques should be used?

    Dried blood on an air mattress can be treated with a mix of cold water and a gentle detergent.

    Apply this with a cloth and blot the area gently. If required, you can also use a mild enzyme cleaner. Scrubbing is okay, but be gentle to avoid damaging the outer material of your air mattress.

    What alternatives exist for getting blood out of a mattress without using hydrogen peroxide?

    If you prefer not to use hydrogen peroxide, you can create a mixture of cold water, baking soda, and dish soap to form a paste.

    Apply this to the stain and let it dry before scraping it away. Some also suggest adding cornstarch to make a paste, but we don’t see any benefit to that, and it just makes things messier.

    You could also use lemon juice or white vinegar, which act as natural bleaches due to their acidity, to lighten the stain. Then, rinse away the solution and dab dry with a clean absorbent cloth.

    How can one remove blood stains from a mattress using household items like baking soda?

    Baking soda is effective for removing blood stains. Sprinkle a generous amount over the stain, add a bit of cold water to create a paste, and wait for it to dry.

    After that, you can spray or pour on a bit of white vinegar. This will lift the blood out of the mattress.

    Finally, rinse and dry.

    In what ways can blood be extracted from bed sheets without damaging the fabric?

    To remove blood from bed sheets, soak them in cold water as quickly as possible, removing, rubbing some Dawn dish soap or vinegar into the soiled fabric, and allowing that to sit for 5-10 minutes. Finally, you can launder them on the cold water setting using your regular detergent.

    Always avoid hot water, as it can set the blood stain in the fabric.

  • Benefits of Natural Cleaning Products: Guide + 7 DIY Recipes

    Benefits of Natural Cleaning Products: Guide + 7 DIY Recipes

    Benefits of Natural Cleaning Products: Guide + 7 DIY Recipes

    Switching to natural cleaning products can bolster your home’s safety and contribute positively to environmental health.

    These eco-friendly alternatives are crafted from substances that you can confidently use without exposing yourself and your family to harsh chemicals. Reducing your family’s exposure is more than just a practical choice. It’s a lifestyle decision.

    • Using green cleaning products minimizes your indoor exposure to pollutants that can be as harmful as outdoor pollutants.
    • By avoiding synthetic fragrances and chemicals commonly found in traditional cleaners, you can reduce the risk of allergic reactions and the onset of asthma, which are concerns often linked to volatile organic compounds (VOCs).
    • These improvements in your indoor air quality can make a noticeable difference to your well-being.

    Moreover, these environmentally friendly cleansers support sustainable practices, from the responsible sourcing of ingredients to the use of biodegradable packaging. Even better, when making your own DIY cleaning products, you can reuse containers to avoid overall household waste.

    The Importance of Choosing Green Cleaning Products

    When you opt for green cleaning products, you’re making a decision that benefits the world you live in. While we think many aspects of the “green movement” are overblown, largely political, and driven by greed in many cases, we do believe we should be good stewards of what we’re given.

    That includes our world, bodies, families, finances, etc. If we can implement a few easy changes to reduce waste in our local communities and use wholesome natural ingredients in our homes, why wouldn’t we?

    Natural and DIY cleaning products are a simple decision that ensures good stewardship.

    Positive Environmental Impacts

    Biodegradability: Green cleaning products are often crafted to be more biodegradable than traditional cleaners. They break down more easily once they enter the environment, reducing pollution and the impact on wildlife.

    Cleaner Manufacturing: The ingredients in many natural cleaners, such as essential oils, are sourced more sustainably with less waste and chemical byproducts.

    Benefits for Personal Health

    Non-Toxic Ingredients: Green cleaners are typically free from harsh chemicals. This means that by using them, you’re less likely to experience skin irritation or other adverse health reactions.

    Reduced Chemical Exposure: The EWG and other health advocates note that many conventional cleaners contain substances that can be toxic if ingested or inhaled. Additionally, some chemicals can leech into the skin when you’re in regular contact with them.

    By choosing natural cleaners, you’re minimizing your exposure to potentially hazardous compounds.

    Advantages for Indoor Air Quality

    Lower VOC Levels: Products approved by the Environmental Protection Agency (EPA) for green cleaning often contain lower levels of volatile organic compounds (VOCs), which can improve your indoor air quality.

    Allergy and Asthma Friendly: Without the irritation caused by VOCs, individuals suffering from allergies or asthma could see an improvement in symptoms, making green products a smarter choice for those with respiratory sensitivities.

    Understanding Natural Ingredients: Common Cleaners

    When you choose to clean with natural products, you’re leveraging the power of ingredients that have been used for generations. These components are not only environmentally friendly but also highly effective against a variety of household dirt and grime.

    Some of the most versatile and commonly used natural cleaners include baking soda, vinegar, lemon, essential oils, and salt.

    Baking Soda

    This common household item is a natural and effective abrasive.

    Known for its mild abrasive properties and ability to neutralize odors, baking soda is excellent for scrubbing surfaces without scratching them. It’s especially useful for cleaning ovens, tile grout, and deodorizing.

    Vinegar:

    A natural cleaner, descaler, and deodorizer due to its high acidity of 2-3 on the pH scale.

    • Due to these acidic properties, it can dissolve mineral deposits and soap scum. In addition to that, it can also break down stains and odors on varied surfaces.
    • When mixed with rubbing alcohol, it creates a terrific evaporating glass cleaner. When mixed with dish soap, it cuts through almost anything.

    These characteristics make it one of the most commonly used natural household cleaning ingredients in DIY cleaner recipes..

    Lemon

    Ideal for deodorizing and cutting through grease.

    Lemons are natural deodorizers and have antibacterial properties due to their acidic nature. Additionally, lemon juice is a great deodorizer and can easily be added to homemade natural cleaners for that purpose.

    Essential Oils

    Essential oils like lemon, tea tree, and lavender have natural antibacterial, antimicrobial, and antiseptic properties that make them great natural ingredients for cleaning products.

    • Tea Tree Oil: Known for its antimicrobial properties.
    • Eucalyptus Oil: Often used for its antiviral capabilities.
    • Lavender Oil: Favoured for its scent and mild disinfecting properties.

    They can be added to solutions containing baking soda, vinegar, or castile soap for enhanced cleaning and aromatic benefits.

    Using essential oils for household cleaning is a safe and effective way to disinfect surfaces without exposing yourself and your family to the harsh chemicals found in many conventional cleaners.

    Salt

    Due to its abrasive nature, it can serve as a great additive for scrubbing and scoring tasks on durable surfaces. For example, we regularly use salt to clean our cast-iron skillets. Never use soap on a cast-iron skillet!

    Myth vs. Fact: Mixing Baking Soda and Vinegar

    When baking soda and vinegar are mixed, they create a chemical reaction that forms carbonic acid. This solution quickly turns into carbon dioxide and water, resulting in a fizzing action that may help dislodge dirt, making it useful for tasks like unclogging drains.

    For most cleaning purposes, this mixture is not recommended.

    Here’s why:

    The reaction between vinegar (an acid) and baking soda (a base) neutralizes their individual pH levels. As a result, their unique cleaning properties are diminished, rendering the combination no more effective than using plain water for cleaning.

    While baking soda and vinegar are effective on their own, they should generally not be combined for cleaning. If you do mix them, it’s best to do so after the area has been cleaned with one or the other, using the reaction to remove any loosened dirt or residue as a final step.

    Health and Safety Considerations

    When you opt for natural cleaning products, you’re choosing to protect your health and the safety of your family.

    From reducing exposure to toxic chemicals to safeguarding sensitive skin, the benefits are clear for everyone in your home, especially those with heightened vulnerabilities, like children and pets.

    Avoiding Toxic Chemicals

    Many conventional cleaning products contain toxic chemicals that can pose health risks. For example, phthalates—often found in fragranced products—can disrupt hormones, while formaldehyde can irritate the eyes, nose, and throat.

    ChemicalFound InHealth Concerns
    FormaldehydeDisinfectants, general cleanersCarcinogen (EWG), respiratory irritation
    PhthalatesFragrances, air freshenersHormone disruption, developmental issues
    Quaternary ammonium compounds (QUATS)Disinfectants, antibacterial cleanersAsthma, skin irritation
    SulfatesDetergents, soapsSkin irritation
    Glycol ethersAll-purpose cleaners, glass cleanersReproductive toxicity
    ChlorineBleach, disinfectantsRespiratory irritation, asthma
    AmmoniaGlass cleaners, general cleanersRespiratory irritation, asthma
    TriclosanAntibacterial soaps, hand soapsHormone disruption, antibiotic resistance
    2-butoxyethanolAll-purpose cleaners, glass cleanersBlood disorders
    ParabensAir fresheners, antimicrobial cleanersHormone disruption

    Choosing products containing mostly or exclusively natural ingredients will prevent exposure to the above chemicals.

    Protecting Sensitive Skin and Allergies

    If you or your family members suffer from sensitive skin or allergies, like our family, natural cleaning products can be a game-changer.

    Some conventional cleaners contain ingredients that may irritate the skin or exacerbate allergy symptoms. For safer cleaning, consider using products free from irritants like chlorine bleach, prioritizing those specifically designed for sensitive skin.

    Again, we prefer just making our own cleaning products. It’s so much cheaper, and we know exactly what’s in them that way.

    Safety Around Children and Pets

    In homes with babies, young children, or pets, the stakes are even higher when it comes to the safety of cleaning products.

    Little ones and animals are often in close contact with surfaces and may ingest harmful chemicals during normal play. Also, always remember to store your cleaning products safely, even if they are natural.

    By using natural cleaning products, you reduce the risk of accidental poisoning or harm, contributing to a safer home environment for your most vulnerable loved ones.

    Practical Cleaning Applications

    Natural cleaning products can effectively maintain your home’s cleanliness without harsh chemicals.

    The key to success lies in understanding how to harness the potency of items like vinegar and baking soda to tackle different cleaning tasks in the kitchen, bathroom, and laundry. Let’s dive into that a bit deeper below.

    Kitchen Cleaning Solutions

    The list of cleaning opportunities in the kitchen is endless, as you’re probably already aware. We have a big family, so we know what it’s like to walk into a kitchen that’s in need of serious cleaning.

    For kitchen countertops and sinks, simply create your own multi-surface cleaner by mixing equal parts water and vinegar in a spray bottle. Use essential oils to repel pests, add fragrances, or even kill bacteria.

    For Stoves and Griddles:

    Spray your multi-purpose cleaning solution and wipe clean to remove daily grime. To combat tougher spots like a dirty stove, sprinkle baking soda and allow it to sit before scrubbing. This combination provides a powerful clean without any toxins.

    If you’re curious about how to clean a griddle or Blackstone griddle, we recently wrote a post about that, which you can read here:

    How to Clean a Blackstone Griddle in 7 Minutes

    For Floors:

    • Mix 1/2 cup of vinegar in a bucket of warm water, offering a natural floor cleaner that’s safe for use on most surfaces.
    • Add a few drops of essential oil for a pleasant scent.

    Bathroom Cleaning Techniques

    Tile Grout Cleaning

    Soap scum and hard water stains on shower doors and tiles can be handled well with baking soda. Simply make a paste with baking soda and water.

    For extra tough jobs, add equal amounts of dish soap and water, then enough baking soda to make a paste.

    Toilet Bown Cleaning

    When it comes to cleaning the toilet, toilet cleaners should be acidic in nature. There are many recipes online about mixing vinegar and baking soda to make a toilet cleaner. Do not mix baking soda and vinegar to clean!

    As we mentioned earlier, baking soda and vinegar neutralize each other, eliminating their cleaning qualities if they had simply been used individually.

    How to clean a toilet bowl naturally and effectively:

    1. Add 1 cup of white vinegar to a spray bottle with 20-30 drops of your favorite essential oils
    2. Spray inside the toilet bowl and allow the vinegar to soak in for 5-10 minutes. This will give the acid a chance to break down stains.
    3. Spray the inside of the bowl again and finish by dusting the bowl with a bit of baking soda.
    4. Scrub away any stains with a toilet brush.

    With the above method, since the vinegar has had a chance to work without being neutralized by the baking soda, the stains should easily lift away. We add baking soda last so that the chemical fizzing reaction can help lift away the stains that have already been broken down in earlier steps.

    Laundry and Fabric Care

    Switching to green cleaning products like homemade laundry detergent can also yield positive results.

    Combine washing soda, natural soap, and borax to create a detergent that’s both effective and environmentally friendly. Hard water stains on fabrics might require a specific natural cleaner like salt or baking soda.

    For the freshest clothes:

    • Add 1/2 cup of vinegar during the rinse cycle as a natural fabric softener and deodorizer.
    • For tough stains on fabric, make a paste with baking soda, dab it on the stain, and let it sit before washing.

    Relying on simple, natural ingredients in your cleaning routine can lead to a healthier home and environment.

    Eco-Friendly Practices and Products

    When considering the switch to nontoxic and eco-friendly cleaning, it’s important to focus on product choice, certifications, and underlying ingredients.

    Of course, if you’re making your own DIY products, it’s also important to consider potential reactions between ingredients, as well as the quality of those ingredients.

    Choosing the Right Eco-Friendly Products

    Your choice of cleaning products can significantly affect your health and the environment. Opting for green cleaning products means selecting items that typically use biodegradable, non-toxic ingredients and are less harmful to aquatic life after going down the drain.

    Brands like Eco-Me and Branch Basics set themselves apart by offering concentrated formulas.

    Certifications and Labels as Guides

    Navigating the world of eco-friendly products is made easier by reputable certifications.

    • Look for the EPA Safer Choice label, which indicates products with ingredients that have gone through a testing process to determine their safety.
    • Products that are EWG Verified meet some of the most rigorous chemical safety standards.

    Again, we recommend simply making your own products or choosing products that only contain natural ingredients.

    7 Natural DIY Cleaning Recipes for Around the House

    Creating homemade cleaning products is so easy, and you can get started with many of the below recipes with items that are already lying around the house.

    1.) All-Purpose Cleaner

    • Ingredients: Mix equal parts of water and distilled white vinegar in a spray bottle.
    • Use: Suitable for most surfaces except granite or marble.

    2.) Scouring Paste

    • Ingredients: Combine baking soda with enough water to form a paste. Add dish soap for tough stains and residue.
    • Use: Effective for scrubbing tiles and grout, removing tough stains without scratching surfaces.

    3.) Disinfecting Spray

    • Ingredients: Mix together equal parts of water and hydrogen peroxide.
    • Use: Ideal for sanitizing surfaces, but test fabrics for colorfastness first.

    4.) Glass Cleaner

    • Ingredients: Mix together 1 part white vinegar and 1 part isopropyl alcohol in a spray bottle.
    • Use: Great for getting streak-free shine on windows, mirrors, and glass surfaces.

    5.) Wood Polish:

    • Ingredients: Mix together 1 part olive oil and 1 part lemon juice.
    • Use: Polishes wood furniture and surfaces naturally.

    6.) Oven Cleaner

    • Ingredients: Make a paste with baking soda, salt, and water. Spread on oven surfaces and let sit overnight before scrubbing.
    • Use: Removes baked-on grime from oven walls.

    7.) Drain Opener

    • Ingredients: Pour 1/2 cup baking soda down the drain, followed by 1/2 cup vinegar. Cover and let sit 15 minutes, then rinse with hot water.
    • Use: Clears clogged drains naturally.

    For any of the above simple recipes, add essential oils for even more of the benefits mentioned earlier in this post, the fragrance being one huge benefit.

    Benefits of Natural Cleaning Products FAQs

    What advantages do bio-based cleaning products offer for indoor air quality?

    Bio-based cleaning products typically contain fewer volatile organic compounds (VOCs), which can improve your indoor air quality.

    By reducing the presence of toxic fumes, they help maintain a cleaner and healthier air environment in your home.

    How do eco-friendly cleaning products impact the overall environment compared to traditional cleaners?

    Eco-friendly cleaning products often use biodegradable ingredients that minimize environmental pollution. These alternatives have a lower ecological impact as they break down more quickly and do not introduce harmful chemicals into ecosystems.

    What are the safety benefits of using non-toxic cleaning products in household and commercial settings?

    Non-toxic cleaning products reduce the risk of chemical burns and poisonings, making them a safer option for both homes and workplaces.

    They particularly offer a safer environment for children, pets, and individuals with chemical sensitivities.

    What distinguishes green cleaning products for commercial use from regular cleaning products in terms of efficacy?

    Green cleaning products for commercial use are formulated to meet rigorous safety and performance standards while still ensuring efficacy.

    They effectively clean without leaving behind harmful residues, which is crucial in settings such as restaurants, hospitals, and schools.

    How can using natural cleaning products contribute to a healthier home or workplace?

    Using natural cleaning products helps limit your exposure to harsh chemicals, which can contribute to health issues such as respiratory problems and skin irritation.

    Their use promotes a healthier living and working environment. DIY or homemade cleaning products are even better since you’ll know the ingredients and have the flexibility to tailor them to your cleaning needs.

    In what ways are biodegradable cleaning products more beneficial for waste management and water quality?

    Biodegradable cleaning products are formulated to break down more easily in the environment, which supports proper waste management and protects water quality.

    They help in reducing pollution and conserving aquatic ecosystems.

  • 13+ Uses for Epsom Salt: Practical Tips and DIY Recipes

    13+ Uses for Epsom Salt: Practical Tips and DIY Recipes

    13+ Uses for Epsom Salt: Practical Tips and DIY Recipes

    Epsom salt, a crystalline substance rich in magnesium and sulfate, has been a trusted household staple for generations. Its uses extend far beyond the commonly known post-workout soak.

    We’ve used Epsom salt in our family for many applications, including to relax muscles after a strenuous day. But it’s also a key ingredient in homemade bath bombs and bath powder.

    • Discover the versatility of Epsom salt in your daily life, from enhancing your garden’s vitality to elevating your personal care routine.
    • Whether mixed into a soothing bath, applied as an exfoliant, or utilized to boost plant growth, Epsom salt can be an affordable, multi-purpose mineral compound that may help in addressing a wide array of tasks around your home.

    Unlock the potential of Epsom salt and explore its myriad of common everyday uses and applications.

    Epsom Salt: What is It?

    It’s a substance with specific chemical properties and a rich historical context that spans centuries.

    Chemical Composition

    • Epsom salt is a mineral compound comprised of magnesium, sulfur, and oxygen, with the chemical formula MgSO₄·7H₂O.
    • Its composition is unique because it forms hydrated magnesium sulfate crystals.
    • When Epsom salt dissolves in water, it releases magnesium and sulfate ions, which can be absorbed through the skin.

    When absorbed, it can provide notable benefits such as relaxation of muscles and reduction of inflammation.

    Historical Background

    The discovery of Epsom salt dates back to the 17th century in Epsom, England.

    The water of a particular spring in the area was found to possess healing properties due to the presence of bitter-tasting magnesium sulfate.

    Over time, Epsom salt has become a widely used substance, both for its health benefits and its utility in garden care, by leveraging the benefits of sulfur and magnesium for plant growth.

    13+ Uses and Benefits of Epsom Salt

    Now that we know what Epsom salt is and a bit about its history let’s dive into a multitude of uses and applications of this amazingly cheap and common household item.

    Muscle Soreness and Exercise Recovery

    Epsom salt baths are a popular recovery method for athletes and those seeking natural remedies. The magnesium ions in the bath promote muscle relaxation and aid in exercise recovery.

    Soaking in an Epsom salt bath can help relieve sore muscles after strenuous workouts by facilitating quicker muscle recuperation.

    This makes it a beneficial addition to many high-performance athletes’ post-exercise routines, allowing them to combat fatigue and recover faster.

    • Soak Method: Dissolve 2 cups of Epsom salt in warm bathwater and soak for at least 15 minutes.
    • Compress Method: A concentrated solution on a cloth can be applied directly to sore muscles for localized relief.

    Soothing Bruises and Sprains

    Epsom salt can help reduce swelling and alleviate pain. Applying it as a compress or in a soak can speed up your body’s natural recovery process.

    • Direct Compress: Mix 2 tablespoons of Epsom salt with a cup of cold water, soak a compress, and apply to the bruised area.
    • Soothing Soak: For sprains, soak the affected area in a basin of warm Epsom salt water to relieve discomfort and decrease inflammation.

    Non-Exercise-Related Aches and Pains

    If you’re experiencing chronic aches, pains, or inflammation unrelated to exercise, an Epsom salt soak may alleviate discomfort.

    The magnesium in the salt can help to relax muscle aches and reduce swelling, contributing to recovery from muscle pain, and some sources suggest even aiding in inflammation-related conditions.

    Stress and Relaxation

    Epsom salt baths can significantly contribute to your relaxation and stress relief routine. Immersing yourself in a bath with Epsom salt helps soothe your body, potentially easing the mental and physical symptoms of stress.

    When combined with the aromatherapy effects of essential oils, these effects are even more prominent.

    Skin Exfoliation

    Epsom salt is a gentle exfoliant that can make your skin feel softer and cleaner. Its granular texture gently removes dead skin cells, which may help clarify your skin’s texture and reduce the appearance of acne.

    Exfoliation is only one of the many cosmetic uses of Epsom salt.

    • Facial Scrub: Mix half a teaspoon of Epsom salt with your facial cleanser for a skin-smoothing scrub.
    • Exfoliation: Combine Epsom salt with an emollient like coconut oil for a whole-body exfoliator, focusing on rough patches such as elbows and knees. Lightly and gently rub the mixture over rough areas, then finish with a warm bath, rinse, and apply moisturizer.

    Hair Care

    In hair care, Epsom salt can contribute to removing product buildup and improving hair texture, giving your hair more volume.

    • Hair Volume: Use equal parts conditioner and Epsom salt, apply to your hair, let it sit for 20 minutes, then rinse to add volume.
    • Remove Hairspray: A solution containing Epsom salt, lemon juice, and water can help to effectively remove hairspray residue from your hair.

    Constipation

    Internally, Epsom salt has been used as a laxative due to its magnesium sulfate content. When used for this purpose, medical professionals advise against using it for long-term use. Instead, improving gut health through diet and other means is recommended.

    It’s imperative to follow medical advice when using Epsom salt for internal health, as improper use could have adverse effects. As always, check with your healthcare professional first.

    Tile and Grout Cleaner

    You can create a scrubbing paste with Epsom salt by mixing it in an equal ratio with liquid dish detergent.

    This paste can then be used to tackle tough stains on tile and grout. Apply the mixture onto the tile, allow it to soak in for a few minutes, then scrub away and rinse.

    Anti-Microbial Hand Soap

    Epsom salt can also be used in homemade hand washes to aid in removing dirt and bacteria, ensuring your hands are clean without the harshness of chemical soaps. We’ll provide a recipe for this in the section below!

    Gardening Applications

    Epsom salt plays a critical role in the garden, especially for plants that like higher levels of magnesium.

    When it comes to soil, it works as a natural soil amendment that can enhance the nutrient uptake of plants. The magnesium helps seeds germinate better and improves chlorophyll production, leading to more lush green leaves.

    • For roses, Epsom salt can encourage stronger growth and more vibrant blooms. Simply sprinkle a tablespoon around the base of rose bushes once a month before watering.
    • Peppers and tomatoes also benefit from Epsom salt. Using it as a foliar spray or a soil additive can result in larger, tastier yields. Adding one tablespoon per foot of plant height to the soil around these plants once per month can make a significant difference.
    • Slugs can be a nuisance, but a light sprinkling of Epsom salt where these pests tread can help deter them without using harsh chemicals.

    By incorporating Epsom salt into your home cleaning regime and gardening practices, you’ll leverage a natural and effective product to maintain cleanliness and promote plant health.

    A Guide to Epsom Salt in Bathing and Skincare

    As mentioned above, Epsom salt baths are a well-established remedy for soothing sore muscles and promoting relaxation. When dissolved in warm water, Epsom salt quickly dissolves to provide its benefits.

    Preparing an Epsom Salt Bath

    To experience the benefits of an Epsom salt bath, start by filling your bathtub with warm water. It’s ideal to use a temperature that is comfortable to touch without causing any discomfort.

    • Fill the Tub: Aim for a warm bath that’s not overly hot to prevent skin irritation.
    • Measure Epsom Salt: Generally, you can add about 2 cups of Epsom salt to a standard-sized bathtub filled with approximately 40 gallons of water.
    • Dissolve Completely: Stir the bathwater until the Epsom salt is fully dissolved in water, ensuring an even distribution.

    Optional: Add a relaxing essential oil like patchouli, palmarosa, lavender, or jasmine for a more therapeutic bathing experience.

    Take some time, kick back, close your eyes, and let the stress melt away.

    Safety and Precautions

    While Epsom salt baths are generally safe, there are some precautions you should keep in mind to maintain safety:

    • Check With a Physician: If you have preexisting conditions, consult your healthcare provider before using Epsom salt.
    • Hydration is Key: Drink plenty of water before and after your bath to stay hydrated and support the body’s natural detox process.
    • Avoid Overexposure: Limit your bath soaks to 15-20 minutes to prevent skin dryness and dehydration. Follow up with a skin moisturizer or body butter.
    • Not Too Much Heat: Ensure the bath is not too hot, as extreme temperatures can stress the body rather than promote relaxation.

    DIY Epsom Salt Anti-Bacterial Hand Soap Recipe

    Here is a DIY recipe for natural antibacterial hand soap with Epsom salt. It uses Castile soap, vitamin E, and a careful selection of fragrant essential oils.

    Ingredients:

    • 3/4 cup liquid castile soap
    • 1 tablespoon almond oil
    • 1 teaspoon vitamin E oil
    • 2 tablespoons Epsom salt
    • 5 drops tea tree essential oil
    • 3 drops thyme essential oil
    • 5 drops lavender essential oil

    Instructions:

    1. Add the castile soap, almond oil, vitamin E oil, and Epsom salt to a mixing bowl. Use a whisk to stir the ingredients together until fully combined.
    2. Next, add in the essential oils – tea tree, thyme, and lavender. The tea tree oil provides strong antibacterial properties, while the thyme adds an extra antibacterial boost. Lavender gives a nice, calming scent.
    3. Whisk again to distribute the essential oils evenly throughout the mixture.
    4. Funnel the hand soap blend into a foaming soap dispenser.
    5. Fill the rest of the dispenser with filtered water, leaving about 1 inch of space at the top.
    6. Secure the pump and shake vigorously before first use to fully mix all ingredients.

    This natural hand soap contains antibacterial essential oils to help eliminate germs while keeping skin nourished with moisturizing oils. The Epsom salt will gently exfoliate and soften the skin. Shake before each use to remix. Replace contents when low.

    DIY Epsom and Lavender With Colloidal Oatmeal Fizzing Bath Powder Recipe

    The below recipe is for a skin-soothing fizzing bath powder. It also includes colloidal oatmeal, lavender, a hint of citrus scent, and the sweet scent of vanilla.

    If you don’t have colloid oatmeal, simply add dried oats to a blender and blend until their a fine powder-like consistency. Then, use that as colloidal oatmeal. We love using oatmeal since some members of our family struggle with eczema.

    Ingredients:

    • 1 cup Epsom salt
    • 1/4 cup baking soda
    • 3 tablespoons colloidal oatmeal
    • 2 tablespoons citric acid (for fizzing, optional)
    • 2 tablespoons ground flaxseed
    • 1 tablespoon dried lavender buds
    • 5 drops lavender essential oil
    • 3 drops bergamot essential oil
    • 2 drops vanilla essential oil

    Instructions:

    1. In a bowl, mix together the Epsom salt, baking soda, colloidal oatmeal, citric acid, ground flaxseed, and dried lavender buds.
    2. Add the lavender, bergamot, and vanilla essential oils. Stir thoroughly to distribute evenly.
    3. Transfer to an airtight container for storage.
    4. To use, scoop 1/4 cup into warm bath water and enjoy a fizzy, aromatic soak!

    The citric acid allows the ingredients to fizz and dissolves when added to the bath. The combination of the nourishing ingredients, aromatic fragrances, and benefits of Epsom salt make this a skincare recipe you’ll be coming back to time and time again.

    Frequently Asked Questions

    In this section, you’ll find clear answers about Epsom salt’s unique applications and safety guidelines, ensuring you use it effectively and safely in various scenarios.

    How can Epsom salt be used to enhance plant growth in the garden?

    Epsom salt is a natural source of magnesium and can help improve plant growth when your garden soil is deficient in this nutrient. Either apply it by sprinkling it directly onto the soil or by dissolving it in water and spraying it for plants to absorb.

    Are there benefits of using Epsom salt baths for muscle recovery?

    Soaking in an Epsom salt bath may benefit muscle recovery by helping to relax muscle tension and alleviate soreness due to its high magnesium content. We included a bath powder recipe in the above post!

    Are there any risks associated with Epsom salt soaks for particular individuals or conditions?

    Individuals with certain health conditions must consult their healthcare provider before using Epsom salt soaks.

    For example, those with kidney problems or pregnant women should seek medical advice as Epsom salt can alter mineral balances and may not be recommended.

    What are the consequences of not rinsing off after an Epsom salt bath?

    If you don’t rinse off after an Epsom salt bath, you might experience skin dryness or irritation because the salt can leave a residue. It’s advisable to rinse with fresh water to remove the salt remnants to ensure skin comfort and cleanliness.

    After rinsing, use an all-body moisturizer or body butter to seal in the skin’s moisture. This moisturization step should be part of your regular skincare routine after bathing or showering.

  • Benefits of Almond Milk for Skin: 3 Nourishing DIY Recipes

    Benefits of Almond Milk for Skin: 3 Nourishing DIY Recipes

    Benefits of Almond Milk for Skin: 3 Nourishing DIY Recipes

    Almond milk has established a unique position in the realm of skincare, replete with traits that promote healthier, more nurtured skin.

    For centuries, almonds have been prized for their nutritional content, and now almond milk offers a convenient way to deliver these benefits directly to your skin. It has a natural composition with hydrating properties that keep your skin supple.

    Rich in antioxidants, almond milk combats the environmental stressors that accelerate the aging process.

    In addition to its moisturizing and age-defying benefits, almond milk brings gentle cleansing action. It can serve as a mild yet effective cleanser, leaving your skin feeling refreshed and smooth without stripping it of its natural oils. The result is soft, nourished, moisturized skin.

    Almond Milk Skin Benefits

    Almond milk is a nutritious addition to your skincare routine, offering multiple skin health benefits. It’s a source of essential nutrients that can help combat oxidative stress, improve hydration, and soothe sensitive skin. Not only that, it’s a great additive to DIY skincare recipes since it’s light, hydrating, and gentle.

    Antioxidant Properties

    Almond milk contains antioxidants such as vitamin E, which help protect your skin from damage by neutralizing free radicals.

    These radicals can cause oxidative stress, which accelerates skin aging. You can help nourish your skin and maintain its natural barrier against environmental stressors by including almond milk in your skincare products.

    Hydration and Suppleness

    The fats in almond milk serve as an emollient, providing hydration and helping to keep your skin supple and plump.

    Regular use can lead to skin that feels more nourished and maintains a hydrated, youthful appearance.

    Anti-inflammatory Benefits

    For those with sensitive skin or conditions like acne, almond milk can offer soothing benefits due to its anti-inflammatory properties.

    It can help reduce redness and calm inflammation, contributing to healthier skin overall.

    Anti-Aging Effects

    Almond milk may be beneficial in combating the signs of aging, such as wrinkles and fine lines, when used regularly.

    Its skin-friendly nutrients help to hydrate and promote collagen formation, aiding in skin elasticity and strength, which can reduce the appearance of aging on your skin.

    Skincare and 3 DIY Almond Milk Recipes

    You can opt for home-prepared DIY skincare mixtures or commercial almond milk-infused products when incorporating almond milk into your skincare routine.

    Known for its soothing and nourishing properties, almond milk can be combined with other skin-friendly ingredients that you might already have at home. Let’s take a look at a few easy recipes.

    1.) DIY Almond Milk and Aloe Face Mask:

    Combine 2 tablespoons of almond milk with 1 tablespoon of aloe vera gel for a hydrating and healing face mask. Apply to your skin for 10-15 minutes before rinsing off with lukewarm water.

    For a calming effect, mix in a few drops of lavender essential oil or another if you prefer. This light and hydrating recipe is fantastic for soothing the skin.

    2.) DIY Almond Milk and Manuka Honey Mask:

    Combine 2 tablespoons of almond milk with 1 tablespoon of manuka honey.

    Optionally, you can add a teaspoon of colloidal oatmeal for a thicker consistency, in addition to a few drops of your favorite essential oil for scent. For acne-prone skin, tea tree oil is quite effective, as demonstrated in multiple studies.

    3.) Almond Milk, Lavender, and Coconut Oil Moisturizer:

    Blend homemade almond milk with coconut oil to create a custom moisturizer. This easy DIY recipe provides essential hydration and creates a barrier to lock in moisture.

    Ingredients:

    • 1/4 cup almond milk
    • 1/4 cup coconut oil
    • 10 drops lavender essential oil (optional)

    Combine the almond milk and coconut oil in a small bowl or glass jar. Heat the jar by placing it in a pan of simmering water until the coconut oil melts. This should take 5-10 minutes. Once melted, stir the ingredients together until fully combined. Once the mixture has cooled but not yet hardened, add your selection of essential oils.

    Store the moisturizer in an airtight container. It will solidify once cooled but liquefy in contact with the skin.

    The almond milk helps hydrate skin while the coconut oil provides deep moisturization. This simple, 2-ingredient moisturizer leaves skin smooth, soft, and nourished. The addition of lavender oil gives it a lovely, soothing fragrance.

    Additional Skincare Applications

    As we mentioned above, almond milk can be found in various skincare products on the market, ranging from face washes to lotions. When you choose these products, you’re opting for a gentle, often vegan, alternative to traditional skincare ingredients.

    • Face Wash: Find a face wash that lists almond milk as a key ingredient, which can offer a gentle cleansing experience suitable for most skin types. Even better, make your own face wash and use almond milk in the recipe instead of water.
    • Creams and Lotions: Skincare products like creams and lotions containing almond milk can help hydrate the skin deeply, leaving it soft and supple.

    Nutritional Profile of Almond Milk

    Now that we’ve covered how almond milk can be used topically let’s take a look at its nutritional profile as a healthy beverage. After all, diet is a major contributing factor to the overall condition of your skin, so it’s worth taking a moment to review the benefits.

    Rich in Vitamins and Minerals

    Almond milk is a treasure trove of vital vitamins and minerals.

    • It’s enriched with vitamin E, a potent antioxidant that supports skin health, and often fortified with vitamin D, which can bolster bone strength.
    • The calcium content in almond milk is impressive, often matching or exceeding that found in dairy milk. Our family loves plant milk varieties since we have a lot of dairy sensitivities. Almond milk is a great option for individuals or families with dairy sensitivities.
    • Other noteworthy minerals found in almond milk include magnesium, potassium, and zinc.

    Low in Sugars, Calories, and Healthy Fats

    Almond milk stands out as a low-calorie alternative to traditional dairy, providing a way to enjoy a creamy beverage without a high-calorie intake. Again, this is particularly appealing if you’re watching your calorie intake or seeking a healthy alternative to cow’s milk.

    In addition to being low in calories, unsweetened almond milk is also low in sugars at a fraction of the sugar content of a glass of cow’s milk. Why drink beverages that are high in sugar when we aren’t splurging?

    Instead, a beverage like almond milk can quench your hydration and provide some good vitamins and minerals, all without a needless intake of additional sugars.

    What about the fat content?

    • Almond milk contains polyunsaturated fats like omega-3s and omega-6s
    • It’s low in saturated fat compared to whole almonds since the milk is diluted with water during production.
    • Fat content and types vary by brand, based on ingredients. Check labels for details, especially if you have dietary restrictions.

    Protein and Carbohydrate Content

    While almond milk is not as protein-rich as cow’s milk, it does offer an amount that can contribute to your daily protein needs—a bonus for those on a plant-based diet. When it comes to plant milk protein vs. dairy protein, our society has a fixation on dairy protein and protein in general.

    Our family’s stance on that is that we don’t need nearly as much protein as many health gurus and low-carb diet promoters claim.

    Carbohydrate-wise, unsweetened almond milk is low in carbs, making it a suitable choice if you’re looking for a light and refreshing beverage.

    Advantages for Individuals With Dietary Restrictions

    As mentioned earlier, almond milk is an excellent dairy-free and lactose-free option if you’re vegan, have lactose intolerance, or have other dairy-related allergies.

    It’s plant-based, making it a staple for vegans and those who are intolerant to dairy products without compromising nutrition and taste.

    Homemade Unsweetened Almond Milk Recipe

    Creating homemade almond milk allows you to enjoy a fresh, nutritious beverage free from the preservatives found in commercial brands. For this same reason, we recommend making your own, especially when used in your own homemade skincare products.

    Ingredients:

    • 1 cup raw almonds
    • 4 cups filtered water (5 cups for thinner consistency)

    Instructions:

    1. Rinse the almonds and remove any shells or debris.
    2. Add the almonds to a bowl and cover with water. Let soak for 8-12 hours to soften.
    3. Drain and rinse the almonds well. Discard the soak water.
    4. Add the almonds and 4 cups of filtered water to a high-powered blender.
    5. Blend on high for 2-3 minutes until the almonds are finely ground and the water turns milky white.
    6. Optional: Line a fine mesh strainer with cheesecloth and strain the almond pulp from the milk. Twist the cheesecloth to squeeze out all the moisture.
    7. Transfer the freshly made almond milk to an airtight jar and store it in the refrigerator for up to one week.
    8. Shake or stir the milk before drinking to recombine the ingredients.
    9. Use the homemade unsweetened almond milk in smoothies or overnight oats, or enjoy it plain.

    The 1:4 almond-to-water ratio creates a milk-like consistency. Feel free to tweak the proportions to suit your tastes.

    Don’t have 8 hours to soak the almonds? If you don’t have time to soak the almonds for 8-12 hours, you can simply blend them to a fine almond powder, mix them with the water, then blend the almond and water mixture a final time for a smooth consistency.

    Enjoy this simple, wholesome, homemade plant milk as a beverage (more on that below) or in any of the skincare recipes we mentioned earlier.

    Customization of Taste and Nutrition

    For a vegan and dairy-free treat, you can add honey or another natural sweetener of your choice if you prefer a hint of sweetness. If you’re monitoring your sugar intake, leaving your almond milk unsweetened ensures a nutritious drink without added sugars. Also, you can add vanilla, cinnamon, nutmeg, or any other flavors as desired.

    Warm cinnamon and honey almond milk is fantastic around the holidays, especially in the morning. Don’t overdo it with the sweeteners, though!

    Benefits of Almond Milk for Skin FAQs

    Almond milk offers various dermatological benefits, from soothing sensitivity to promoting a clear complexion. Discover how it can enhance your skin health through these common inquiries.

    What are the benefits of using almond milk on the skin?

    Almond milk is known to soothe sensitive skin, help reduce redness and irritation, and can even aid in relieving sunburned skin more quickly.

    Can almond milk be used for skin whitening, and is it effective?

    While almond milk may brighten the skin due to its vitamin E content, it is not a skin-whitening product.

    How can almond milk improve skin conditions such as eczema?

    Almond milk has emollient properties that can help moisturize and alleviate the dryness associated with eczema. Its anti-inflammatory qualities can also help reduce eczema-related inflammation.

    That said, eczema can be very tricky because if you take ten eczema sufferers, they’ll likely all have differing triggers for flare-ups.

    We’ve discovered that in our own family. What doesn’t cause a flare-up for one person may cause a flare-up for another. So, always patch-test a small area first.

    How should one apply almond milk to the skin for best results?

    For best results, apply almond milk directly to the skin with a cotton ball or as part of a homemade mask (see recipes earlier in this post). Let it sit for a few minutes before rinsing for a hydrating effect.

    Are there any side effects to using almond milk on the skin?

    Almond milk is generally safe for topical use; however, those with nut allergies should avoid it as it may cause allergic reactions. Again, always patch test before applying widely.

  • Inaccurate Critiques and Cons of Homeschooling: Myth vs Fact

    Inaccurate Critiques and Cons of Homeschooling: Myth vs Fact

    Inaccurate Critiques and Cons of Homeschooling: Myth vs Fact

    Homeschooling emerges as a prominent alternative to traditional schooling when considering the educational landscape today. Despite common misconceptions, it offers a flexible and individualized approach to education, which can be tailored to your child’s unique learning style.

    Table Of Contents
    1. Parental Control: Overbearing or Reasonable?
    2. Criticisms at a Glance
    3. Why We Choose to Homeschool
    4. Foundations of Homeschooling
    5. Benefits and Challenges of Homeschooling
    6. Critiques of Homeschooling
    7. Practical Aspects of Homeschooling
    8. Extracurricular and Social Opportunities
    9. Long-Term Effects and Outcomes
    10. The Role of Technology in Homeschooling
    11. Wrapping Up: The Results are Self-Evident
    12. Inaccurate Critiques and Cons of Homeschooling FAQs

    Critiques often paint homeschooling as lacking in socialization opportunities or academic rigor, yet many families (including ours) have found it provides a rich, diverse, and well-rounded educational experience.

    The range of subjects, teaching methods, and social interaction that homeschooling can accommodate often surpasses what is available in conventional classrooms.

    Parental Control: Overbearing or Reasonable?

    The discussion surrounding the negative aspects of homeschooling frequently involves concerns about “overbearing parental control” or inadequate educational outcomes. We reject those notions since they’re based on logical fallacies. Parental control isn’t any more overbearing than the control of the state.

    Rather, parental control naturally proceeds from the family unit.

    Overbearing? We think not. If anything is overbearing, it’s when the state (or government authority in general) holds the conviction that it has the power to intrude upon a family’s freedom to determine their own path of education in accordance with their closely held convictions.

    Thus, homeschooling is a natural and logical outcome flowing from the duties of parents within the context of the family.

    Criticisms at a Glance

    Criticisms are often based on outdated stereotypes or isolated incidents rather than the reality experienced by the majority of homeschoolers. In fact, many parents choose to homeschool precisely because they can ensure a more engaging, hands-on learning environment that nurtures their child’s passion for knowledge.

    They work diligently to provide a curriculum that not only aligns with state standards but also goes beyond them, equipping their children with critical thinking skills and a love for lifelong learning.

    Your journey into understanding homeschooling better may reveal that the usual critique of homeschooling as being socially isolating or academically inferior is not only inaccurate but also ignores the testimony of countless homeschool graduates who excel in higher education and diverse career paths.

    These students often demonstrate a level of maturity, independence, and intellectual curiosity that is highly sought after in the professional world.

    With this in mind, it’s critical to consider the evidence and experiences of those within the homeschooling community before forming opinions on its supposed drawbacks.

    Why We Choose to Homeschool

    We decided to homeschool early on and discussed our alignment on that conviction even before marriage. We hold to the conviction that, as parents, we are responsible for teaching our children at or far above the level they would receive through traditional public education.

    We also hold to the conviction that the sacrifices we make to homeschool our children are worth it in every way. We provide them with a wholesome education through the lens of a truly Biblical worldview while also preparing them to think critically about the world around them.

    We understand that every teacher and educator holds to a worldview. No matter what measures are taken to reduce bias and presupposition, the worldviews of educators will manifest themselves in the classroom.

    As human beings, we act in accordance with our beliefs within the confines of our worldview. Understanding that reality, we believe we are the authority of the bias our children are exposed to on a daily basis.

    Our worldview, presuppositions, and biases do not align with that of most educators, so we choose to withdraw from the educational system entirely.

    That said, even if there was a perceived alignment with our own, we would still choose the path of non-participation because we ultimately believe parents should teach their own children, not the state.

    We understand that not everyone who homeschools will hold to this conviction, but that’s a key driving force behind our decision. It’s rooted ultimately in our worldview and our philosophy about our duty as parents.

    Ideals, worldviews, philosophies, and convictions in our classroom are on our terms for the benefit of our children, smothered in love; that’s the untouchable freedom of homeschooling, and that’s what we embrace on a daily basis.

    Foundations of Homeschooling

    Homeschooling is a viable educational option that offers a flexible, individualized approach to learning in adherence to legal standards. The goal is often an educational experience at or above the experience in a public or private setting.

    Defining Homeschooling and Educational Choices

    When you homeschool, you’re taking on the responsibility of providing your child’s education at home. This method is distinct from enrolling them in public or traditional private schools.

    It rests on the belief that a personalized learning environment can more closely address an individual student’s needs, strengths, and interests.

    Legal Framework and Regulation of Homeschooling

    In the United States, education is a right and a requirement. The U.S. Department of Education, along with state-level departments, ensures that all educational approaches, including homeschooling, meet basic educational standards.

    The specific regulations governing homeschooling vary by state, but they serve to protect both the quality of education and democratic values by ensuring a well-educated populace.

    Laws and restrictions vary considerably from one state to the next, so be sure to research the laws for your state if you’re planning to homeschool.

    Comparing Homeschooling with Public and Traditional School Systems

    Homeschooling is often compared to education received in public and traditional school settings.

    Unlike public schools, which follow a scalable and standardized one-size-fits-all curriculum, homeschooling allows you to tailor the educational experience to your child’s unique learning style and pace. That gives more customization in terms of accelerated learning within specific subjects.

    Homeschooling presents a different mode of learning that can be just as rigorous and comprehensive as anything in more typical settings. The flexibility natural to the homeschooling model is often more productive and efficient at achieving positive learning outcomes.

    Benefits and Challenges of Homeschooling

    In evaluating homeschooling, it is essential to weigh its advantages against the potential challenges it presents in terms of flexibility, personal pace, family bonds, and social skill development.

    There are very good and very bad examples of homeschooling, and we’ve seen both. With that in mind, the pros and cons may play out differently depending on a family’s administration of the homeschooling model, but we’ll review a few more generally below.

    Advantages and Disadvantages of Homeschooling

    Advantages:

    • Customized Learning Experience: You can tailor the curriculum to meet your child’s specific educational needs and interests, providing a one-on-one learning environment that promotes in-depth understanding.
    • Academic Performance: Studies suggest that homeschooled students often outperform their peers on standardized tests, evidencing the effectiveness of personalized education.
    • Curriculum and Convictions: You’re able to tailor the curriculum to your family’s own convictions and overall worldview. Regulations regarding curriculums vary from state to state, but ultimately, you decide to teach in a way that aligns with your family’s ideals.
    • A Motivation of Love: Love is our motivation and lifeblood when it comes to homeschooling. We know deeply that we love our children and want to teach them what they must know to interpret and think critically about the world around them. That’s the DNA of our classroom, meaning we are willing to go the extra mile to sacrifice for the benefit of our children.

    To list all of the benefits would lead to quite a long post. So, we’ve just included a few themes above. Keep in mind that we know there are many loving and exceptional teachers in both public and private settings as well.

    While that’s the case, our conviction is that there’s no substitute for a parent’s love demonstrated through homeschooling when it’s done well.

    Disadvantages:

    • Resource Limitations: Unlike public schools, you may not have immediate access to certain educational resources, such as specialized teachers or equipment.
    • Expertise Requirements: You might face challenges in areas where you don’t have expertise, potentially necessitating outside help or resources.
    • Workload Requirements: Lesson plans, curriculum research, grading homework, tracking academic achievement, and much more are but a taste of what’s involved in the homeschooling model. Homeschooling isn’t always easy, especially when you have other priorities to balance with it at home.
    • State Compliance Requirements: Maintaining a state-compliant homeschool model is easier in some states than it is in others. For example, you may need to hold a degree or teacher certificate in some states, while in others, you may only need to inform the local school board that you’re choosing to homeschool for religious reasons. Additionally, standardized testing or curriculum approval may be required in some states, whereas in others, there are little to no requirements.

    Exploring the Flexibility and Structure of Homeschooling

    Flexibility:

    • Scheduling: You have the liberty to create a schedule that suits your family’s lifestyle, allowing for travel, hobbies, and extracurricular activities without the constraints of a traditional school calendar. If you want to homeschool four out of five days, that’s up to you. Or, perhaps you prefer a year-round school model vs. taking off over the summer. It’s your decision.
    • Structure: There are different educational philosophies available to choose from. But you determine what’s best for your classroom. Perhaps you prefer a classical education model or a more hands-on approach. Or, you may also prefer less age segregation for certain subjects. Again, it’s up to you.
    • Consistency: While you have flexibility, maintaining a consistent structure is vital for ensuring steady progress and meeting educational goals.

    The Impact of Homeschooling on Family Dynamics

    Positive Impacts:

    • Bonding: Homeschooling allows for more time together, strengthening family bonds and enabling real-time celebration of achievements.
    • Challenges: When you handle learning challenges well, they’re opportunities to teach your children valuable lessons about patience, perseverance, and persistence. They’re unique opportunities to build up your children while also learning more about areas you can improve in as well.
    • Interpersonal Dynamics: Managing both parent and teacher roles may strain relationships; being mindful of interpersonal dynamics is crucial for a harmonious homeschooling environment.
    • Social Skills: While concerns about socialization are often voices, this isn’t something we’ve experienced at all. That said, you can encourage social skills through extracurricular activities, cooperative learning groups, and community engagement. Also, check to see if you have any homeschool coops in your area that may be a good fit for you.

    Critiques of Homeschooling

    Navigating the complex landscape of homeschooling, you may encounter various critiques that address the educational method’s perceived drawbacks. We touched on a few briefly earlier in this post, but it’s worth further review, especially if you’re considering homeschooling.

    Academic and Educational Concerns

    Critics often worry that homeschooled children may not receive the same standard of academic education as those in traditional schools, pointing to differences in curriculum and the potential lack of teachers’ formal training.

    However, ample research suggests that homeschooled students frequently achieve on par or better than their traditionally schooled peers when considering academic skills and performance on standardized tests.

    One report details that home-educated students typically score 15-25 percentile points above public school students when tested via standardized methods.

    Socialization and Emotional Development

    The concern that homeschooled children lack social interaction and opportunities for socialization is a common misconception.

    On the contrary, homeschooling can offer a broad range of social experiences through co-ops, community activities, and interest-based clubs, fostering well-rounded emotional development outside of the traditional school setting.

    The difference between homeschooling and traditional education settings with regard to education is that the parent is in full control of the social contexts their children are exposed to. And again, some notion that parental control is a negative theme is based on logical fallacy at best.

    The Question of Child Welfare and Oversight

    Child welfare is crucial, and while Elizabeth Bartholet and other critics from sources like Harvard Magazine raise the issue of insufficient oversight in homeschooling, it’s essential to understand that most families choose homeschooling to provide a nurturing and tailored educational environment, not to evade scrutiny.

    The level of arrogance from certain critics of the homeschooling model is a noteworthy mention. And we would ask the reader to remember that we’re all representatives of the worldviews we hold. Apparently, the worldview of some is that the state is the supreme authority in the education of our children. We couldn’t disagree more.

    Critics sometimes offer claims of indoctrination of Christian or other values with the homeschool model. While they call it indoctrination, we call it parenting and child-rearing. Nonetheless, if given the option between state-sponsored indoctrination vs. parent-sponsored “indoctrination,” we happily choose the latter.

    Instances of child abuse, while serious, are not representative of the homeschool community, and many states have implemented measures to monitor and protect child welfare. We support laws and regulations that protect children from abusive environments, be it in the school system or at home.

    Furthermore, if we use logic and reason to maintain a critical perspective about homeschooling vs. the traditional school model the aforementioned sources promote, we postulate that far more abuse happens in the traditional school system vs. the homeschooling model.

    Stigma and Misconceptions About Homeschooling

    Homeschooling often bears a stigma or misconceptions due to a lack of understanding. Rather than indicating a lack of social skills or academic rigor, homeschooling is a legitimate, alternative educational path that prioritizes the unique needs and potential of each child, accounting for various learning styles and interests.

    Homeschooling, when done responsibly, upholds children’s rights and fosters a strong foundation for mental health and personal growth. And this is all done within a safe, nurturing environment under the direction of those who have our children’s best interests in mind: parents.

    Practical Aspects of Homeschooling

    When choosing to homeschool, you’re taking on a multifaceted role that intertwines education, time management, financial planning, and personal commitment.

    Grasping the practicalities of homeschooling helps you to prepare effectively and manage the responsibilities efficiently.

    Developing a Homeschooling Curriculum and Schedule

    Developing your homeschooling curriculum involves understanding your child’s learning style and finding resources that match their educational needs.

    It’s essential to establish clear educational goals and meet or exceed your state’s learning standards. Utilizing a variety of teaching materials and methods, such as textbooks, online courses, or experiential learning, can enhance the homeschooling experience.

    Schedule-wise, consistency is key – carve out regular hours for different subjects whilst allowing for flexibility to accommodate your child’s pace of learning. We take a disciplined approach with a set hours of instruction per day that exceeds requirements in most states.

    Do not only do what’s required with your home instruction. Instead, in every way possible, make it your goal to exceed what they would receive in a public or private school setting.

    How you define that will also depend on your priorities and what you consider to be the most important aspects of their educational journey.

    The Cost and Resources Required for Homeschooling

    The cost of homeschooling can vary widely. Basic costs include curriculum supplies, books, and other learning materials. You may also need to factor in the price of additional resources, like specialized software or virtual tutors for subjects outside your expertise.

    It’s vital to budget carefully and take advantage of free or low-cost resources when needed, such as public libraries or online educational platforms, to minimize expenses.

    Balancing Homeschooling with Work and Other Responsibilities

    As a homeschooling parent, balancing educational duties with work and other responsibilities will be one of your biggest challenges.

    Effective time management is crucial; consider creating a dedicated homeschooling space to separate schooling from other home activities.

    You’ll also want to explore networking with other homeschooling parents for support and resource-sharing, which can alleviate some of the pressure. Remember that taking care of your own needs is essential to maintain a healthy homeschooling environment.

    Extracurricular and Social Opportunities

    In addressing homeschooling critiques, it’s essential to understand that you have ample opportunities to engage in a diverse range of extracurricular and social activities.

    Cultural Activities and Field Trips

    Cultural activities and field trips are significant components of extracurricular engagement.

    As a homeschooler, you may coordinate with local museums and cultural institutions for educational visits. This involvement enriches your understanding of various subjects through hands-on experiences and interactions with experts.

    • Museums: Engage with history, science, and art through exhibits.
    • Theater: Experience literary works and storytelling from the stage.
    • Field trips provide you with an immersive learning environment that traditional classrooms often cannot offer. They allow a break from the usual study routine and encourage experiential learning. This might involve a trip to a local battlefield or historical site.

    Involvement in Sports, Music, and Arts

    Participating in sports, music, or the arts offers a counterbalance to academic studies by nurturing your creative and physical development.

    Local community centers, private clubs, church groups, and others often welcome homeschoolers into their sports leagues and band programs.

    • Sports: Develop teamwork and personal discipline.
    • Music and arts: Refine your artistic skills and express creativity.

    Community Engagement and Volunteering

    Community engagement and volunteering are powerful ways for you to connect with your community, develop empathy, and build a robust volunteer service portfolio.

    • Service projects: Learn the value of contribution and service.
    • Leadership roles: Take on responsibilities that improve your leadership and organizational skills.

    These activities can also expand your social network and provide experiences that are valuable for college applications and future job opportunities.

    Your active role in volunteer work reflects a commitment to bettering society and can be a transformative aspect of your homeschooling experience.

    Long-Term Effects and Outcomes

    When considering the long-term effects and outcomes of homeschooling, your focus might often gravitate toward academic success and entry into the workforce. However, be sure to not only instill a consumer-like mindset into your children.

    Teach them they can be the builders, the movers, the shakers and that working for someone else isn’t the only option. Education is all about giving your children options when it’s time for them to make decisions about their future.

    Bad homeschooling experiences often manifest in a child feeling entirely unprepared when transitioning into self-sufficient adulthood. Your children must be prepared and ready to take on the world by the end of their schooling.

    That should be demonstrated by competence and knowledge proficiency above that of their peers, as well as drive and discipline.

    It’s essential to explore how this form of individualized education shapes a potential path to college (if that’s best), career prospects, and real-world success.

    Homeschooling and College Admissions

    A student’s journey through homeschooling can demonstrate to colleges their ability to engage in self-directed learning and adapt to various educational models.

    Many homeschooled students have been found to possess the discipline and motivation that are crucial for higher education.

    They often have to provide a thorough record of their education, highlighting their unique learning experiences, which can make their applications stand out in the admissions process.

    Career Prospects for Homeschooled Individuals

    With a customized education, homeschooled individuals may develop specific skill sets and adaptability characteristics that are prized in many careers.

    These abilities, fostered in a homeschooling environment, can smooth your transition into the workplace. However, it’s important to recognize that vocational success is multifaceted and not solely dependent on educational background.

    Success Stories and Notable Homeschooling Alumni

    Homeschooling families often celebrate the achievements of their children, including those who have forged successful careers.

    High-profile examples showcase individuals who’ve thrived, capitalizing on the personalization of education that homeschooling allows. These success stories serve as testimony to the potential long-term positive outcomes of a homeschooling pathway.

    The Role of Technology in Homeschooling

    In recent years, you’ve likely noticed that technology has become integral in the education sector, including homeschooling. It provides a vast array of digital resources and fosters the adaptation to hybrid learning environments.

    Utilizing Digital Resources and Remote Learning Tools

    You have access to a wealth of digital resources that can enhance your homeschooling experience. Online libraries, educational apps, and virtual labs open up endless possibilities for learning. For instance, educational platforms offer interactive lessons that can be more engaging than traditional textbooks.

    Remote learning tools also play a crucial role. Video conferencing software enables you to connect with educators and other homeschoolers worldwide, facilitating collaborative learning experiences.

    Moreover, assignment submission and grading can be streamlined through online portals, saving you considerable time.

    Adapting to Technological Change and Hybrid Models

    The landscape of education is evolving with technological change. As a homeschooler, it’s important to stay updated with new tools that can aid in your educational journey.

    Hybrid models, which blend online education with traditional homeschooling methods, might be particularly effective.

    A hybrid model often includes a mix of synchronous (live online classes) and asynchronous (recorded lessons, downloadable worksheets) elements. This model provides flexibility in your schedule, allowing you to learn at your own pace while still benefiting from structured guidance when needed.

    Wrapping Up: The Results are Self-Evident

    As you look back on the pros and cons of homeschooling, it’s evident that the method holds substantial merit.

    Firstly, homeschooled students typically benefit from customized learning experiences and flexible schedules tailored to their individual needs. These advantages allow you to optimize educational outcomes for your children.

    On the other hand, critics often highlight potential drawbacks such as limited social interaction and the burden on parents to provide a comprehensive education.

    Nevertheless, many homeschoolers mitigate these issues through community groups and cooperative learning. Additionally, we’ve briefly touched on how homeschooled students generally outperform in areas of academic achievement vs. students in more traditional settings.

    Here’s a quick comparison to illustrate further:

    Homeschooling AspectProsCons
    Academic FlexibilityTailored curriculumNeed for parent-driven structure
    SocializationOpportunities for diverse social encountersLess daily interaction with peers
    Parental InvolvementStrong relational bondsHigh commitment, potential stress

    The results speak for themselves; when executed effectively, homeschooling can be a powerful educational pathway. With proper support systems and resources, your journey in educating your children at home can be as rewarding as it is productive.

    The most common critiques from homeschooling critics are unfounded and unsubstantiated.

    Still, we must not underestimate the high level of responsibility and weighty nature of what it means for us as parents to completely own our children’s educational experience. It’s a weighty calling indeed, apt most favorably to parents and natural to the ideals of love and instruction within the family unit.

    Inaccurate Critiques and Cons of Homeschooling FAQs

    What are the most common misconceptions about the effectiveness of homeschooling?

    The belief that homeschooling cannot match the quality of traditional schooling is pervasive yet unfounded. Research indicates that homeschooled students often perform better academically than their peers in conventional settings.

    How might homeschooling impact social development, and are concerns about socialization substantiated?

    Concerns that homeschooling hinders social development are frequently overblown.

    You’ll find that homeschoolers typically have ample opportunities for socialization through diverse channels, and these experiences can lead to well-rounded social skills.

    Also, if this is a concern for you, you have the power to ensure it doesn’t become problematic. Take field trips, get involved in local groups and communities, and much more. You have this flexibility available to you. You can choose the social settings, the frequency, etc., on your own terms in a way that benefits your children the most.

    What are the potential challenges in measuring the long-term success of students who are homeschooled?

    It’s difficult to holistically measure long-term success due to varied homeschooling approaches and objectives. However, many homeschoolers maintain successful careers and report high satisfaction with their homeschooling experience.

    Standardized testing can also be useful to benchmark their achievement. Additionally, you can give them levels are responsibility that exceed what they’d receive in a public school setting.

    Are there any misrepresentations in statistics pertaining to the academic performance of homeschooled students?

    Statistical misrepresentations often arise from comparing non-standardized homeschool environments with public schooling. In reality, many homeschoolers achieve high academic performance, often outscoring their traditionally schooled counterparts on standardized tests.

    How does homeschooling affect college readiness, and what are the inaccuracies in prevalent beliefs about this issue?

    Misconceptions about college readiness suggest that homeschoolers are at a disadvantage, but evidence points to homeschool graduates being well-prepared for higher education, often excelling in college environments.

    The reality is that you can also accelerate your child’s learning experience, outpacing the experience they’d receive in other settings. Additionally, keep in mind that college may not be in their best interest at all, depending on their goals, interests, and skill sets.

    What are the inaccurately perceived disadvantages regarding the adaptability of homeschooled students to traditional work environments?

    Critiques regarding adaptability often assume that homeschoolers may be less prepared for conventional workplaces.

    On the contrary, homeschooling can foster independent thinking and self-motivation, valuable traits in any professional setting. Better yet, you have the freedom to get children involved with entrepreneurial projects, vocational learning, practical skills, and other pursuits in ways that may not be available to them in a traditional school setting.

  • How to Treat Fungus on Succulents: 5 Easy Natural Remedies

    How to Treat Fungus on Succulents: 5 Easy Natural Remedies

    How to Treat Fungus on Succulents: 5 Easy Natural Remedies

    Succulents are cherished for their ease of care and endless varieties, but like any plant, they can fall prey to fungal infections. When you notice a change in the texture, color, or health of your succulents, it’s essential to consider the possibility of a fungal issue.

    Treating fungus on succulents starts by identifying the problem—whether it’s powdery mildew, black spot, or root rot. Each type of fungus requires a specific approach, and it’s vital to act promptly to stop the spread and heal your plants.

    Understanding the conditions that lead to fungal growth is key to both treatment and prevention.

    • Overwatering is a common culprit, creating an environment where fungi can thrive.
    • Adjusting your watering habits to ensure the soil can dry properly between waterings helps prevent the recurrence of fungal issues.
    • Providing adequate airflow and sunlight can bolster your succulents’ defenses against fungi.

    A range of effective methods are available for eradicating the fungus, which we’ll dive deeper into in this post.

    Identifying Fungus on Succulents

    Before attempting treatment, accurately identifying the presence of fungal disease is essential for the health of your succulents. Below, key indications of fungal infections are outlined for your awareness.

    Common Signs and Symptoms

    • Powdery Mildew: Look for a telltale white or gray powdery coating on leaves and stems. This is one of the most common fungal issues that affect succulents, indicating the presence of powdery mildew.
    • Leaf Spots: Brown or black spots on leaves often represent a fungal disease called leaf spots. These may also have a yellow halo, indicating their infectious nature.
    • Mold Issues: Sooty, black mold can develop on the surfaces of your succulent leaves as a result of fungal spores in the environment. Alternatively, gray mold may appear as fuzzy or woolly patches.
    • Discoloration and Wilting: If you notice your succulent’s leaves turning yellow or the plant wilting without an apparent overwatering issue, this could be a sign of a fungal problem.
    • Odd Growth Patterns: White spots or irregular growths on your succulent could be a symptom that fungus is present.

    By recognizing these symptoms early, you can take prompt action to treat the infection and prevent further damage to your plants. Remember, healthy succulents should have firm, colorful leaves indicative of good health.

    5 Common Causes of Fungal Infections

    Understanding the causes of fungal infections in succulents is crucial to preventing and treating these issues effectively. Fungi thrive under certain conditions that can often be controlled with careful attention to environmental factors and cultural practices.

    Environmental Factors

    Humidity: High levels of humidity, especially when paired with poor air circulation, create an ideal setting for fungal infections. Ensuring your succulents are in a well-ventilated area where air can freely circulate helps mitigate the risk of infections.

    Moist Conditions: Overhead watering can leave moisture on leaves, which is conducive to fungal growth. Water at the base of your plants to keep the foliage dry and reduce the chance of infection. More on this later.

    Cultural Practices

    Watering: Overwatering is a common cause of fungal infections in succulents. These plants prefer a ‘soak and dry’ method, meaning you should allow the soil to completely dry out between waterings. This prevents the excessively moist soil that fungi favor.

    Soil: The use of well-draining soil is essential. Succulents need soil that doesn’t hold on to water for too long. Ensure your soil mixture is appropriate for succulents to avoid creating a humid environment at the roots.

    Succulent soils are often sandier in texture and very well-draining. If your soil is more clay-like, clumpy, or overly dense, it’s definitely not ideal.

    Dust on Leaves: Dust accumulation can block sunlight and reduce the plant’s ability to combat fungal growth. Cleaning off dust regularly can help maintain the health of your succulents and deter fungal infections.

    Prevention Strategies

    Successfully preventing fungus in succulents hinges on effective soil and water management, ensuring proper air circulation and sunlight exposure, and implementing diligent pest control measures.

    These practices will create an environment that is less hospitable to fungal growth and more conducive to the health of your succulents.

    Soil and Water Management

    Soil: Use well-draining soil tailored for succulents to prevent moisture buildup. Sterilize your potting mix to kill off potential pathogens before planting.

    Watering: As mentioned earlier, water your succulents at the base and avoid getting water on the leaves. There’s no need to drench the entire plan.

    Ensure the potting mix is dry before you water again; succulents thrive on a ‘soak and dry’ approach rather than frequent watering. Letting your plant dry in between waterings may be the best way to prevent fungus.

    Air Circulation and Sunlight

    Air Circulation: Increase airflow around your succulents by not overcrowding them. Good air movement helps keep the foliage dry and reduces fungal problems.

    Sunlight: Provide plenty of sunlight or adequate grow lights for indoor plants. Succulents require a certain amount of light to maintain their health and keep fungal issues at bay.

    Pest Control

    Aphids, mealybugs, scales, and whiteflies are more than just nuisances; they can spread disease. Regularly inspect your plants and isolate new additions to your collection. Treat infestations promptly with a natural solution like neem oil or insecticidal soap to prevent pests from weakening your plants or creating conditions favorable to fungal growth.

    We’ll take a deeper look at the treatment methods below.

    Treatment of Fungal Infections

    When tackling fungal infections on your succulents, it’s important to consider both natural and chemical treatments that are effective against fungal growth. Both methods, when used correctly, can help you control and eliminate the problem.

    5 Natural Remedies to Treat Fungus on Succulents

    1.) Baking Soda Mixture: A baking soda solution can be an economical and safe way to treat fungal issues in your plants. To make a DIY Fungicide, mix one tablespoon of baking soda with half a teaspoon of liquid, non-detergent dish soap in a gallon of water.

    Apply this spray to the affected areas, ensuring that the plant is not under direct sunlight at the time of application to avoid leaf burn.

    2.) Neem Oil: Neem oil stands out as a natural and effective treatment for inhibiting succulent fungus. It not only treats fungal infections but also deters pests. Apply neem oil to the affected parts of the plant, making sure to follow label instructions for dilution and application frequency.

    3.) Garlic Extract: Garlic contains natural antifungal properties. Crush a few cloves of garlic, steep in water, strain, and then spray onto the succulents to prevent fungal growth.

    4.) Milk Spray: Diluted milk spray may help manage fungal diseases due to its antiseptic qualities. Mix one part of the milk with two parts of water and spray onto the plant’s leaves.

    5.) Hydrogen Peroxide: A solution made from one part hydrogen peroxide to four parts water can be effective in treating fungus on succulents.

    Chemical Fungicides

    Commercial Fungicides: If natural methods don’t yield the desired results, you might turn to a commercial fungicide, choosing a product that’s labeled safe for use on succulents.

    Copper-based fungicides can be effective; however, it’s important to follow the manufacturer’s instructions on properly applying them to avoid harming your plant.

    Remember, when using any natural or chemical treatment, the key is to get the mixtures right. Do not give into the temptation to make a “strong” fungicide mixture, regardless of your method. That could burn or kill your succulents.

    Practical Care Tips

    Effectively treating fungus on succulents revolves around proper watering, feeding, and soil maintenance. These preventive measures can significantly reduce the risk of fungal infections.

    Watering and Feeding

    When watering your succulents, ensure you do so at the base of the plant to keep the leaves dry, as damp foliage is susceptible to fungal growth.

    Use a water and hydrogen peroxide mixture (1 part hydrogen peroxide to 4 parts water) to help rid your plants of fungi.

    For feeding, combine fertilizer with water appropriately, but remember that during cooler months, succulents require less frequent watering as their growth slows down.

    Repotting and Soil Replacement

    Select a well-draining soil, ideally mixed with sand, to ensure excess water doesn’t linger around the roots.

    Re-pot your succulents if the current soil is contaminated or if the plant has outgrown its current pot. Always dispose of old soil if your plant is infected. When repotting, use fresh soil from a sealed, uncontaminated bag to minimize the risk of introducing pathogens.

    Sterilizing your potting mix by baking it at 200 degrees Fahrenheit before use can also be an effective precautionary measure. This is especially recommended if you’re repotting rare species or otherwise expensive succulents.

    Advanced Fungal Issues

    In this section, we address how to tackle succulent problems when they escalate beyond typical concerns. Advanced fungal issues often manifest as severe infections that can threaten the vitality of your plants.

    Dealing with Severe Infections

    When faced with advanced fungal diseases like root rot, fusarium wilt, and black spot, it’s critical to act promptly to salvage the affected succulent.

    These conditions are typically caused by pathogens such as Fusarium oxysporum, Botrytis cinerea, and Phytophthora.

    Root and Crown Rots: If you notice your plant’s roots turning brown or black and becoming soft, your succulent may be suffering from root or crown rots. This is often due to excessive moisture and poor drainage.

    • Identify: Check for blackened roots and a base that easily separates from the soil.
    • Isolate: Immediately remove the affected succulent to prevent the spread of fungal spores.
    • Treat: Trim away rotted roots immediately and repot into fresh, sterile soil. Use a fungicide specifically recommended for treating root rot in succulents. Dip the root end where you cut in ground cinnamon to help prevent new infections.

    Fusarium Wilt: This fungal disease is characterized by yellowing leaves and stunted growth, eventually leading to the collapse of the succulent.

    • Identify: Look for yellow or brown vascular tissue when cutting a cross-section of the stem.
    • Isolate: Isolate the affected plant to prevent the spread of Fusarium oxysporum.
    • Treat: Remove affected tissue and apply a fungicide. Unfortunately, in many cases, plants with Fusarium wilt may not be salvageable.

    Black Spot and Lesions: Dark spots on leaves may indicate a black spot fungus or lesions from anthracnose.

    • Identify: Look for black spots on the foliage, which may be surrounded by a yellow halo.
    • Isolate: Separate the plant to avoid infecting others.
    • Treat: Prune the infected parts. Improve airflow around the plant and ensure the plant receives appropriate sunlight. Apply a fungicide recommended for black spots or anthracnose.

    Botrytis Cinerea and Anthracnose: Fungal diseases that cause grey mold or dark, sunken spots on leaves require immediate attention.

    • Identify: Grey, fuzzy mold, or dark lesions, often after cool, humid conditions.
    • Isolate: It’s a good idea to place the plant away from others to prevent the spreading of the spores.
    • Treat: Trim away the infected area, increase light and airflow, and consider fungicide treatment.

    For all advanced fungal infections, improving the plant’s living conditions is imperative.

    Ensure good airflow, adequate sunlight, and appropriate watering practices. Always use well-draining soil and clean pots to prevent recurrence.

    In severe cases, chemical treatments may be necessary but always start with the least toxic options. It’s essential to read and follow all label instructions on fungicides to avoid harming your plant and the environment.

    Succulent Recovery and Health

    After addressing fungal issues, your succulents require diligent care for the recovery process. The key to this process is monitoring their progress and understanding how their physiological needs affect recovery.

    We’ve got to mention an unfortunate truth, though, and that is that your succulents will not always be able to recover after a fungal infection. But, it’s definitely worth remediating the problem because oftentimes, they will recover.

    Monitoring and Ongoing Care After Mitigation

    Regularly inspect your succulents for signs of recovery or lingering issues. Pay particular attention to previously infected leaves and the emergence of new, healthy growth. Establish a routine:

    • Daily: Check for dead leaves and remove them to prevent decay.
    • Weekly: Assess watering needs based on soil dryness and ensure proper drainage.

    Keep an eye on humidity levels; too much moisture can cause further fungal problems. To do that easily, you can purchase a hygrometer for a few dollars online.

    Improving air circulation around your plants can help control humidity. If a plant is struggling, definitely keep it isolated to prevent potential spread to your succulent collection.

    Kalanchoe and jade plants, common in collections, will benefit from these practices, improving their ability to recover and flourish post-treatment.

    How to Treat Fungus on Succulents FAQs

    What treatments are effective for black fungus on succulents?

    To manage black fungus on your succulents, a solution with hydrogen peroxide and water may help. Mixing 1 part hydrogen peroxide with 4 parts water and spraying it on affected areas is known to treat the fungus without damaging the plant.

    Can soapy water be safely used on succulents to treat fungal issues?

    Yes, you can safely use soapy water to address fungal problems on your succulents. A mixture of baking soda and mild dish soap diluted in water can be an effective fungicide but always test a small area first as some succulents may be sensitive.

    How can one naturally combat powdery mildew found on succulents?

    Natural remedies to fight powdery mildew include neem oil or a milk spray solution, which can act as fungicides. Regularly inspect your plants and apply these treatments to affected areas to prevent spread.

    Which types of fungal infections commonly affect succulents, and how are they identified?

    Succulents are commonly affected by fungi like powdery mildew, which appears as a white, powdery coating, and black sooty mold. These infections can typically be identified by visual inspection, looking for unusual spots or growths on leaves and stems.

    Are there home remedies suitable for treating fungal infections in succulents?

    As mentioned above and earlier in the post, home remedies for treating fungi on succulents include neem oil, baking soda solutions, and milk spray. These options are valuable for those seeking natural methods of treatment.

    What steps should be taken to cure white fungus on cactus plants?

    To cure white fungus on cacti, remove any affected parts with a sterile instrument and apply a fungicide treatment. If the problem persists, repotting in fresh, sterile soil may be necessary to eliminate any remaining fungal spores in the soil.

  • How to Use a Lotion Bar: Top Tips + 4 Seasonal DIY Recipes

    How to Use a Lotion Bar: Top Tips + 4 Seasonal DIY Recipes

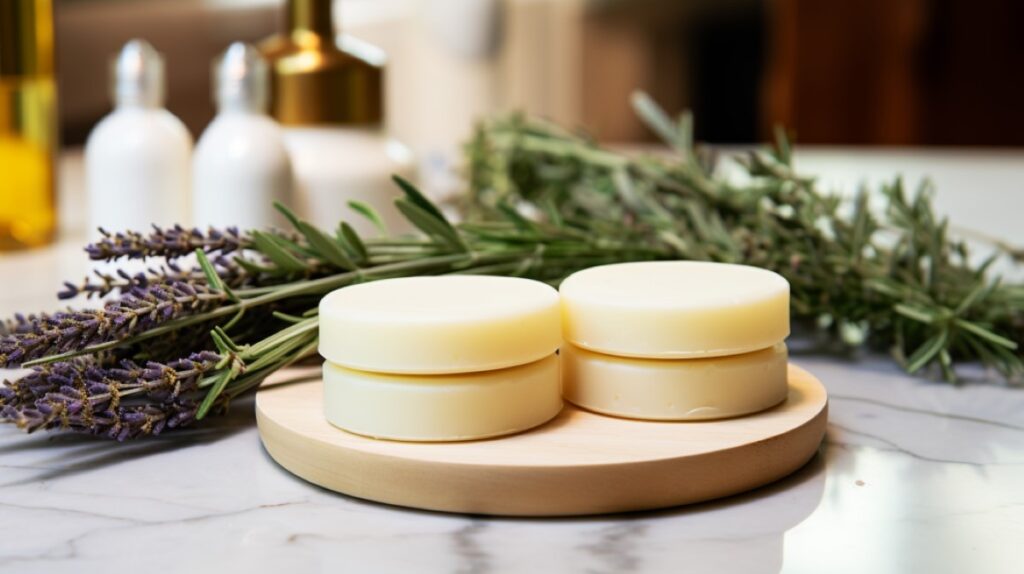
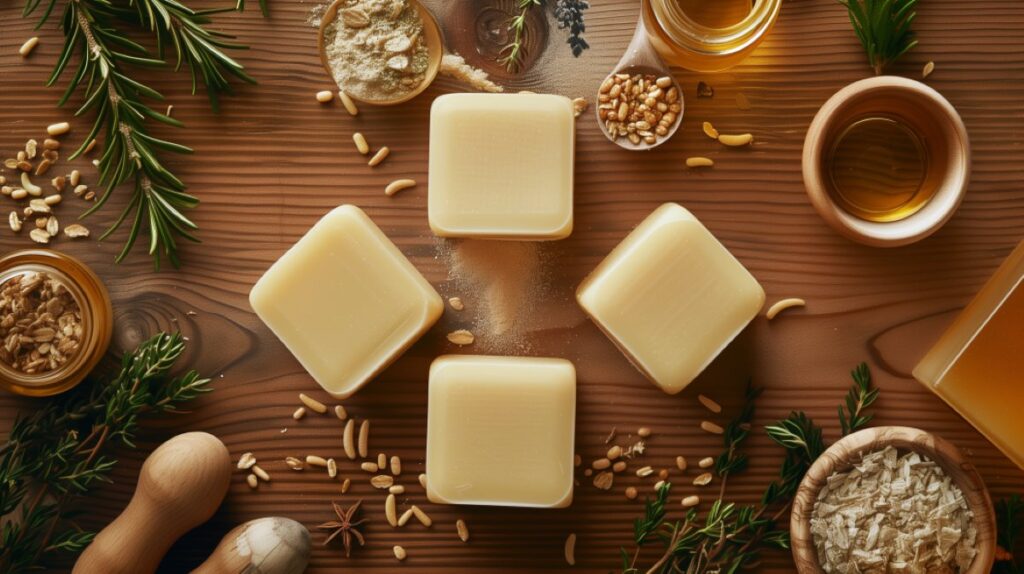
    How to Use a Lotion Bar: Top Tips + 4 Seasonal DIY Recipes

    Lotion bars are a solid form of moisturizer that offers a great alternative to traditional liquid lotions. Unlike typical lotions in a pump or a bottle, these concentrated bars are typically made from a blend of natural oils and beeswax, providing a portable, no-mess application.

    They are gaining popularity for their eco-friendliness and effectiveness in moisturizing dry skin, with the added benefit of having a straightforward ingredient list that often excludes fillers, preservatives, and artificial fragrances.

    To use a lotion bar, your approach is as simple as its composition.

    • Warm the bar between your hands for a few seconds to melt a small amount of the product with your body heat.
    • Apply it directly to dry areas of your skin, like elbows, heels, or knees. The warmth of your skin will further melt the bar, allowing you to glide it over your skin easily.

    We especially recommend using these after showering when your pores are open, and your skin is primed for maximum absorption.

    Consider lotion bars as an all-natural, chemical-free alternative to keep your skin hydrated. Whether you’re at home or on the go, solid lotion bars can be a convenient way to care for your skin sustainably.

    Lotion Bars: Benefits, Ingredients, and Skin Types

    Lotion bars provide a concentrated, portable solution for moisturizing your skin, utilizing natural ingredients that cater to various skin types. In addition to that, if you’re making your own lotion bars, you can tailor the ingredients precisely to your own skin type.

    Why Use Lotion Bars at All?

    You might choose lotion bars for their convenience, natural ingredients, and eco-friendliness. As a solid form of lotion, they’re easy to handle and apply, eliminating the need for plastic containers.

    • They’re a zero-waste skincare option.
    • For DIY lotion bars, you choose each and every ingredient.
    • Formulations can be customized to skin types and applications.
    • Compared to lighter lotions and moisturizers, they keep your skin hydrated for longer.
    • They’re a zero-mess moisturization solution for whenever you’re on the go.

    Lotion bars are just as versatile as they are effective. If they aren’t already a core component of your skincare routine, they should be!

    Differences Between Lotion Bars and Liquid Lotions

    Unlike liquid lotion that comes in bottles, solid body lotion bars remain solid at room temperature and melt slightly when rubbed against the warmth of your skin.

    This direct application ensures that you use the exact amount needed, reducing waste.

    Benefits of Using a Lotion Bar

    Lotion bars are typically made from natural ingredients such as beeswax, mango butter, shea butter, and cocoa butter, enhancing skin moisture and repair without additives.

    The inclusion of vitamin E and natural plant oils, like avocado oil or jojoba oil, offers additional nourishment. You’ll also receive many of their varied skin benefits when essential oils are added, depending on the EOs you use.

    Key Ingredients in Lotion Bars

    Most lotion bars are a blend of many of the natural ingredients mentioned previously. Let’s take a deeper look below.

    • Beeswax: Acts as a skin barrier
    • Plant Butter: Options such as shea or cocoa provide deep and lasting moisturization.
    • Natural oils: Soften and nourish the skin. Depending on the oils, they can help the lotion bars to glide on more smoothly.
    • Essential oils: Gives an endless option of fragrance blends and leverages the benefits of aromatherapy. Additionally, certain essential oils provide additional skin benefits, creating a sensory experience tailored to your preferences.

    Suitable Skin Types for Lotion Bars

    Whether your skin is dry, sensitive, or prone to various skin issues, lotion bars can be beneficial.

    Their natural composition is gentle on the skin, while certain formulations target specific conditions with tailored ingredients like organic oils and butters for intensive care.

    Daily Routine: 5 Preparation and Usage Tips

    Incorporating a lotion bar into your daily skincare routine can offer a convenient and effective means of hydration. Follow these steps to achieve optimal moisturization with a non-greasy feel, making the most of your lotion bar’s benefits.

    1.) How to Apply a Lotion Bar

    To apply a lotion bar, ensure your hands are clean and then hold the bar between them. Your body heat will soften the bar.

    Glide the bar over your skin, particularly dry areas, using a small amount.

    Your skin’s warmth will help the bar deposit a thin layer of rich moisturizer.

    2.) Best Time to Use a Lotion Bar

    The best time to use a lotion bar is after a shower when your skin is still slightly damp and warm.

    The residual warmth and moisture help the bar glide smoothly, and the ingredients lock in hydration for a long-lasting, non-greasy feel.

    3.) Storage and Care for Lotion Bars

    Store your lotion bar in a dry place, away from direct sunlight, and at room temperature.

    A cool environment or a reusable tin is ideal to extend its shelf life and maintain its consistency.

    4.) Traveling with Lotion Bars

    Lotion bars are perfect for travel due to their solid form.

    • Pack them in a reusable tin to keep them secure.
    • Keep them out of the sunlight and out of the heat. They will melt if exposed to heat. If that happens, no worries; they’ll solidify again at room temperature.
    • We recommend just carrying one or two at any given time. They’re so convenient and easy to use anywhere.
    • In most cases, you’ll be able to bring lotion bars on the plane, and they won’t exceed the 3.4-ounce rule.

    5.) Additional Best Practices for Hydrating Moisturization

    For best results, use your lotion bar on your entire body and repeat usage throughout the day as needed.

    Remember, a small amount goes a long way, and consistent use increases efficacy.

    4 Lotion Bar Recipes for Each Season

    In dry climates or winter, include more fatty oils for extra protection, while in humid seasons, opt for a formulation with a lighter, non-greasy feel. Here are a few customizable recipes for each of the four seasons.

    Spring Lotion Bar:

    • 3 oz Beeswax
    • 2 oz Coconut oil
    • 2 oz Jojoba oil
    • 1 oz Rosehip oil (for its skin rejuvenating properties)
    • A few drops of rose geranium essential oil (for a floral scent reminiscent of spring blooms)

    Summer Lotion Bar:

    • 3 oz Beeswax
    • 2 oz Shea butter (to help protect the skin)
    • 2 oz Avocado oil (for its light yet moisturizing properties)
    • 1 oz Cocoa butter (for a hint of tropical scent)
    • A few drops of lemon essential oil (for a refreshing citrus scent)

    Autumn Lotion Bar:

    • 3 oz Beeswax
    • 2 oz Sweet almond oil (for a soothing effect on the skin)
    • 2 oz Hemp seed oil (rich in omega fatty acids)
    • 1 oz Mango butter (for its softening properties)
    • A few drops of cinnamon essential oil (for a warming, autumnal scent)

    Winter Lotion Bar:

    • 3 oz Beeswax
    • 3 oz Coconut oil (for its deep moisturizing benefits in dry winter air)
    • 2 oz Tamanu oil (for its reputed skin-healing properties)
    • 1 oz Shea butter (to help protect against the harsh winter elements)
    • A few drops of peppermint essential oil (for a festive and invigorating scent)

    For each recipe, you can follow these general instructions:

    1. Melt the beeswax, butters, and oils together in a double boiler.
    2. Once everything is fully melted and combined, remove from heat.
    3. Stir in the essential oils.
    4. Carefully pour the mixture into molds of your choice and let them cool.
    5. Once solidified, pop the lotion bars out of the molds.
    6. Store them in a cool, dry place or package them for future use.

    Remember, you can adjust the scent by adding more or less essential oil, and you can also add other skin-loving ingredients like vitamin E oil for extra nourishment. Customize the essential oils to your preference, but always ensure they are skin-safe and used in appropriate dilutions.

    Lastly, always do a patch test with homemade skincare products to ensure you don’t have a reaction to any of the ingredients, especially if you have sensitive skin or known allergies.

    Lotion Bar Varieties and Tailoring to Your Skin Type

    Lotion bars provide a solid, concentrated moisture treatment using natural oils and can be customized for your skin type, from dry to sensitive.

    Scented vs. Unscented Lotion Bars

    Scented lotion bars often incorporate essential oils such as lavender essential oil for a relaxing aroma or lemon for a refreshing scent.

    These natural scents can offer therapeutic benefits; for example, lavender is known for its calming properties.

    On the other hand, unscented lotion bars are perfect if you prefer no fragrance or have sensitive skin that might react to essential oils or synthetic fragrances.

    Lotion Bars for Different Purposes

    You can choose lotion bars designed for specific purposes beyond simple moisturizing.

    • Some are formulated as in-shower lotion bars, providing hydration directly in the humidity of your shower for greater absorption.
    • Others might be created for massaging, with a slightly different composition of oils that helps the bar glide smoothly over the skin, doubling as massage oils.
    • Lip balms are a more targeted type of hard lotion bar specifically designed for the delicate skin of your lips.

    Specialty Lotion Bars

    For those looking to address particular skin concerns, specialty lotion bars are the way to go.

    • These can be packed with various natural oils, like coconut or argan oil, which are particularly nourishing for dry hair or flaky skin.
    • If you engage in activities that stress your skin, look for bars containing ingredients like menthol for a cooling effect.

    Specialty bars can even come in unique forms, such as being shaped with a soap mold or packaged in a soap-saver bag for convenience and extended use.

    How to Use a Lotion Bar FAQs

    What are the steps for applying a lotion bar to the skin?

    First, hold the lotion bar in your hands to warm it up. Once softened, gently rub it directly onto your skin areas that need moisturization. We recommend especially using lotion bars after showering to seal in hydration.

    Can lotion bars be used on all skin types?

    Lotion bars are generally safe for all skin types as they contain natural ingredients, but you should always check the specific product for any potential allergens.

    If you’re making your own, the solution is simple. Use ingredients that you know don’t irritate your skin, and patch test if you’ve included ingredients you haven’t used before.

    Can I use lotion bars on sensitive skin areas?

    Yes, in most cases, lotion bars can be gentle enough for sensitive skin areas. That said, it ultimately will depend on the ingredients in the lotion bar you’re using.

    Opt for unscented or fragrance-free versions to minimize irritation.

    Is it possible to use lotion bars during a showering routine?

    Applying lotion bars during your shower routine is possible. Apply to warm, damp skin after showering for easier absorption.

    What is the best way to store lotion bars to maintain their quality?

    Store lotion bars in a cool, dry place away from direct sunlight. Using a protective container can also prevent them from melting or getting damaged.

    As with most beauty products, moisture can lead to premature spoilage. So again, keep them dry!

    How do solid lotion bars compare to traditional lotions in terms of effectiveness?

    Solid lotion bars can be just as effective as traditional lotions. They often contain concentrated natural ingredients that provide intense hydration.

    Do I need to use other moisturizers if I’m using lotion bars?

    You may not need additional moisturizers if a lotion bar meets your skin hydration needs, but some may prefer to use them for specific skin concerns or applications.

    For example, we would prefer to use a light natural moisturizer on the face that isn’t greasy, and that isn’t comedogenic (doesn’t clog the pores).

  • How to Clean a Blackstone Griddle in 7 Minutes

    How to Clean a Blackstone Griddle in 7 Minutes

    How to Clean a Blackstone Griddle in 7 Minutes

    Unleash the full potential of your Blackstone griddle with masterful maintenance that promises epic backyard feasts for years to come. It’s not just about keeping it clean; it’s about crafting outdoor cooking traditions or perhaps even a legacy of fun memories with family and friends.

    Our family loves outdoor cooking. Our kids will remember all of the fun family times and tastes from preparing some pretty darn amazing food over the years, then continue those traditions with their families.

    Discover how you can transform your griddle into a culinary powerhouse where every meal sizzles to perfection every time without continually battling with cooked-on residue. Starting with a clean cooking surface makes griddle cooking so much easier.

    Key Points to Savor:

    • Quick Clean Mastery: We’ll visit some quick hacks to banish grease and grime post-cooking.
    • Deep Cleaning: Deep cleaning needs to happen periodically. But it’s a simple process we’ll dive deeper into below.
    • Effective Seasoning: A properly seasoned surface is critical. The better job you do at seasoning, the more non-stick your cooking surface will be. Plus, it prevents rust and increases overall longevity, similar to the importance of seasoning cast-iron skillets, though Blackston uses cold-rolled steel instead of cast iron. Still, the seasoning process is similar.

    By elevating your griddle game, you ensure each dish is a safe, flavor-packed masterpiece. A well-kept Blackstone isn’t just a griddle; it’s the heart of your outdoor kitchen, ready to fuel your passion for open-air culinary adventures.

    Before You Begin Cleaning

    Having the right materials at hand and understanding safety precautions are critical first steps.

    Gather Materials

    Before starting the cleaning process, it’s essential to assemble all the necessary items. You’ll need:

    • Hot, soapy water: To effectively remove grease and food particles.
    • Bucket: To hold the soapy water.
    • Non-metallic scrubber or a lint-free cloth: For gently scrubbing your new Blackstone griddle.
    • Heat-resistant gloves: To protect your hands from heat and cleaning agents.
    • Metal scraper: If your griddle has residue from cooking, this will help remove it.

    Safety Measures

    Taking the right safety measures will prevent accidents and ensure a positive experience.

    • Turn off and cool down: Always ensure your griddle is completely turned off and cooled down before you attempt to clean it.
    • Wear heat-resistant gloves: Protect your hands from potential heat and avoid direct contact with cleaning agents.
    • Only use abrasive materials when needed: To protect the integrity of your griddle top, do not use steel wool or other harsh scrubbers for common cleaning. You should only use those to remove rust or burnt-on food.

    Initial Cleaning for New Griddles

    When you first get your new Blackstone griddle, it’s essential to clean it before the initial use.

    To clean your griddle top for the first time, simply use a weak solution of hot water and soap, wipe down the cooking surface, and then rinse thoroughly. You will only ever use soap for this initial cleaning.

    This will remove any residues from the manufacturing process and prepare the surface for seasoning, which is crucial for creating a non-stick coating and protecting the griddle from rust.

    Seasoning Your Blackstone Griddle

    We’ll break down the seasoning process in the section belowbelow, but also check out this video from Blackstone for more info:

    5-Step Griddle Seasoning Process:

    1. Rinse With Water:

    • Simply use warm water to rinse the surface of your griddle.
    • Ensure you rinse off all soap before moving on to the steps below.

    2. Dry the Surface:

    • After rinsing, immediately dry the griddle surface with a lint-free cloth or paper towels.
    • Ensure it’s completely dry to prevent rusting.

    3. Apply Oil for Seasoning:

    • Choose an oil with a high smoke point, like canola or vegetable oil, for the initial seasoning.
    • Apply a thin, even layer across the entire surface, including the sides and back. Wipe off any excess oil so that only a thin layer of oil remains.

    4. Heat It Up:

    • Set the griddle to a high temperature.
    • Once the oil starts to smoke, let it burn off until it stops, indicating that the seasoning is bonding to the griddle.

    5. Repeat Seasoning:

    • Let the griddle cool, and then repeat the oiling and heating process a few more times. Preferably 2-3 times.
    • Multiple layers of oil enhance the griddle’s natural non-stick qualities.
    • Future cooking sessions will act as additional seasoning, so you shouldn’t need to complete the above process again. Once in a while, be sure to coat the entire surface with a thin layer of oil, especially if you don’t typically use the entire cooking surface.

    By following these steps, your new Blackstone griddle will be well-seasoned and all set for some serious cooking.

    7-Minute Routine Cleaning After Cooking

    Proper maintenance of your Blackstone griddle after each use ensures longevity and ready-to-go performance for your next cookout. The key steps are straightforward: remove leftover bits, clear away any grime or excess oil, and safeguard the surface from rust.

    Scrape Off Food Residue

    Immediately after cooking, while the griddle is still warm, use a metal scraper to gently remove any food particles or debris. This will prevent food from hardening on the surface, which can create irregularities and affect your next cooking session.

    Stuck-on food will accumulate if you don’t regularly perform this step, making food more likely to stick. Also, there’s no need to use excess pressure when scraping.

    Excess pressure could damage the seasoning layers of the cooking surface. If that happens, just re-season again, following the steps in the previous section.

    Wipe and Rinse the Surface

    Once the residue is scraped off, dampen a few paper towels in hot water and wipe the griddle surface to remove excess oil or dirty grime and food bits. If needed, you can also use a non-metallic scrubber to address any stubborn spots without scratching the surface.

    Dry and Oil Lightly

    After cleaning, dry the surface thoroughly with clean paper towels to prevent rust. Then, apply a thin layer of cooking oil; this acts as a protective barrier, keeps the surface non-stick, and extends the life of your griddle. Use a paper towel to evenly distribute the oil across the entire surface.

    If you use your Blackstone griddle multiple times per week, there’s no need to wipe down the surface each time. Instead, do this after a few cooking sessions, perhaps once every two weeks.

    Deep Cleaning Process

    Performing a deep clean of your Blackstone griddle ensures the longevity of the cooking surface and maintains its non-stick properties. Perhaps the biggest thing to remember is that there’s no reason to overthink it; cleaning your griddle is super straightforward.

    Apply Water (no soap)

    For a successful deep clean, start by heating the Blackstone griddle to help loosen any remnants. Once warm, turn off the heat. Then, create pour some water on the griddle surface and use a scraper or scouring pad to loosen all food residue.

    Once all residue and food particles are free, go over the entire surface with dry paper towels to remove all loosened dirt from the previous step. Feel free to use an old rag, but keep in mind that it will get very greasy. Just rinse and repeat until the surface is clean.

    Note: Blackstone does not recommend using soap to for regular cleaning on their griddles. If you use soap, you may taste soap residue in your food.

    Rinse

    Once the surface is free of food debris, it’s time to rinse. Use a clean microfiber towel soaked in plain hot water and give everything a final wipe-down. You do not need to remove all grease from the surface; the goal is just to get it completely smooth.

    Apply Cooking Oil

    After the above steps, dry the griddle completely. You can even heat it up a bit to ensure all the water evaporates from the cleaning process. Then, wipe down the entire cooking surface, including the sides, with a thin layer of cooking oil.

    3 Easy Steps for Removing and Preventing Rust

    Rust is a huge problem with griddles and grills. However, if you regularly use your griddle, clean it, and apply oil to the cooking surface, you shouldn’t have any issues with rust on the flattop.

    However, if your griddle is left unused for long periods of time, there’s a far greater chance of rust, and it’s even more important to ensure you regularly wipe down the cooking surface with oil.

    1.) Identify Rusty Areas

    First, inspect your griddle for any rusty areas. It’s important to spot these early on, as rust can spread if not addressed promptly.

    Common signs are discoloration and a rough texture on what was once a smooth surface. Identifying these areas will help you focus your rust-removal efforts.

    2.) Remove Rust with Vinegar or a Grill Stone

    For the removal process, start with a gentle solution like distilled white vinegar—apply it to the rusted areas and let it sit for a few minutes to break down the rust. Alternatively, using a grill stone is an effective method to scrub away rust.

    • Vinegar Method:
      1. Apply vinegar directly to rust.
      2. Allow to sit for 5-10 minutes.
      3. Scrub rusted areas with steel wool until completely smooth.
    • Grill Stone Method:
      1. Apply oil to all rusted areas.
      2. Gently scrub the area with the grill stone.
      3. Progress in a circular motion until all rust is removed.
      4. Do a final wipe-down, removing all rust residue.

    Ensure all rusty residue is completely removed before proceeding to the next step.

    3.) Re-Season the Griddle

    Once your griddle is rust-free, it’s crucial to re-season the griddle to protect it from future rust. Seasoning creates a non-stick surface and shields the metal rust-prone surface from moisture—one of the primary catalysts for rust.

    1. Apply a very thin layer of cooking oil (flax, olive, or canola is fine) to the entire cooking surface.
    2. Turn the heat to high and let all the oil burn off.
    3. Once there’s no additional smoke, turn off the griddle and let it cool.

    Repeat the oiling and heating process several times to build up a solid layer of seasoning, two to three times minimum.

    Remember to always dry your griddle thoroughly after cleaning and to apply a light coat of oil before storage to prevent rust from forming.

    Storing Your Blackstone Griddle

    One of the best ways to prevent rust is to store your griddle in a dry location with a cover.

    Location: Choose a dry, sheltered location to store your griddle. If you must store it outside, ensure it is under a covered area to protect it from the elements.

    Cover: Always use a cover specifically designed for your griddle. A good cover not only shields the griddle from dust and debris but also minimizes exposure to moisture.

    Storage TipsDetails
    Store in a Dry PlaceMoisture is the enemy of your griddle; keep it bone-dry.
    Use a Griddle Cover or TarpProtect it from the elements when not in use.
    Hang AccessoriesKeep spatulas and scrapers off the ground and dry.

    Remember, when not in use for extended periods, periodically check on your griddle to make sure the cover is secure and that no moisture has collected inside.

    If possible, consider storing your griddle indoors during extreme weather conditions to avoid unnecessary wear.

    Your Blackstone Griddle is a valuable investment, and with these steps, you’ll ensure it remains in prime condition for your next cooking adventure.

    How to Clean a Blackstone Griddle: FAQs

    What is the best method to remove rust from a Blackstone griddle?

    Don’t fret if you see rust; it’s easy to remove with a few easy steps. Apply oil to the rusted areas on the flattop cooking surface, then simply use steel wool or a grill stone to buff out the rust lightly. You can use vinegar as well, as detailed in the above post.

    We usually like to also lightly buff the areas around the rust, out 2-3 inches on all sides to be extra thorough.

    After that, wipe the entire area down again with some oil, then season your griddle by turning it on the high setting until the oil smokes off completely. Once the griddle cools, reapply a thin layer of oil, then turn the griddle on high again. Do this 2-3 times minimum to ensure it’s well-seasoned.

    Can I use dish soap like Dawn to maintain my Blackstone griddle?

    It’s generally recommended to avoid soap-based cleaners to maintain the seasoned surface of your Blackstone griddle. Routine cleaning usually only requires hot water and a scraper or stone.

    If you use soap, you also may end up tasting it in your food, even if you’ve rinsed it off really well. There is simply no reason to use soap on a seasoned griddle, and we’d advise against it.

    The only time you should use soap to clean the cooking area is when you’ve first removed it from the packaging. After that, food, water, oil, or vinegar should be the only things that end up on your cooking surface.

    What are the essential first-time cleaning steps for a new Blackstone griddle?

    When cleaning a new Blackstone griddle for the first time, it is crucial to clean and season the griddle top to create a non-stick surface. This includes heating it to remove any factory residues, applying oil, and heating it until it smokes and darkens.

    Which accessories are recommended for effectively cleaning a Blackstone griddle?

    For effective cleaning, accessories such as a metal scraper, paper towels, heat-resistant gloves, and seasoning oil are recommended. Additionally, grill stones can be super handle, especially if you encounter issues with rust.

    You may also consider a Blackstone cleaning kit for convenience.

    How should I clean my Blackstone griddle after each use?

    After each use, allow your Blackstone griddle to cool, then scrape off any remaining food particles. Wipe the surface clean with a cloth or paper towels and apply a thin layer of oil to protect the surface until its next use.

    Is vinegar a suitable cleaning agent for a Blackstone griddle?

    Yes, vinegar can be a suitable cleaning agent for your Blackstone griddle, especially for removing sticky residues or for a deeper clean without harsh chemicals. Always follow up with rinsing and oiling the surface.

    Why is my Blackstone Griddle rusting?

    Water plus metal and time equals rust. Your griddle is rusting because the metal cooktop surface was exposed to moisture for an extended period of time, causing oxidation.

    Oftentimes, if you read forums or reviews on grills or griddles, you may see comments like “Poor quality, it rusted in less than a year.”, and so on. However, when it comes to the cooking surface, poor quality isn’t usually the reason for rust; oxidation is the reason.

    Common reasons your griddle is rusting would be a lack of proper cooking seasoning on the cooking surface, improper maintenance between cooking, or inadequate storage.

    As long as you season your Blackstone griddle well and ensure there’s always oil on the surface, it will not rust.

  • How to Remove Gel Nail Polish from Natural Nails with Sugar

    How to Remove Gel Nail Polish from Natural Nails with Sugar

    How to Remove Gel Nail Polish from Natural Nails with Sugar

    Wave goodbye to gel polish with a surprisingly sweet twist: the sugar method. This clever DIY trick sidesteps the need for harsh chemicals, using just a sprinkle of sugar from your kitchen to gently exfoliate and remove nail polish. It’s a quick, eco-friendly, and nourishing alternative that keeps your nails healthy and happy.

    Traditional gel removal methods almost always involve the use of harsh or harmful chemicals or a visit to the nail salon.

    As you seek gentler alternatives, you might be intrigued to learn about the sugar method—a straightforward DIY approach using this common household item, which also happens to be way cheaper than a nail salon visit.

    All About Gel Nails

    When you choose a gel manicure, you’re opting for a durable and glossy finish that regular polish simply cannot match. We get that; the result is amazing. Let’s explore the specifics that set gel nails apart.

    Difference Between Gel and Regular Polish

    Gel polish is distinct from regular nail polish. It’s obviously a gel-based polish that requires curing under UV light to harden, unlike regular polish, which air dries.

    Gel polish is not merely a different formula but a completely different system. Regular polish dries through evaporation of solvents and can chip within days, while gel polish stays chip-free and pristine for a long time, often up to two weeks or more.

    Benefits of Gel Manicure

    A gel manicure offers benefits beyond the nail color’s longevity. Gel nails are known for their high-shine finish that resists fading. The UV curing process creates not only a longer-lasting finish but also a stronger protective layer over your natural nails, helping to prevent breakage.

    Additionally, having gel nails reduces the chances of your manicure smudging, giving you peace of mind right after your appointment.

    Preparation for Removal

    Before attempting to remove gel nail polish with sugar, it’s important to highlight a few considerations. Mind you, the process of actually removing the gel polish is super simple. But you love your nails and want to ensure they aren’t damaged.

    With that in mind, let’s consider the following.

    Assessing Nail Health

    Examine your nails closely for any signs of damage or weakness.

    Healthy nails are a must before proceeding. If you have cracked nails or a damaged nail bed, trim or file what you can. Nail glue can also work, depending on the situation. Removing gel polish will require some buffing, which is why it’s difficult if you already have nail damage.

    Ensure your nail plate is free of cuts, nail splits, cracks, etc. If you notice any of these issues, it’s best to address them or cause existing splits and cracks to become worse.

    Gathering Required Materials

    Next, compile the necessary items:

    • Cotton balls or pads: Essential for the application of the sugar mixture.
    • Nail file: This is used to gently buff the shiny top layer off your nails, which allows the sugar mixture to penetrate.
    • Sugar: The key ingredient for the removal mixture. The sugar crystals remove polish through their abrasive properties.
    • Oil: This moisturizes and will mix with sugar to create an oil-abrasive paste. Feel free to use cuticle oil, fractionated coconut oil, olive oil, jojoba, or any other natural oils you have. Water can also be used, but we prefer oil for moisturization benefits.

    Remember, our natural DIY method with the above materials and tools will avoid the use of harsh chemicals like acetone and preserves the natural oils in your nails. No acetone is needed.

    7-Step Sugar Method for Gel Polish Removal

    Now, onto the process of removing the gel polish. You’ll have the process down in no time.

    1.) Soak Your Nails

    Get a small bowl of water and soak your nails for just 3-5 minutes. The idea here is to saturate each nail a bit, making it easier to remove the top layer of gel polish with a file in the next step.

    2.) Remove the Topcoat Gel Polish Layer

    This step is pretty simple, but don’t overdo it.

    Now that your nails are saturated from the previous step, get a nail file and gently file the top layer of polish. The idea here is to remove the topcoat protective layer so it’s easier to remove the additional layers in later steps with the sugar solution. A gentle buff is fine.

    Do not try to remove all of the polish in this step.

    3.) Mix the Oil and Sugar

    To create your sugar solution, you will need two tablespoons of sugar and roughly the same amount of oil. Mix these two ingredients in a small bowl until you get a wet paste-like consistency. If it’s a bit more fluid than paste, that’s fine.

    If you use more oil than needed, you can still use the mixture. It will just work a bit more slowly since there will be a lower concentration of sugar crystals in the solution.

    Sugar is cheap, and two tablespoons along with the oil should be plenty of mix to remove the polish. The idea is to mix enough, so you won’t need to mix more again, being that your hands will be a bit messy. As briefly mentioned above, you can also use water if desired, but we prefer using oil for the added moisturization.

    The sugar solution should feel slightly grainy.

    4.) Application Process

    Begin by soaking a cotton ball or pad in the sugar solution. Once thoroughly soaked, apply the solution to each nail on the hand you’re starting with.

    We prefer coating all of the nails before buffing, allowing the solution to penetrate into the buffed nail polish on each nail while we’re working to remove polish on other nails.

    5.) Removing the Gel Polish

    Buff each nail, one by one, with a circular motion. Use adequate pressure to work the sugar and oil (or water) solution into the polish. You’ll begin to see the polish buffing away, primarily from the abrasive quality of the sugar crystals.

    If you added too much oil, feel free to add a bit more sugar to your mixture. Keep in mind, though, that even if a lot of the sugar has dissolved, it will still remove the polish. You can’t see the sugar crystals, but they are there. Starting with a grainier texture will make the process take less time overall.

    The sugar particles act as a scrub, helping to loosen and lift the stubborn gel nail polish from your nails. You can repeat the application process if needed, but be gentle to avoid damage to the natural nail and nail bed. You can use nail tools (like an orange stick) to push away lifting polish, but please be gentle if you do to avoid scratching the surface of the nail.

    As soon as you can see the nail, don’t buff that area anymore; just focus on the polish. Keep in mind, too, that all gel nail polishes are different. Some may be easier to remove than others. Patience with the above simple steps is key.

    6.) Inspection and Rinse

    Once you visibly can’t see any more nail polish, you’re all set. At this point, you can rinse your nails.

    If you see polish remaining after your rinse, lightly buff those areas a bit more, then rinse again.

    7.) Final Inspection and Moisturization

    While this step isn’t necessary, especially if you used oil for your sugar solution, it locks in even more moisture. Think about it: your nails have been through a lot of buffing, right?

    After rinsing, you can add a bit of oil to your nails again to keep them moisturized. We’re talking about 1-2 drops (just a dab) on a cotton ball, then wiping that on each nail, as well as the surrounding skin.

    Super Easy, No Chemicals Needed

    Following the above five steps to remove gel polish with sugar is so simple and prevents unnecessary visits to the nail salon. More importantly, it means you won’t need to use harsh chemicals on your nails or, even worse, soak them in an acetone bath.

    In the unlikely event you don’t have sugar or oil (kidding), we’ll explore some alternative methods to remove gel nail polish in the next section.

    Alternative Non-Acetone Methods

    Removing gel nail polish without using acetone can be done safely and effectively with common household items or natural oils. If you want to try something different than the easy way with the sugar and oil method above, check out what else you can use below.

    Using Household Products

    Lemon juice and dish soap are two ingredients you can use. The acidic nature of lemon juice, combined with the degreasing properties of dish soap, creates a mixture that can help break down gel polish.

    Remove the top layer of your nail polish, just as detailed in step 2 of the sugar method (above section), then you’ll soak your nails. More below.

    Steps with Lemon Juice and Dish Soap:

    • File through the topcoat of your gel nail polish.
    • Mix equal parts of lemon juice and dish soap in a bowl.
    • Soak your nails in the solution for approximately 10-15 minutes.
    • Use a wooden or plastic nail stick to gently push off the polish.

    Another household product you can consider is hydrogen peroxide. It is gentler than acetone but requires a bit more patience to remove all of the polish.

    Instructions Using Hydrogen Peroxide:

    • File through the topcoat of your gel nail polish.
    • Soak a cotton ball in a mix of hydrogen peroxide and warm water. Use two parts peroxide and one part water (2:1 ratio).
    • Rub the solution onto your nails and periodically dipping your nails in the solution from your bowl. The peroxide will begin to break down the polish, making it easier to remove.
    • After about 10 minutes, you should be able to remove most of the nail polish with an orange stick or other nail tool. Be careful not to scratch the nail surface.

    Be sure to be gentle throughout this process to avoid nail damage. While these natural options work, we prefer the sugar and oil method discussed earlier. It’s more efficient at removing polish since there’s an abrasive aspect to the removal.

    Aftercare and Nail Health

    Proper aftercare is crucial in maintaining the health and strength of your natural nails following gel polish removal. Prioritizing hydration and protection will help to restore your nail beds and prevent unnecessary damage.

    Moisturizing the Nail Bed

    If you used the sugar and oil method in our list of seven steps earlier, you’ll notice that we mentioned rubbing a thin layer of oil onto your nails afterward to ensure they’re well moisturized.

    Moisturization is key to recovering your natural nail beds after the gel polish removal process. Apply a natural oil like sweet almond oil or a natural cuticle oil generously to the nail bed and surrounding skin to replenish essential moisture and nutrients.

    Avoiding Nail Damage

    To prevent damage to your newly exposed natural nails, it’s important to avoid harsh chemicals and physical stress.

    Treat your nails with care by wearing gloves when doing tasks such as cleaning, and minimize the use of nail hardeners or acrylics, as these can sometimes do more harm than good with frequent use.

    Remember, gentle care of your nails will contribute to their overall health and strength.

    Gel Polish Removal: Quick Recap

    Removing gel nail polish at home can be a delicate process, but using sugar provides a gentle and effective solution. This method supports the overall health of your nails while allowing you to continue enjoying the creative expression of nail art.

    Recap of Safe Removal Practices

    Soak First:

    To safely remove gel nail polish with sugar (or any method), you should start by softening the polish with a quick soak in a bowl of warm water. Hot water isn’t needed, just warm to the touch.

    Topcoat Removal:

    Use a file to remove the topcoat. Don’t file down to the nail; buff through the top layer of the polish only. Read more on this in our step-by-step guide earlier in the post.

    Sugar and Oil Buff:

    Apply a sugar-based oil mixture to your nails, employing a gentle, circular rubbing motion to exfoliate the polish away without harsh chemicals. Remember to moisturize your nails afterward to maintain their strength and beauty.

    Final Thoughts on Natural Nail Care

    Opting for a natural DIY method to remove gel polish underscores a good choice in natural nail care. Natural beauty is all about reducing your exposure to chemicals and pollutants while also giving you options to tailor your solutions to your own needs.

    Removing Gel Nail Polish with Sugar FAQs

    What is the best method to take off gel polish without using acetone?

    The best way to remove gel polish without acetone involves using household sugar. This alternative method is gentle on your nails and avoids harsh chemicals. You can learn more about this process by reading about removing gel nail polish with sugar.

    Can you use regular nail polish remover for removing gel nail polish, and if so, how?

    Of course! Regular nail polish remover can be used for gel polish, but it’s less effective unless it contains acetone. Non-acetone removers may require more time and effort. We prefer natural methods anyway. Check out our 7-step guide earlier in this post to avoid a trip to the nail salon.

    What steps should be followed to remove gel nail polish at home safely?

    To remove gel nail polish at home safely, be patient, buff the nails to break the topcoat layer, and use your preferred method to remove the nail polish. We prefer the sugar and oil method, described in detail earlier.

    What is the most efficient way to remove gel nail polish from toes at home?

    Use the same methods as for fingernails, working toe by toe. Keep in mind that gel nail paint or polish will take longer to remove than regular nail polishes.